

Central Dispatch Mobile App provides live updates on location and vehicle status
- Delivery tracking is automatically enabled after completion of a pickup inspection on the Central Dispatch Mobile App
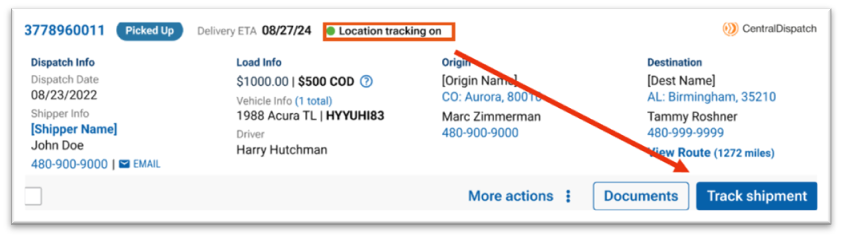
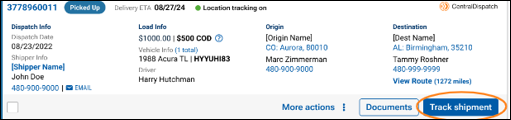
- The dispatch card will have a bullet to indicate if tracking is on or off and the Track Shipment button will be available when tracking is enabled
- Location-sharing will automatically end when the delivery inspection is complete or if a shipment is cancelled
- Real-time location will automatically update every five miles while enroute (this may vary for private marketplaces)
- To protect carrier privacy and safety, location is approximate within .03 miles
1. After the pickup and delivery inspection is complete, the shipper will receive an email with the status of the load and a link to view the location of the vehicle on map
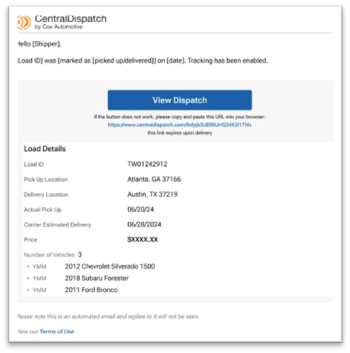
2. Map will display approximate location, timestamp of last update, miles remaining

3. If the carrier completed a pickup inspection tracking will be enabled, the dispatch card will have a bullet indicating Locations tracking on and Track Shipment button will be available to view real-time location at any time
4. If an inspection has not been completed, the dispatch card will display a bullet stating Location tracking off

Map Views
Shippers will continue to get emails after pickup and delivery inspection when using the CD Mobile App, the email will also include a link to view real-time tracking
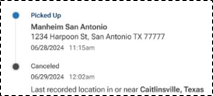
After delivered, the map view will display a pin at the location of the delivery inspection


If the dispatch is archived, map view will be available
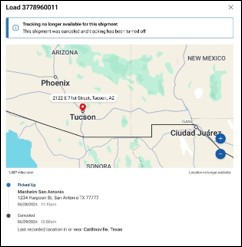
If cancelled, the map view will display last recorded location, time and date and tracking will stop
Track Shipment button
View real-time tracking anytime by clicking on the Track Shipment button on the dispatch card for orders that are in a Picked-Up status
For loads in a Delivered, Cancelled or Archived status the Track Shipment button will be available under More Actions
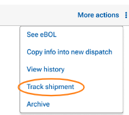
Note: Track Shipment will be available is inspection was completed with mobile app
Privacy, Safety, and Location Sharing
• To protect privacy and safety, the carrier’s location will always be shown with an approximate radius view
• Location data will only be available for the shipper account that is managing the vehicle’s transportation
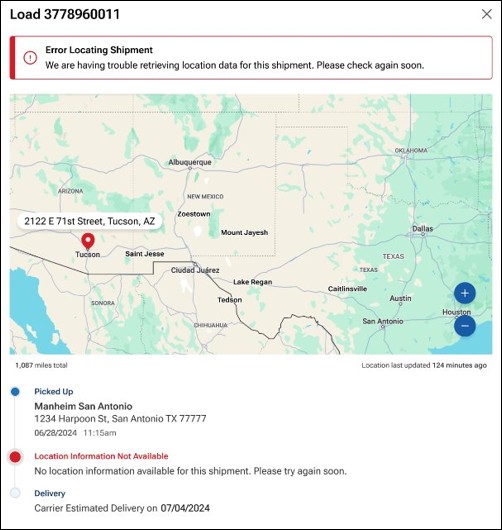
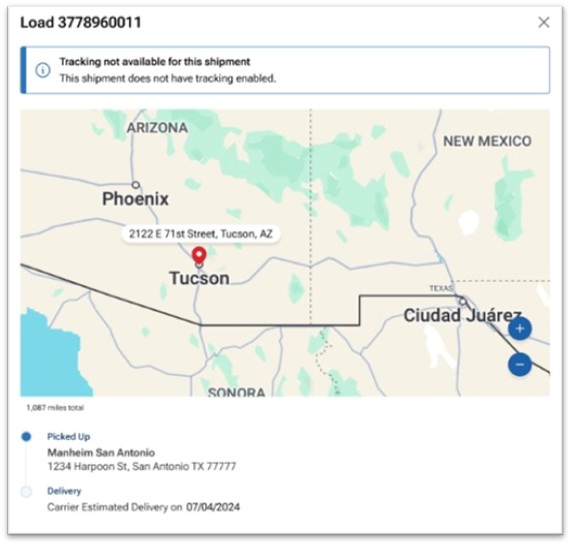
Error Messages
“Error Locating Shipment“
This error message may appear if:
- Location permissions have been disabled
- The carrier’s device is on Airplane Mode or in an area with poor service
“Tracking not available for this shipment“
This message may appear if:
- A pickup inspection was not completed.
- The pickup inspection was completed prior to the deployment of real-time tracking.
What you need to know:
- FMCSA Verification Checklist has been added to provide an objective and standardized way to verify that a carrier is in good standing and authorized to transport vehicles.
- The Checklist will be viewable on the Company Overview page.
- The company’s Motor Carrier (MC) number or USDOT will be used to look up a company’s data in FMCSA/SAFER and display:
- Whether the company has authority to operate as a carrier.
INTRASTATE status for each of the fields shown below:
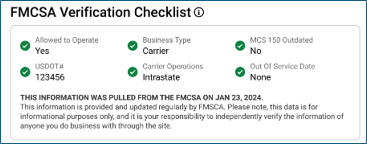
- Allowed to Operate
- USDOT#
- Business Type
- Carrier Operations
- MCS 150 Outdated
- Out of Service Date
INTERSTATE status for each of the fields shown below:
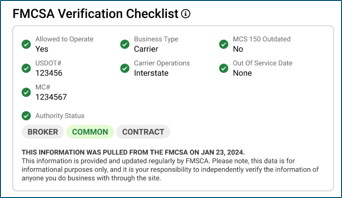
- Allowed to Operate
- USDOT#
- MC#
- Authority Status
- Business Type
- Carrier Operations
- MCS 150 Outdated
- Out of Service Date
Frequently Asked Questions (FAQ)
Q: What is the FMCSA?
- FMCSA stands for Federal Motor Carrier Safety Administration. They are a Department of Transportation (DOT) agency that oversees regulation of commercial motor vehicles. The FMCSA’s main goal is to reduce the number of crashes, injuries, and fatalities involving large trucks and buses.
Q: What is a Motor Carrier Number?
- An MC Number is a certificate required to operate an interstate trucking company. (Note: Carriers operating solely within a single state may not be required to obtain an MC Number).
Q: I just updated my information in FMCSA/SAFER how long will it take for the updates to show up in the FMCSA Verification Checklist?
- Once the update is submitted to FMCSA/SAFER it typically takes 48 hours for the changes to display on the FMCSA/SAFER sites. Once the updates are visible on the FMCSA/SAFER it typically takes 48 hours to reflect the changes in the FMCSA Verification Checklist.
Q: How often is checklist data refreshed?
- The data will be refreshed daily, reflected by a ‘Last Updated’ date at the bottom of the card.
Q: What is MCS-150 Form?
- An MCS-150 form is a document that must be filed with the FMCSA to obtain a USDOT number or update information on file. The form includes information about a company’s operations, types of cargo transported, and safety practices.
Q: How is carrier data pulled from the FMCSA database?
- The carrier’s Motor Carrier (MC) # or USDOT number will be used to look up their information in FMCSA/SAFER. In the event that a carrier has a missing or incorrect MC#, the verification checklist will show an ‘unable to verify’ message. Image below.

What do I do when my account says, “Unable to Verify?”
- Review FMCSA/SAFER to verify if your company information is correct on these sites.
- If the information displayed on FMCSA/SAFER is not correct or accurate contact FMCSA/SAFER directly to update information.
- What is the phone number for FMCSA/SAFER?
- 1-800-832-5660
- The information displays correct on FMCSA/SAFER what do I do next?
- If the information was updated within the last 48 hours on FMCSA/SAFER, please wait an additional 48 hours to give the FMCSA/SAFER and Central Dispatch system/sites to update.
- If the information was updated over the allotted time for the systems to sync and display on Central Dispatch, please call us at 520-800-6881.
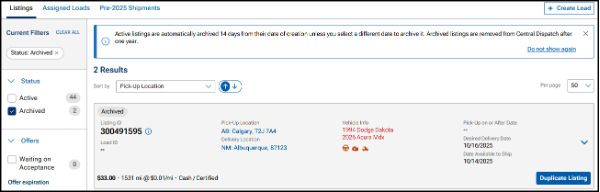
This guide is an overview of managing listings posted to the load board in Central Dispatch.
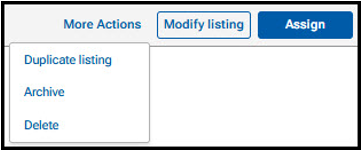
After creating a load and assigning to the load board, shippers can manage the listings on the Manage Listings page including:
- Assign to a carrier
- Modify the listing
- Duplicate the listing
- Archive
- Delete
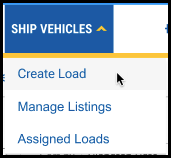
Under the Ship Vehicles tab, click Manage Listings
Manage Listings Page:
- Easily toggle between Manage Listings, and Assigned Loads, and shipments prior to 2025
- Filter loads by:
- Listing status, Pick-up/Delivery location, Load, or Listing ID, YMM
- Sorting options
- Status and any Flags
- Flags: Date available to ship has passed, Not showing in search if +5 days passed available to ship date
- Action buttons
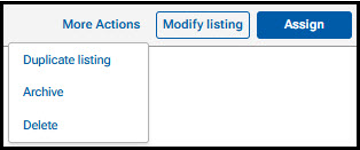
- Assign
- Modify listing
- More Actions: Duplicate listing (counts toward tier), Archive, Delete
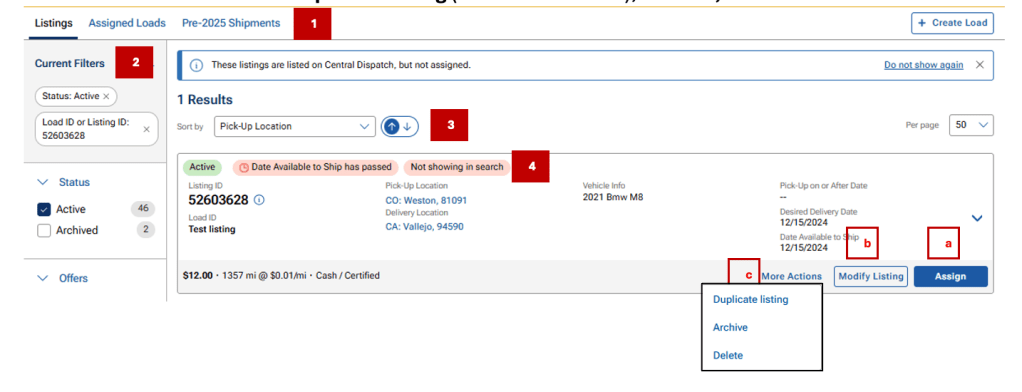
Archive tab: Duplicate listing is only available action (counts toward tier level)
Assigning a Load to a Carrier
If a listing is assigned to a carrier, then the load is available to search in the Assigned Loads tab.
- Use the filters on the left-hand side to search for the load. Available options for searching include Listing Status, Location, Order ID, Load ID, or VIN
- From the load card, under Listings, click the Assign button

Result: The Assign Dispatch page opens in a new window
3. Under Carrier Information, in the Company Name field, begin typing in the carrier’s name and select from the list

Result: Slide bar will appear with a carrier scorecard including performance data, FMCSA data and a summary of any warnings associated with the carrier to allow for additional investigation. Warning could indicate a recent change in phone number, or email address and are indicated with the triangle icon.
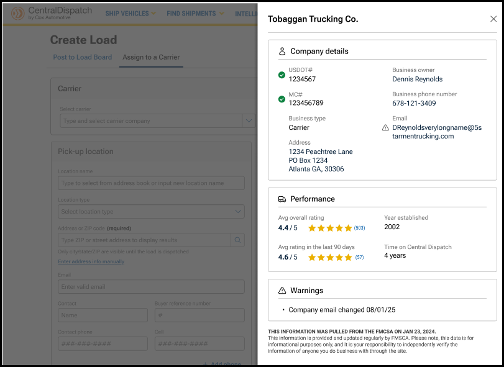
- Carrier name, scorecard, and any carrier warnings display below the carrier selection, making them easier to review
- Click on trash can icon to remove carrier
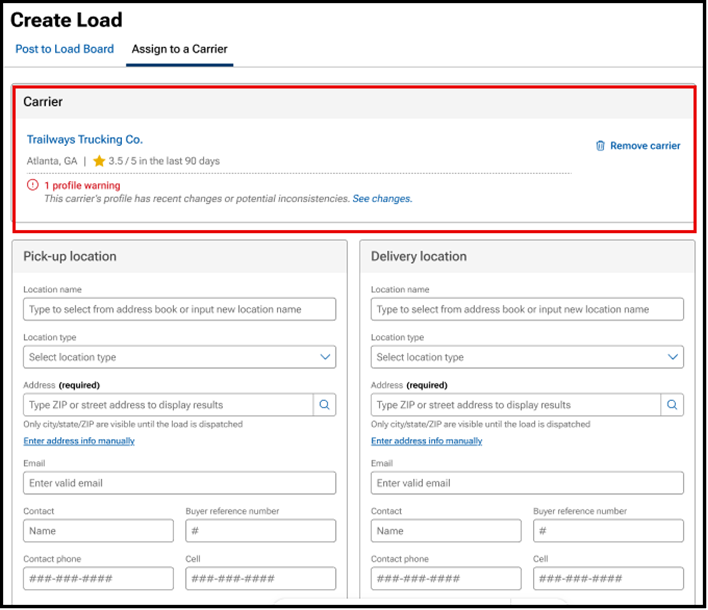
4. Review all information on the Assign Dispatch page that was populated from the Listing and update if needed
- Origin and Destination
- Vehicle Information
- Pick Up and Delivery Dates
- Pricing and Payment Information
- Additional Information, including Load ID, terms, and any notes
5. Click Assign Dispatch
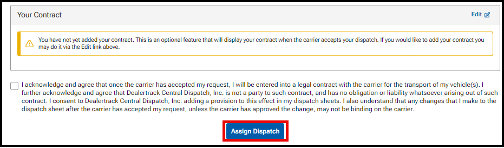
Result: At the top of the screen, a confirmation appears and the screen opens to the dispatch found on the Assigned Loads page to be able to Edit Dispatch Information, Cancel Dispatch and re-list or assign to a new carrier.
Assist with Editing a Listing
If a listing is assigned to a carrier, then the load is available to search in the Assigned Loads tab.
- Find load and click on the Modify Listing button
- The Modify Listing screen will display and you can update any information
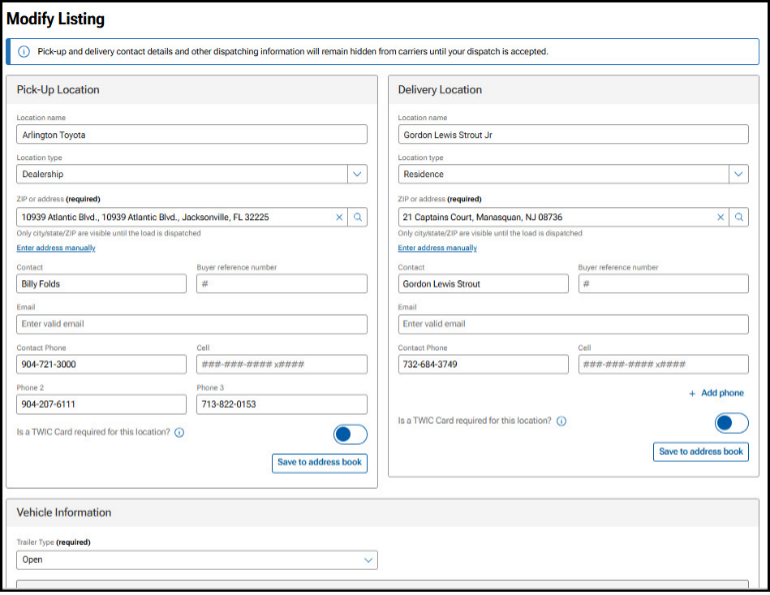
- Once complete with updating any information, click on Modify Listing at bottom of screen
- Note: Adding a vehicle or changing vehicle information will count toward vehicle count for tier
Assist with Archiving a Listing
If a listing is assigned to a carrier, then the load is available to search in the Assigned Loads tab.
Note: Listings that are 30 days from posting date will be auto-archived
- Use the filters on the left-hand side to search for load. Available options for searching include Listing Status, Location, Order ID, Load ID, or VIN
- From the load card, click the More Actions button, and then Archive from the drop-down menu
3. From the pop-up, click Archive Listing to continue
- Note: Archived listings cannot be returned to Active
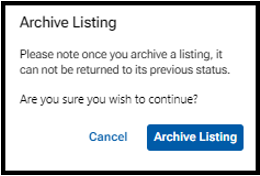
Result: At the top of the screen, the confirmation appears.

Note: View Archived Listing on the Manager Listings page. Duplicate listing is the only button available for archived listings. If a listing is duplicated from an Archived Load, it will count toward vehicle quota limit for tier if any vehicle information has changed
Assist with Duplicating a Listing
- Use the filters on the left-hand side to search for load. Available options for searching include Listing Status, Location, Order ID, Load ID, or VIN
- From the load card, click the More Actions button and then Duplicate Listing from the drop-down menu

3. The Listing screens will open with the information from the duplicated listing. Update any needed fields and click on Modify Listing

Note: If a listing is copied, it will count toward vehicle quota limit for tier if any vehicle information has changed
Assist with Canceling or Deleting a Listing
If the listing is assigned to a carrier, the load will be available to search in Assigned Loads tab.
- Use the filters on the left-hand side to search for load. Available options for searching include Listing Status, Location, Order ID, Load ID, or VIN
- From the load card, click the More Actions button, and then select Delete from the drop-down menu
3. On the pop-up window, click Delete Listing to continue

Result: At the top of the screen, the confirmation appears

Note: Listings cannot be cancelled from the Listings tab because they have not been assigned to a carrier. Assist with an Active listing with a flag
Assist with an Active Listing with a Flag
- Date Available to Ship has Passed: Flag alerts shipper to act when available to ship date is 4 or more days past
- Not showing in search: Flag alerts shipper load is no longer viewable in search when available to ship date is 5 or more days past

- When assigning to a carrier, the dates will be required to be updated
- Click the Modify button to update dates
- Click the More Actions button to Archive or Delete the listing
How to Update a Load’s Status Manually
- Navigate to the Ship Vehicles tab and select Assigned Loads
- Follow these steps to update the load’s status
- Navigate to the desired load
- For units showing in Dispatched status:

- Click Update Status
- From the Update Status slide-out, use the calendar icon to manually enter the Actual Pick-up Date
- Click Update Status to finalize

- Use the calendar icon to manually enter the Actual Delivery Date
- Click Update Status to finalize

- Note: The pick-up and drop-off dates can not be added in the same action, and must be submitted separately
- For units showing in Picked-Up status:
- Click Update Status
- From the Update Status slide-out, use the calendar icon to manually enter the Actual Drop-off Date
- Click Update Status to finalize
- For units showing in Picked-Up status:
Multi-Factor Authentication will assist in protecting unauthorized users from gaining access to a Marketplace account.
A multi-step authentication process for account login requires a user to enter more information than just a password. Users will also enter a verification code sent to the mobile phone number linked to their Central Dispatch account.
How will it work on CD?
- Users will be prompted to set up a multi-step authentication upon logging in by choosing to get a code sent via SMS
- Each user on an account will need their own set of credentials because the user will need to have access to the mobile phone number in their My Profile to receive a code to verify the account
Sign in using Username and Password

A screen will appear to verify access

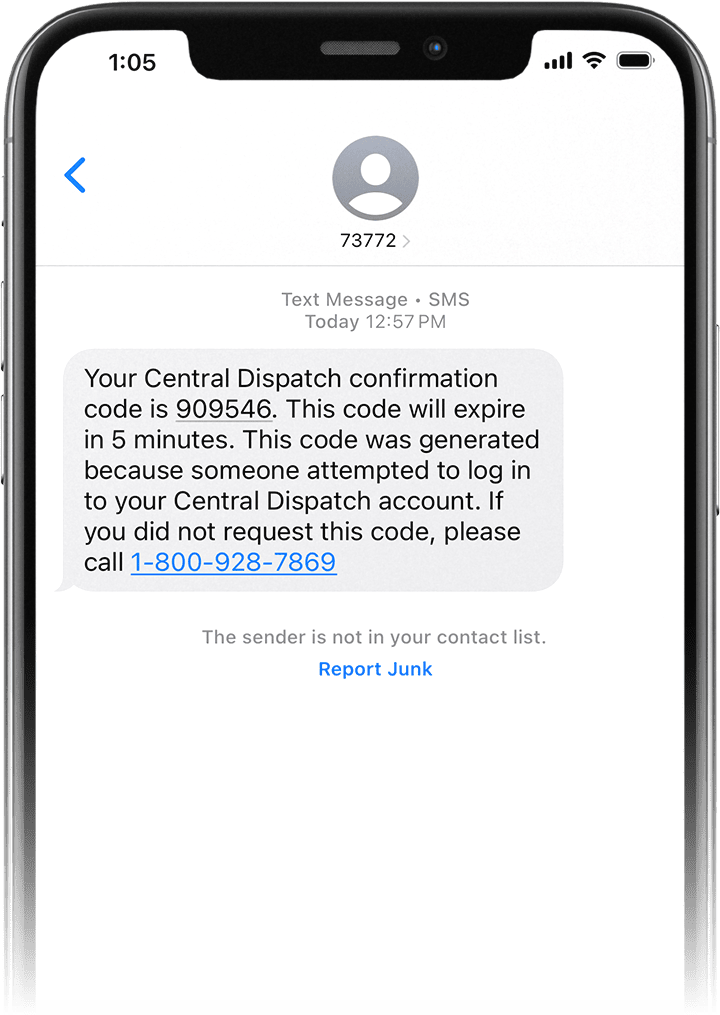
Check your mobile phone for the confirmation code

The confirmation code will be sent to the linked phone number and will expire in 5 minutes
Enter confirmation code and submit

If confirmation code has expired, user can click Resend Code
FAQs
User verification based solely on a username and password provides relatively weak account security. The multi-factor authentication provides an extra layer of security for your account.
Each user on your account can be set up with their own username and password under the Manage Users tab on your account.
With Managing Users, you can assign a role to each person. The role allows you to decide who on your team gets access to certain features and sensitive information, and eliminates the risks that come with a shared sign-in.
Managing Users also allows you to remove a user that is no longer associated with your company, so they do not have access to your account. Learn More About Managing Users
If you are a user on an account, please contact the account owner and ask them to add you to their account.
If you are sharing a log in with another company and do not have access to the verification phone number, you may want to consider getting your own Central Dispatch subscription.
The verification will be sent to the mobile phone number listed in the user’s Central Dispatch account.
Each user can edit the Central Dispatch verification information. Click here to view the steps.
You will need to add a mobile phone number under your My Profile page in Central Dispatch. Click here to view the steps.
If you have completed multi-factor authentication on the same device, navigating to a different account will not require another verification.
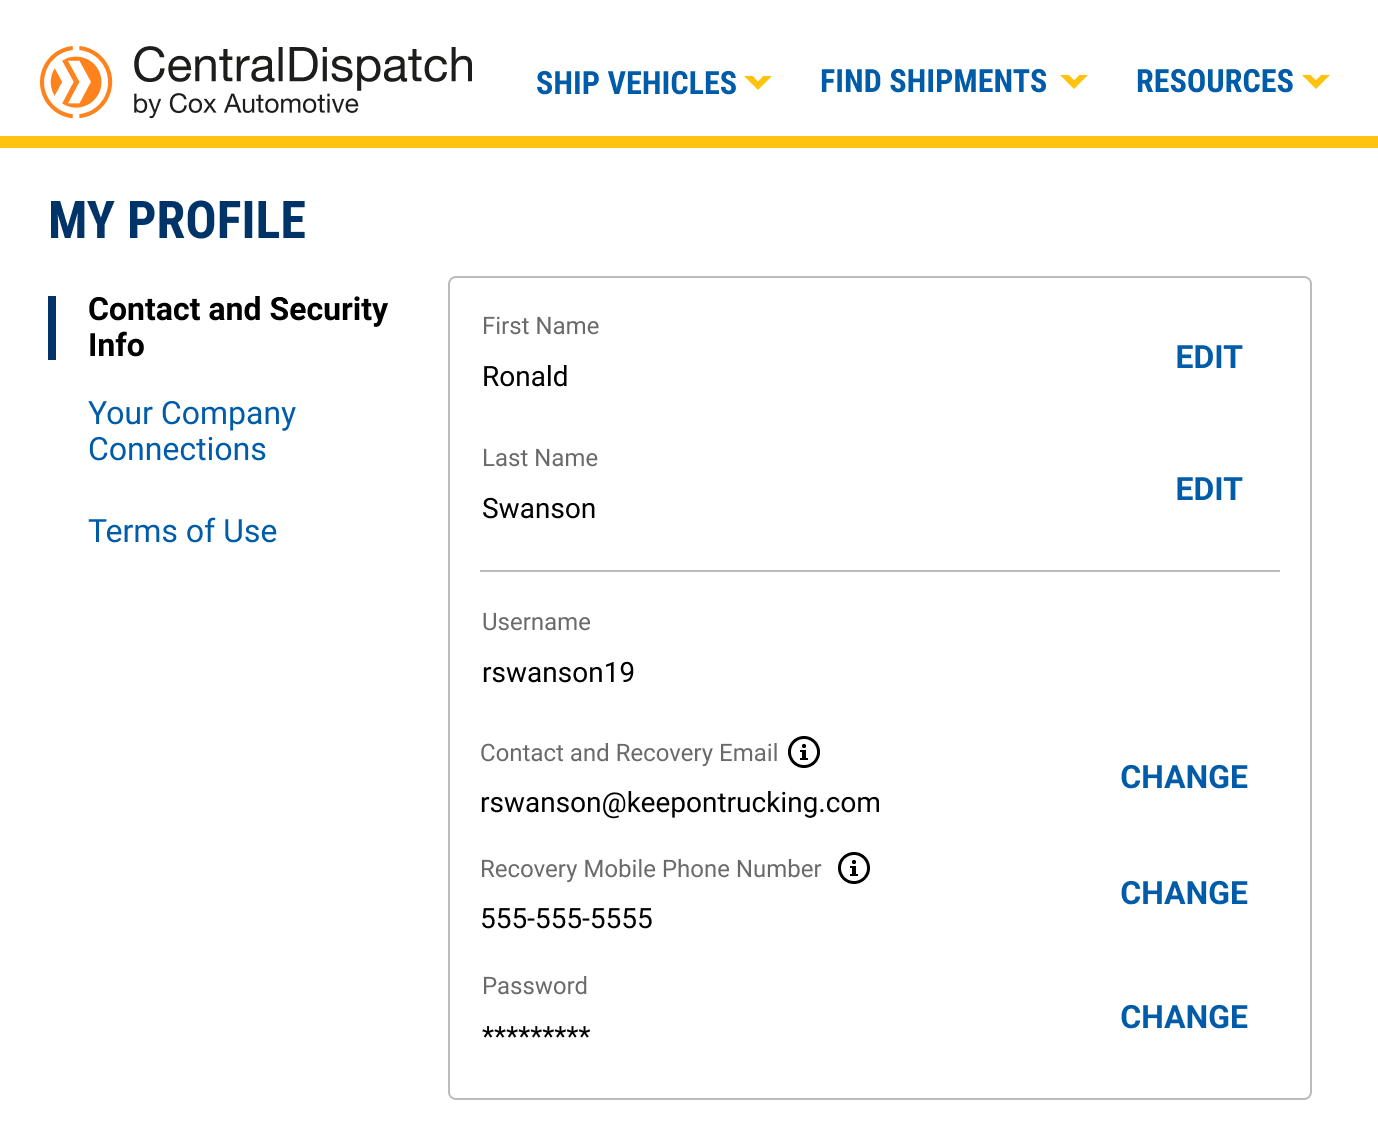
UPDATE email or mobile phone number using ‘My Profile’ under username in upper right corner
1. Click “change” next to the item update
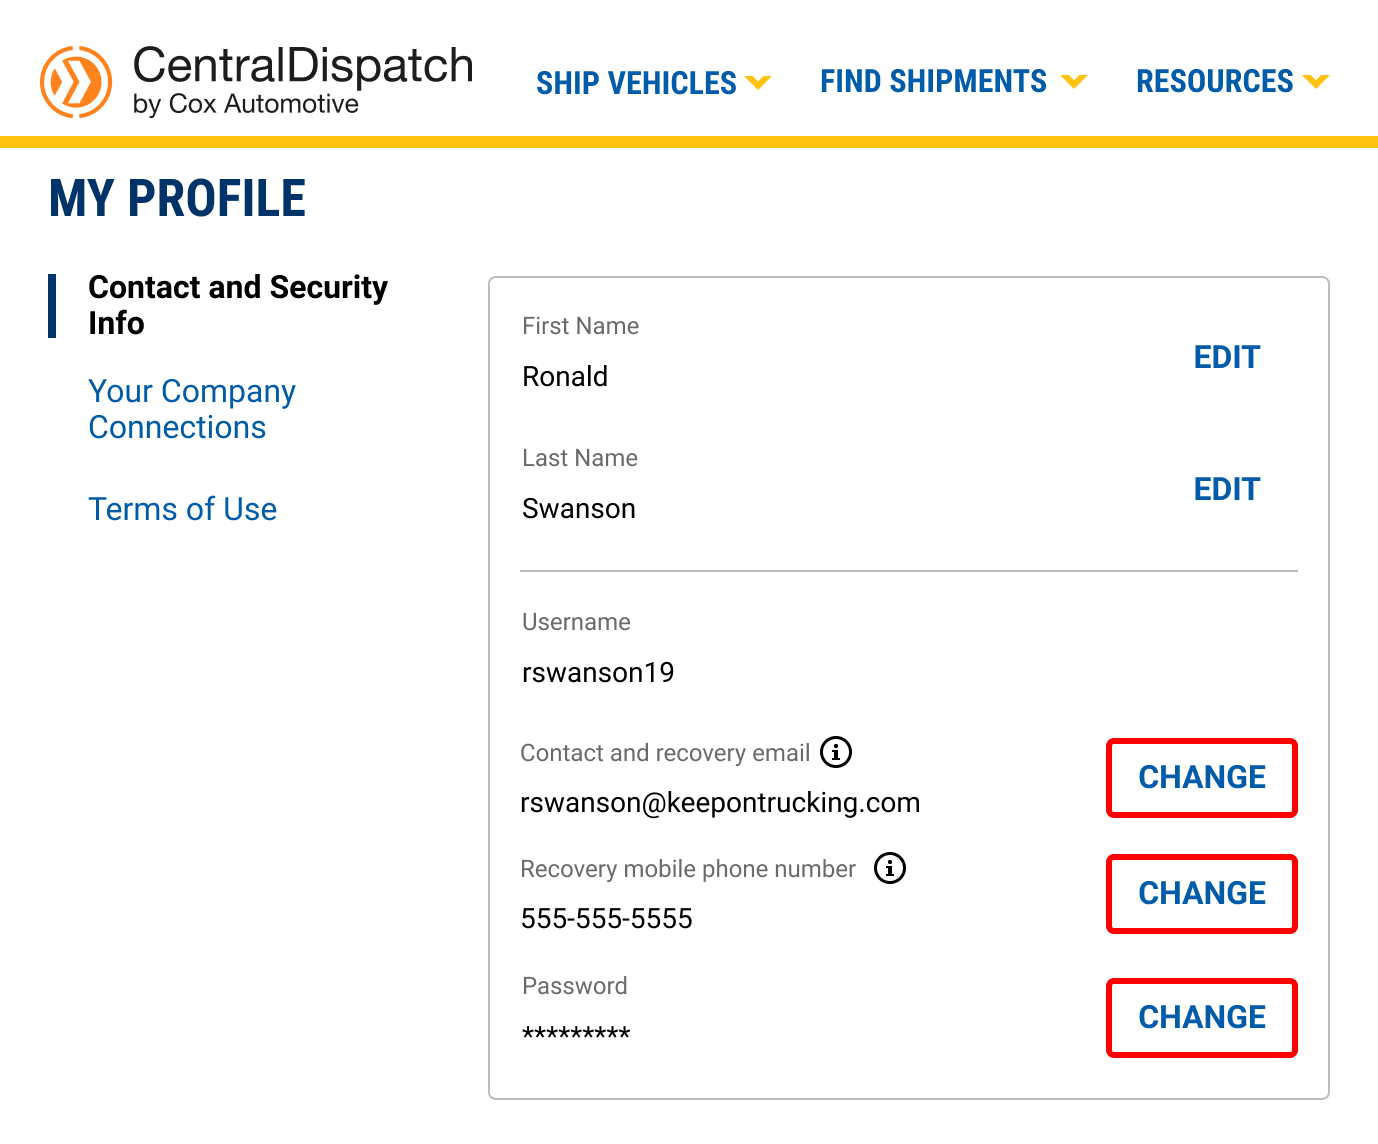
2. Receive confirmation code

3. Enter confirmation code and submit
4. Enter new email or mobile phone number
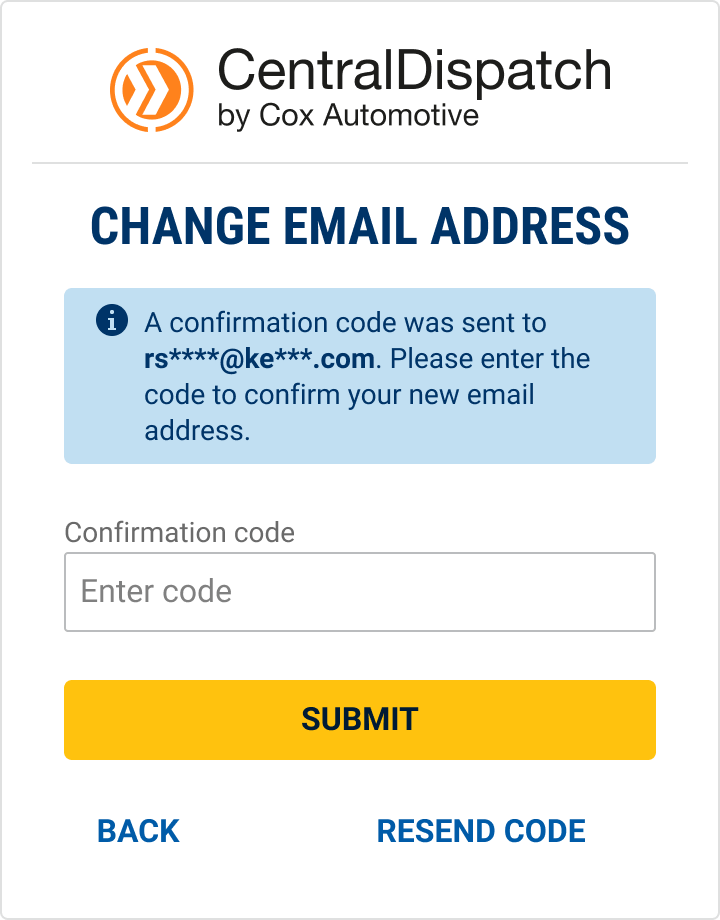
5. Enter confirmation code and submit


6. Email (or mobile phone number) will be updated
See how to save custom searches for quick access to the types loads that keep your business moving, and set up notifications so you never miss a load opportunity.
Discover how using Central Dispatch on your mobile browser makes it easy to find loads and keep trucks full on-the-go!
