

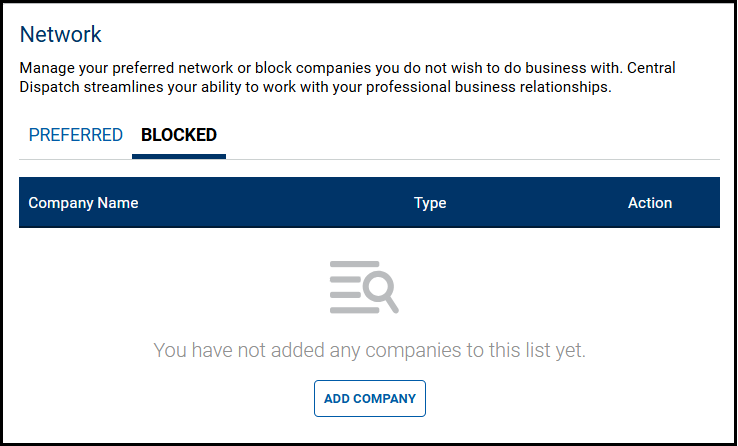
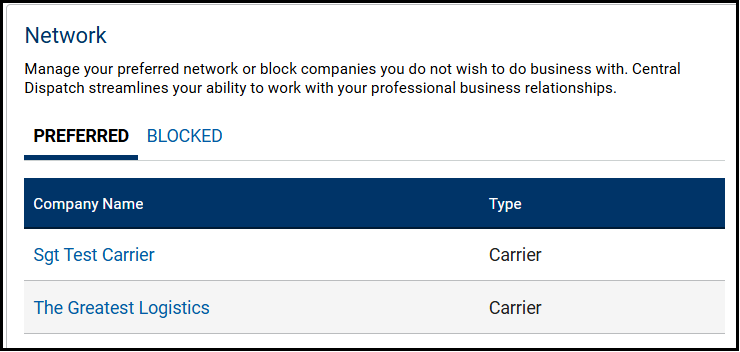
The Network page allows you to manage your preferred network of companies or block companies you do not want to do business with. Central Dispatch streamlines your ability to work with your professional business relationships.
To protect your account, users with the role of Owner, Admin and Member Manager can Edit Information after completing a MFA verification.
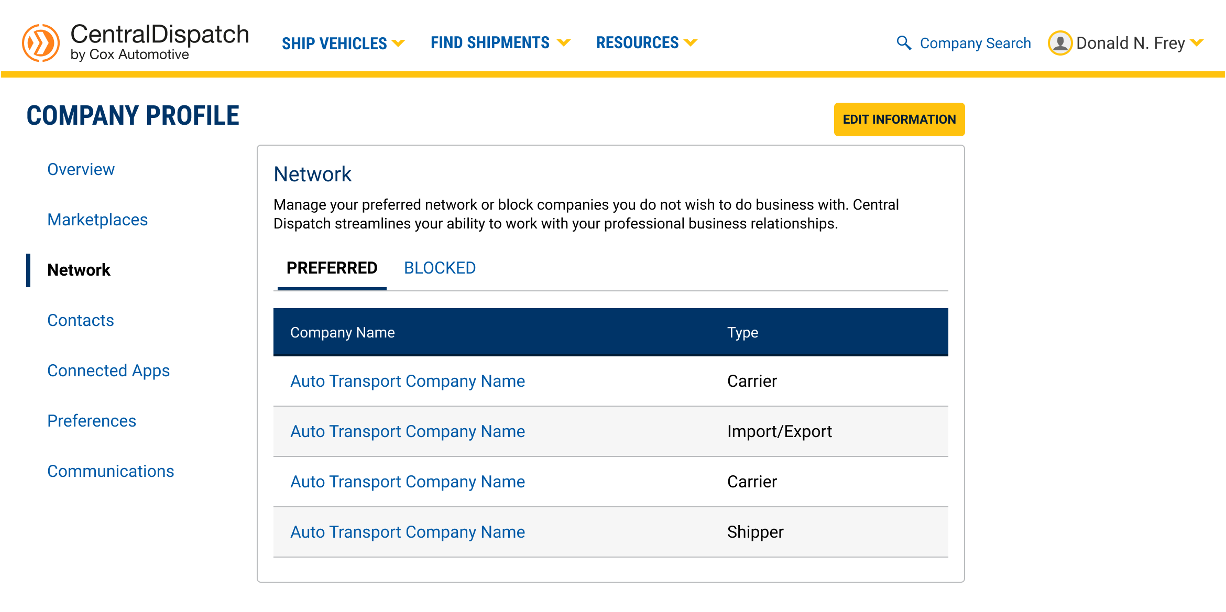
Access your Network by clicking on your account name and clicking the Company Profile link or the Network link

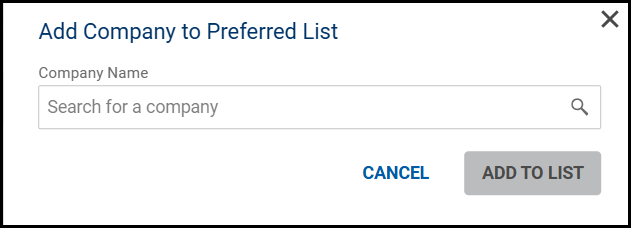
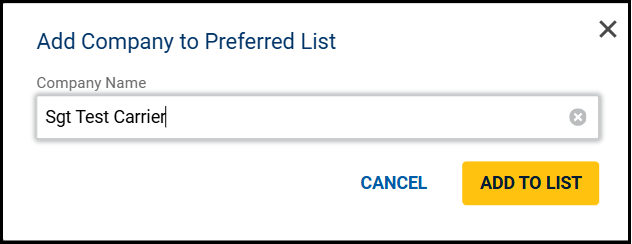
1. To Add Company to your Preferred or Blocked list, click on the appropriate tab and click Add Company

2. Search for the Company and click Add to List
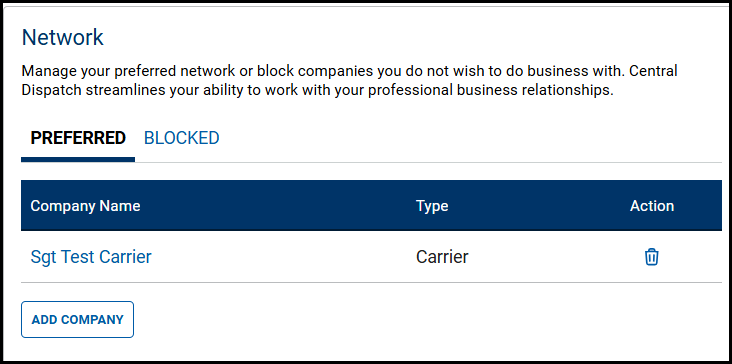
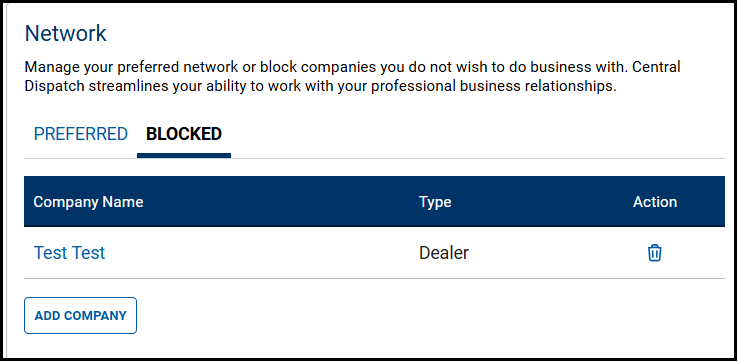
- Click the Trash Can icon under the Action column to remove the company from the Preferred or Blocked list
3. A company can also be added to the Preferred or Blocked list from the Company Overview page by clicking Prefer or Block button
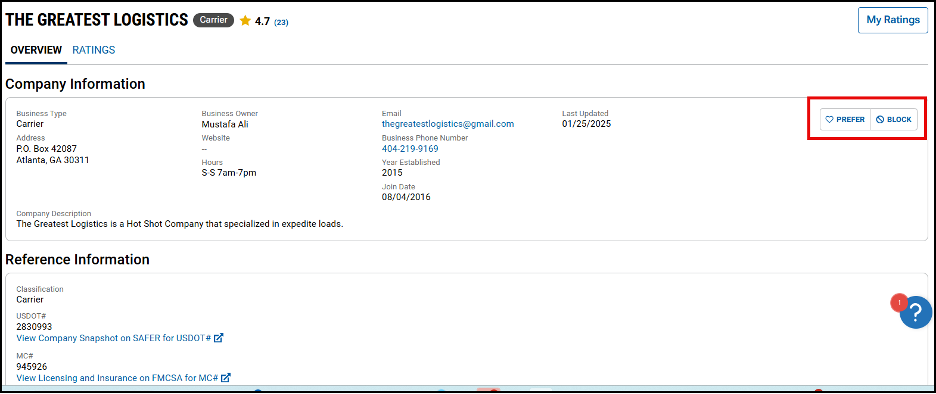
- You are also able to view if the company is on your preferred or blocked list from the Company Overview page
- Click on the Prefer or Block button to remove them from the list
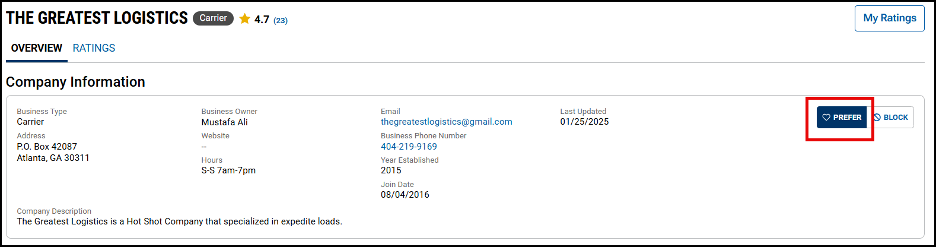
Result: The company will appear on the list for their Network
Search Vehicles
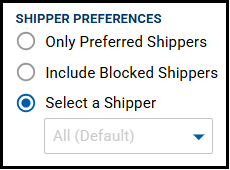
- When searching for vehicles, listings from Blocked shippers will not appear in the results
- Use the Shipper Preferences filter to include listings for Only Preferred Shippers or Include Blocked Shippers in your results
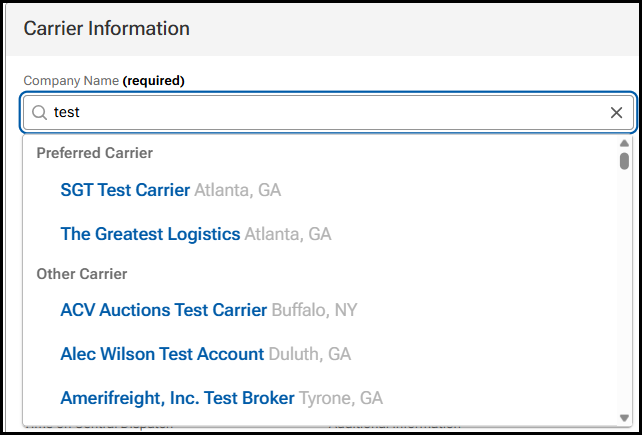
Create Dispatch or Assign Load
- When creating a dispatch or assigning a load, Preferred Carriers will display at the top of the carrier list
- Carriers that are on the Blocked list will not display when searching for carriers
Pricing data is for illustration purposes only and does not reflect actual prices
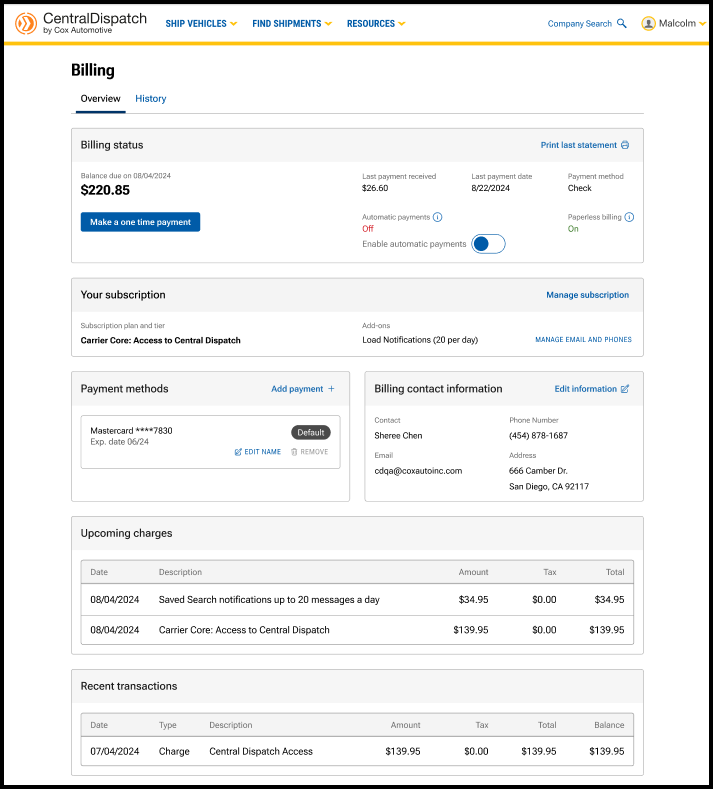
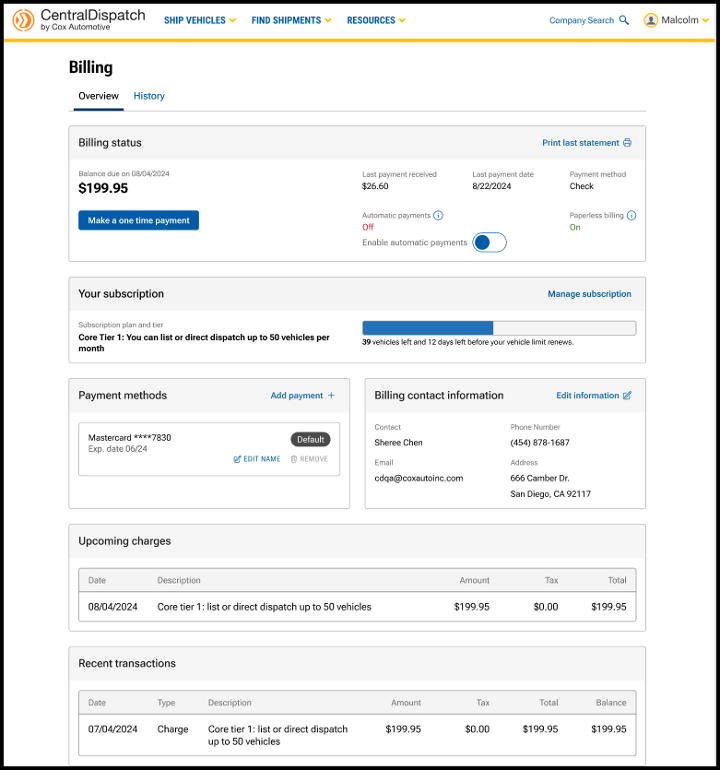
The billing page has been updated with a reorganized layout to prioritize the most important information and provide an intuitive user-friendly experience. multi-factor verification provides an extra layer of security to the account and is required to make any changes to the page. Users with the role of Owner or Admin in Manage Users have permission to make changes after the multi-factor authentication. The billing page is available from the account name dropdown, by selecting Billing.
Billing Status
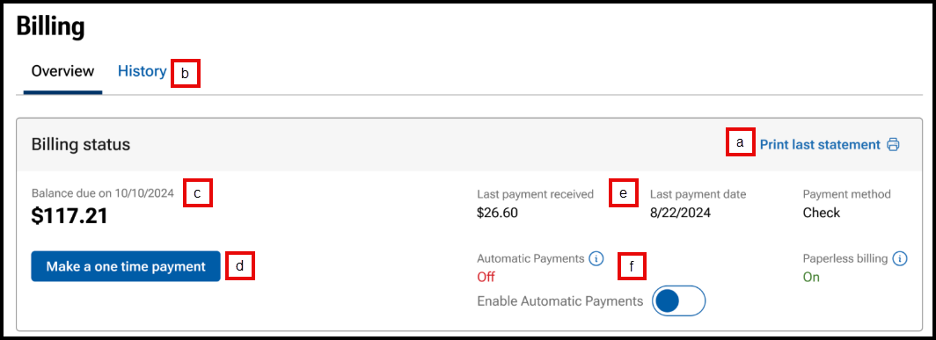
- Link available to Print last statement.
- Click on the History tab to view and print previous months’ statements.
- View Balance due and due date.
- Make a payment by clicking on Make a one-time payment.
- Choose to pay balance or another amount.
- Choose payment method.

- Users can also click toggle when making a payment to enroll in autopay.
- Previous payment information including payment amount, date and payment method.
- Toggle to Enable Automatic Payments on or off.

Result: a confirmation message will appear for users to confirm automatic payments.
Your Subscription
View your subscription plan and any add-ons

- Click on Manage subscription to view current subscription and select or change add-ons such as Notifications for search and Price Check Plus.
- View current subscription.

- Click on any add-on to select it.

- Review changes and click Update subscription.

- Note: Changing Notifications tiers:
- If Adding Notifications, user will need to verify the contact email and phone for the notifications.

- If Removing Notifications, the change will take place on the next billing cycle.

- If Adding Notifications, user will need to verify the contact email and phone for the notifications.
- View current subscription.
- If signed-up for Notifications for search the MANAGE EMAIL AND PHONE link will be visible to update email and phone to send notifications.
- Result: Communications tab on the Company Profile page will open to update or add email and phone for notifications.

- Result: Communications tab on the Company Profile page will open to update or add email and phone for notifications.
Edit Billing Information
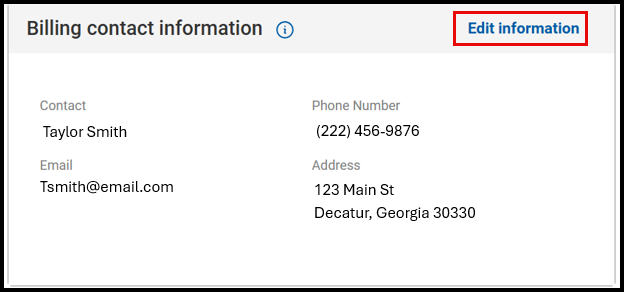
- Click on Edit Information to update billing contact information.
- Result: The Company Profile page will open to the Contacts section and Billing Contact.
- Click on Edit Information to update Billing Contact, MFA authentication will be required.

- Click on Edit Information to update Billing Contact, MFA authentication will be required.
Payment Methods and Billing Contact Information

- Manage payment methods including setting a default card, adding or removing a card.
- Click on Edit Information to update billing contact information.
- Result: The Company Profile page will open to the Contacts section and Billing Contact.
Upcoming Charges and Recent Transactions

- View upcoming charges.
- View the most recent five transactions, users can view additional transactions under the History tab on the Billing page.
Billing History Tab
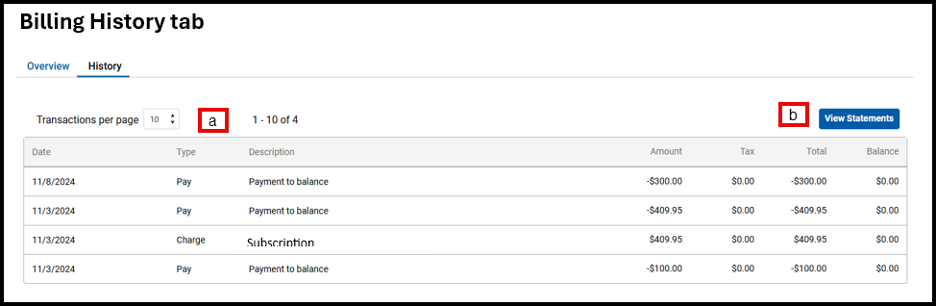
- View previous transactions, select the number of transactions per page.
- Click View Statement to view statements for previous months.
Pricing data is for illustration purposes only and does not reflect actual prices
The billing page has been updated with a reorganized layout to prioritize the most important information and provide an intuitive, user-friendly experience. Multi-factor authentication provides an extra layer of security to the account and is required to make any changes to the page. Users with the role of Owner or Admin in Manage Users have permission to make changes after the multi-factor authentication. The billing page is available from the account name dropdown, by selecting Billing.
Billing Status

- Link available to Print last statement
- Click on the History tab to view and print previous months’ statements
- View Balance due and the due date
- Note: Please note the amount displayed is not due until the Balance due date
- Make a payment by clicking on Make a one time payment
- Note: If moving to a new tier, make a one time payment for only the dollar amount difference between the tiers to get access to the new tier
- Choose to pay balance or another amount
- Choose payment method

- Users can also click toggle to Enroll in autopay when making a payment
- Previous payment information including payment amount, date and payment method
- Toggle to Enable Automatic Payments on or off

Result: A confirmation message will appear for users to confirm automatic payments
Your Subscription

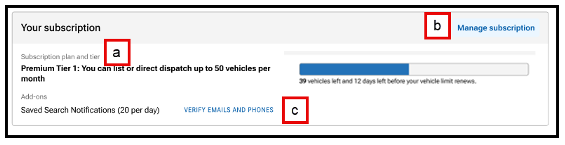
- View your subscription plan and any add-ons to your account, such as notifications
- Tier limits are based on vehicles that are posted or dispatched
- Each vehicle that is listed or dispatched counts toward the monthly vehicle quota
- When the tier limit is reached, it will trigger a notification to the user, and additional vehicles will not be able to be dispatched or listed until next billing cycle, and the user cannot upgrade to the next tier
- Click on Manage subscription to view the subscription plan options, tiers available, and any add-ons selected
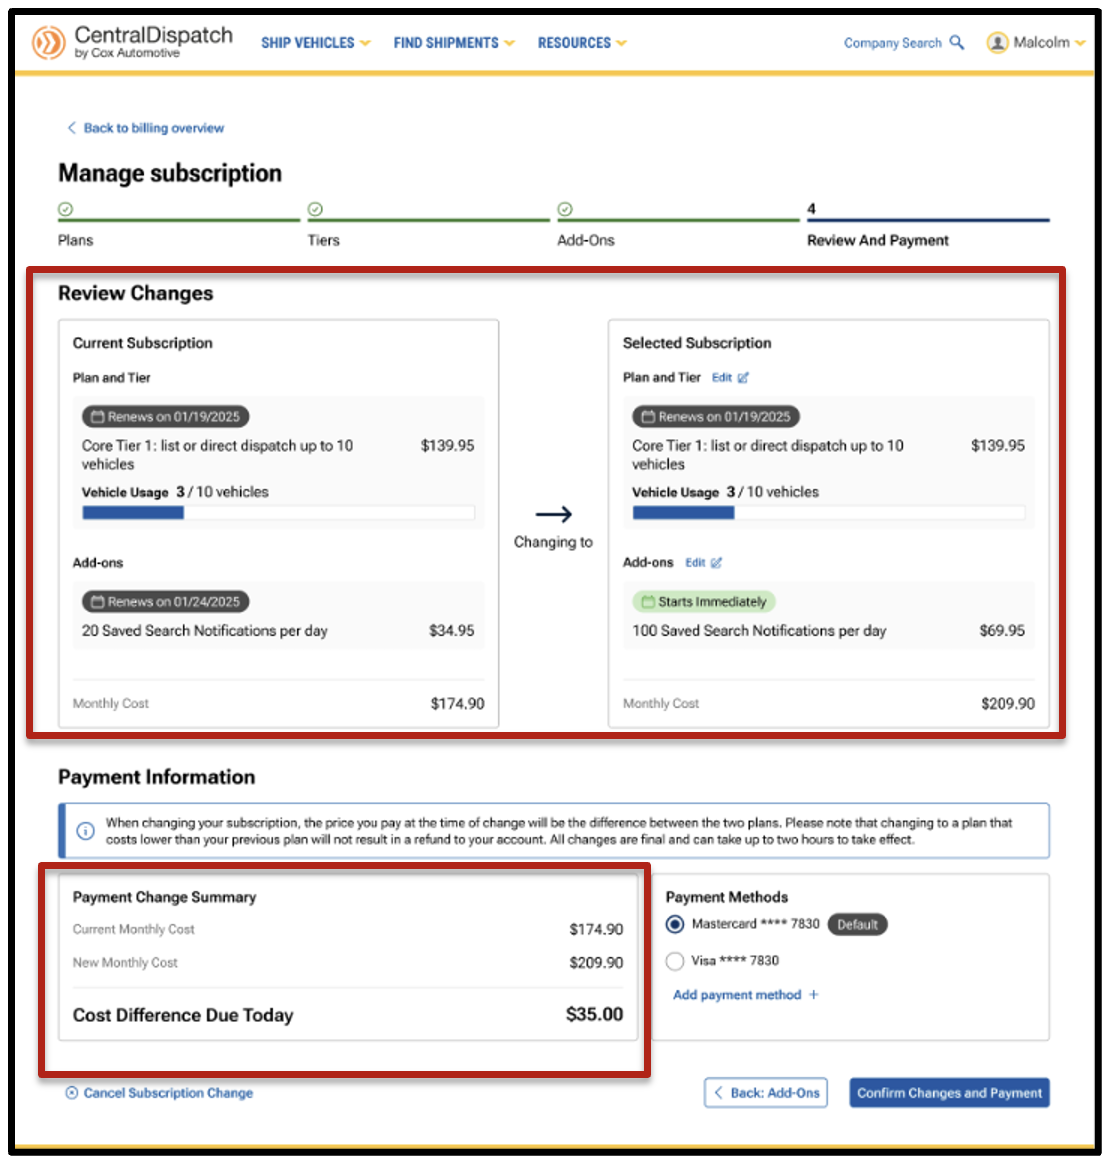
Steps to Upgrade and Downgrade
- View current plan, tiers, add-ons, and price
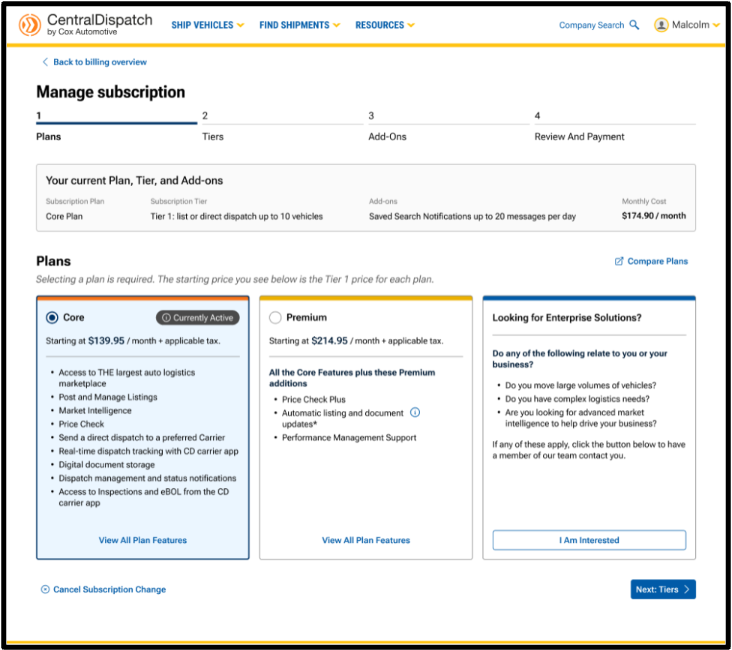
- Choose plan and tiers
- Customers can move back and forth to adjust selections without starting over, reducing frustration and confusion
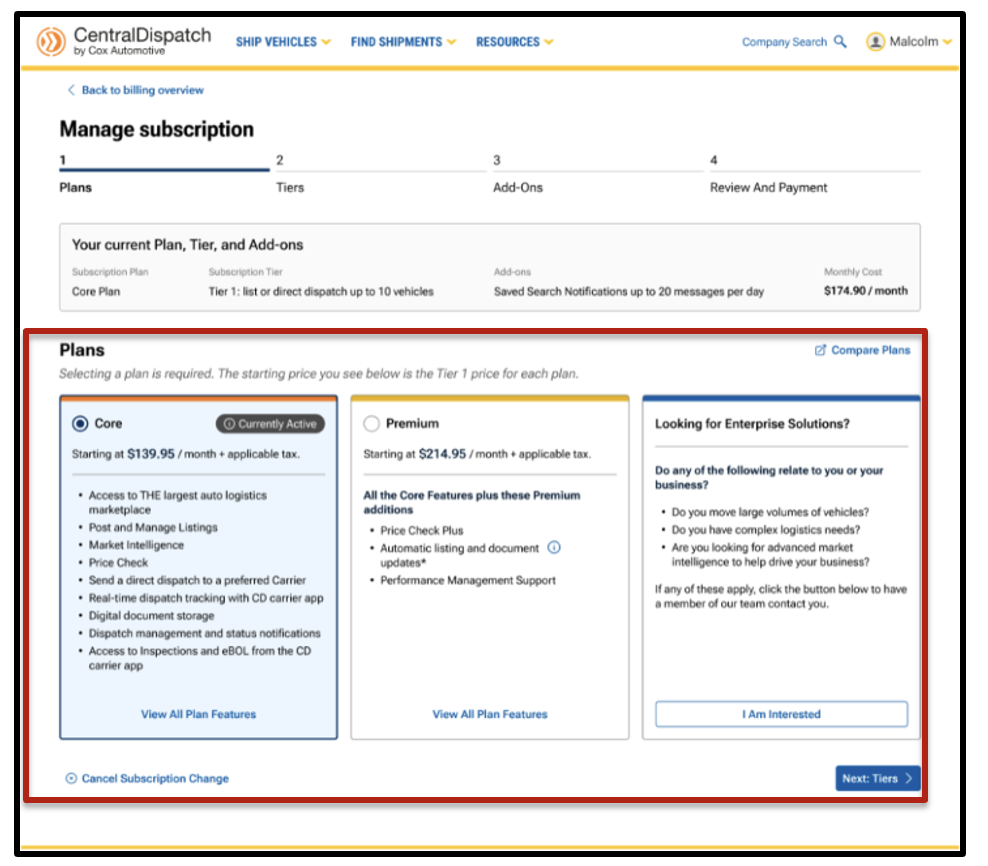
- Customers can move back and forth to adjust selections without starting over, reducing frustration and confusion
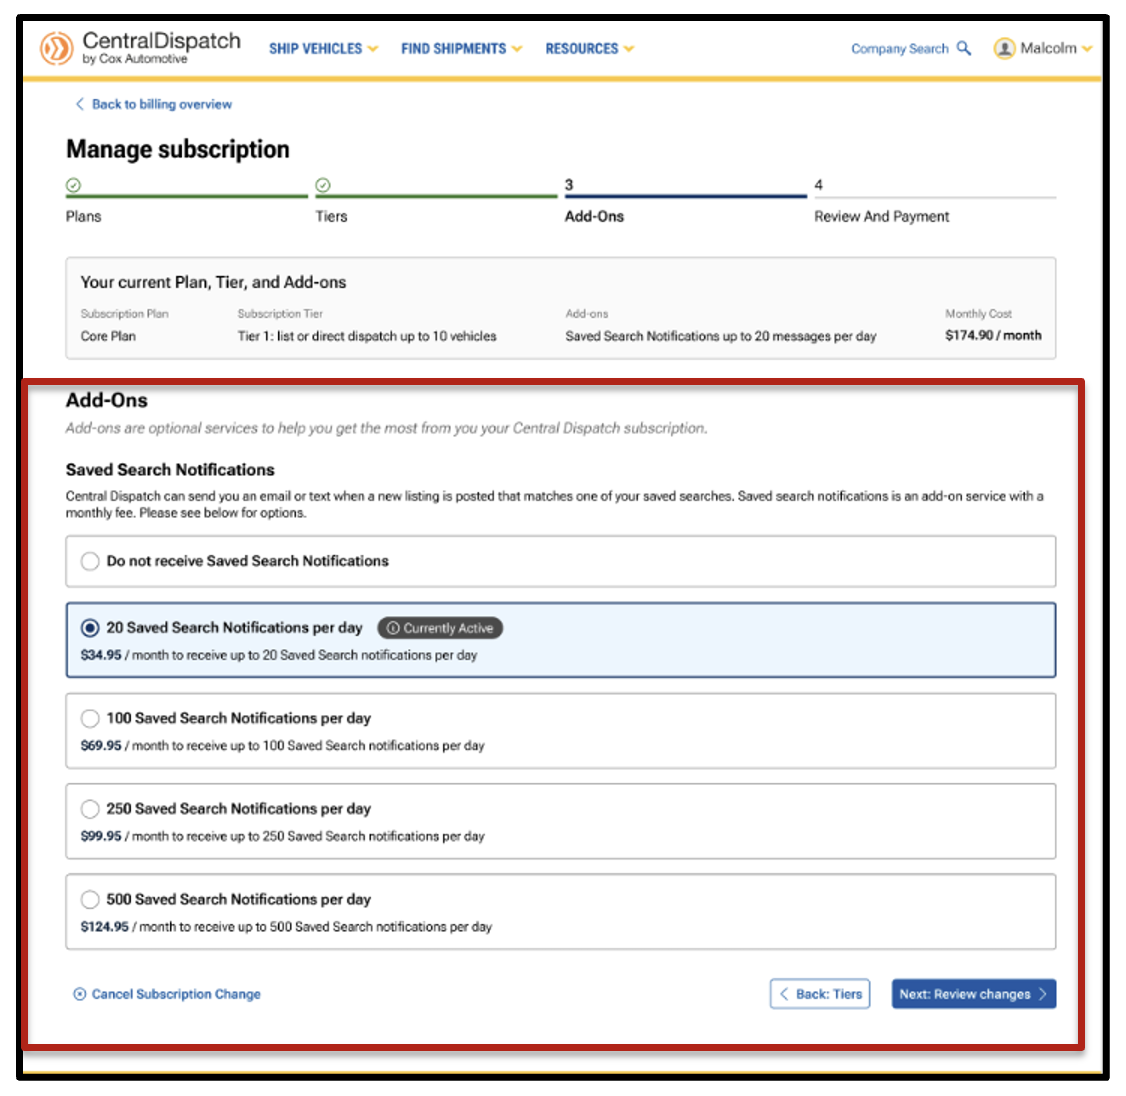
- Choose add-ons
- Customers have clear visibility into available add-ons (such as Saved Search Notifications), with pricing and quantity displayed inline
- The system defaults to current selections with simple opt-in and opt-out options
- Review side-by-side comparison of changes
- Costs, upgrades, and differences due today are shown clearly before checkout, helping customers understand exactly what they’re paying for
- Customers can clearly see their current plan vs. proposed changes before confirming anything
c. If signed up for search Notifications, the MANAGE EMAIL AND PHONE link will be visible to update the email address and the phone number to receive the notifications
- Result: The Communications tab on the Company Profile page will open to update or add the email address and phone number for notifications

Payment Methods and Billing Contact Information

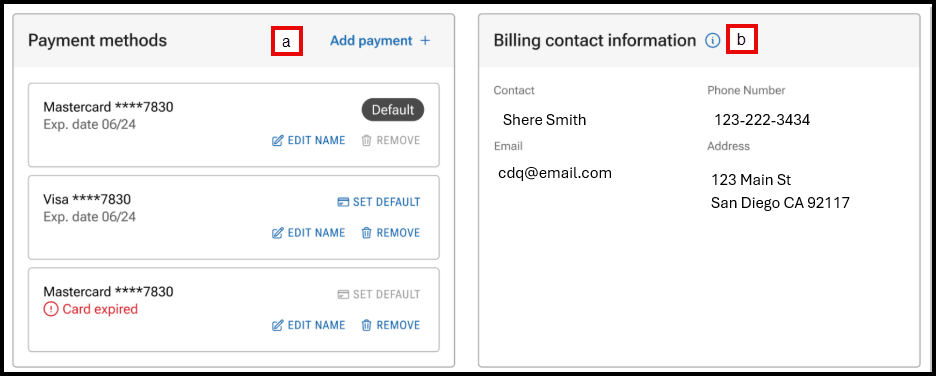
- Manage payment methods, including setting a default card, and adding or removing a card
- Click on EDIT INFORMATION to update billing contact information
- Result: The Company Profile page will open to the Contacts section and Billing Contact

- Result: The Company Profile page will open to the Contacts section and Billing Contact
Upcoming Charges and Recent Transactions
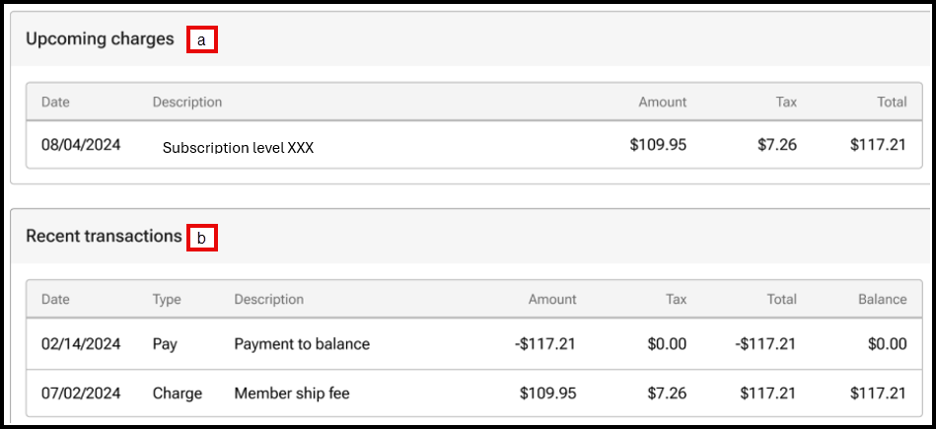
- View upcoming charges
- View the five most recent transactions. Users can view additional transactions under the History tab on the Billing page
Billing History tab

- Select the number of transactions per page to view the previous transactions
- Click View Statement to view statements for previous months
Overview:
Drivers can view loads and perform inspections on vehicles for loads assigned to them when the listing does not have a VIN.
Users will be able to view assigned loads without a VIN and associate a VIN with it using the CD Mobile App in order to complete an inspection.
Why is it important to add a VIN and complete an inspection?
- Provides real-time tracking to the shipper, reducing the need to call or email with updates
- Provides eBOL at pickup and delivery, reducing the risk for both carriers and shippers
- Streamlines the app process
Identifying loads with missing VINs
- Assigned loads without VINs will have a tag on the home page indicating Missing VIN.

- When clicking on the load, the Year, Make, and Model (YMM) and the Missing VIN tag will be displayed on the Load Details page.

Starting the Inspection Process
- Begin by selecting START INSPECTION from the bottom of any screen.

- Scan the VIN on the vehicle or choose the keyboard icon to enter the VIN.

- For the VIN-less load process, when entering the VIN all characters must be entered.

Matching a Load with a VIN
The app will search for a matching VIN, and if not found, the app will decode the scanned VIN to determine YMM of the vehicle and search for VIN-less loads that match the YMM of the scanned VIN.
Possible results:
1. If the scanned VIN and decoded YMM match an assigned load:
- A list of assigned VIN-less loads that match the YMM will display.
- Users can confirm details for the correct load, such as pickup and delivery locations, and click Associate VIN with this vehicle? to merge the VIN with the record and begin the inspection.
Note: Vehicles with make or model names that do not match the VIN decoding results exactly (ex: Chevy vs. Chevrolet) won’t appear in the decoded matches.
- Carriers can select View all loads with missing VINs for a full list VIN-less vehicles.

- Once the load is found, tap on Associate VIN with this vehicle? under the selected vehicle.
- A confirmation screen will appear to confirm the association of the VIN with the vehicle and then the user can continue with the inspection as normal.

- A message will display that the VIN has been successfully associated with the load.
- A tag will appear above the VIN stating, VIN entered by carrier.
- The tag will appear above the VIN throughout the mobile app and on the eBOL.

- The tag will appear above the VIN throughout the mobile app and on the eBOL.
2. If the scanned VIN does not match the YMM of any assigned loads:
- If there are no assigned vehicles matching the decoded YMM, an error message will appear.
- A list of loads with missing VINs will be displayed for review.
- Users can select a load with a missing VIN to associate with the scanned VIN by clicking the Associate VIN with this vehicle? button under the selected load.

- If a vehicle is selected to associate the VIN, the YMM entered by the shipper and the selected YMM will display, and the user will be asked to confirm by tapping one of the Associate VIN button.
- In the example below, the shipper entered a vehicle year of 2012, and the vehicle selected has a vehicle year of 2017.

- In the example below, the shipper entered a vehicle year of 2012, and the vehicle selected has a vehicle year of 2017.
NOTE: Once a VIN has been associated with a load it cannot be unassociated.
3. If there are no assigned vehicles matching the decoded YMM and no VIN-less loads:
- The app will display the following error message will display the YMM of the scanned VIN and request the carrier to call the shipper.

Viewing Manually Added VIN in app and on eBOL


FAQs
Q: How can a user tell if a VIN was manually added by the carrier?
- To indicate whether the VIN was provided by the shipper or added manually, “VIN entered by carrier” will appear throughout the app and on the eBOL for any VINs entered by a carrier.
Q: Where does VIN populate after it is manually added by the carrier?
- The VIN will appear throughout the dispatch record in the app and on the eBOL. It will not populate on any shipper-facing listing or dispatch pages within the Central Dispatch platform.
Q: What if a carrier encounters multiple, identical vehicles missing a VIN?
- The carrier can select the best vehicle match after reviewing all of the load information, as it is only used for the inspection process and is not permanently linked to the vehicle in any way.
- The carrier may reach out to the shipper to confirm a unique identifier on the vehicle such as the license plate or lot number, if needed.
Q: Can a user remove the VIN from a vehicle after manually adding it?
- The VIN cannot be removed after it is added. To ensure accuracy, users will be asked to confirm before finalizing their selection.
Q: If a pickup inspection was not completed, can a carrier still add a VIN to complete a delivery inspection?
- Yes, carriers can follow the same steps to complete a delivery inspection.
Q: What happens if the app is offline during an inspection?
- Users will see a message in the top left corner showing their device is offline.
- The app will bypass VIN decoding and default to showing all vehicles with a missing VIN.
- Carriers can still complete the vehicle inspection but will not be able to submit it until their device is back online (current functionality).
Click on Account name and select Company Profile


Company Profile contains overview information as well as tabs for:
- Marketplaces: will display public and private marketplaces for account
- Network: manage preferred company network and blocked companies
- Contacts: add and manage contact for your account
- Connected Apps: manage connected apps if applicable
- Preferences: choose how businesses search your company
- Communications: manage communication preferences selected for carrier notifications, may also include other notifications depending on marketplace
Users with roles of Owner and Admin can edit certain information after a multi-factor authentication
Overview
The Overview page includes:
- Company Information
- Contact Information for company
- Liability insurance information if applicable to account type
- Authority information if applicable to account type

Edit Information
For account security, users with the Owner and Admin role will need to complete multi-factor authentication after clicking the Edit Information button.
Fields that can be updated will open
Some information such as company name, insurance, and authority can be updated by Central Dispatch team only

Marketplaces
Marketplaces page is read-only and display the public and private marketplaces your account is associated with

Network
The Network page allows you to manage your preferred network of companies or block companies you do not want to do business with
Requires a multi-factor authentication by Owner or Admin role to Edit Information

Preferences
Preferences gives you the control of how other businesses can find your company
Requires a multi-factor authentication by Owner or Admin role to Edit Information

Contacts
Contacts page includes information for positions for your business. Positions include:
- Owner
- Billing
- Manager
- Listings Contact
- Dispatch Contact
- Authorized Contact
The Owner, Billing, and Listing contacts are populated from information entered during the application process. The Dispatch role does NOT auto-assign by default, so you’ll need to manually add the correct contact for this role
The Owner contact cannot be changed through self-service
The Billing contact can be updated from the Billing page
Contacts can have multiple positions
A Listing and a Dispatch contact is required for shipper accounts and the system will not allow more than one Listing or Dispatch contact
A group email can be added for a contact such as Dispatch Contact
Requires a multi-factor authentication by Owner or Admin role to Edit Information
Important Information about Contacts and Manage Users:
- Contacts do not contain information used for the multi-factor authentication process; this information is only available to the user in their My Profile
- Contacts does not replace Manager Users; users must be added to Manage Users to manage their access to the Central Dispatch account and set up their My Profile


Connected Apps
Connected Apps allows you to manage access to any connected apps, if applicable
- Requires multi-factor authentication to Edit Information

Communications
Communications manage communication preferences selected for carrier notifications
- May also include other notifications depending on marketplace
- Requires multi-factor authentication to Edit Information

Price Check and Price Check Plus offers carriers and shippers pricing insights for transportation costs to empower decision making and maximize profitability.
Price Check – Generates pricing information based on vehicle and location information
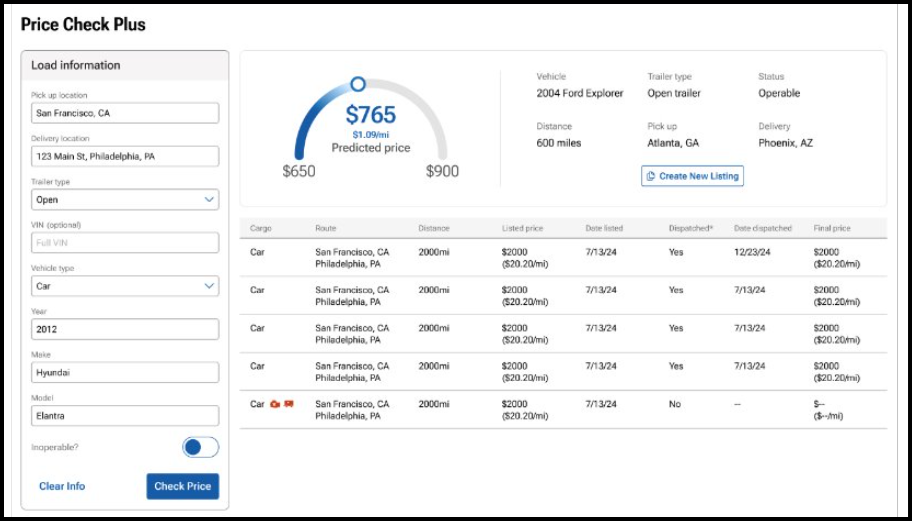
Price Check Plus – Builds on the information offered in Price Check and includes the date and dispatched price as well as a predictive dispatch price within an upper and lower band
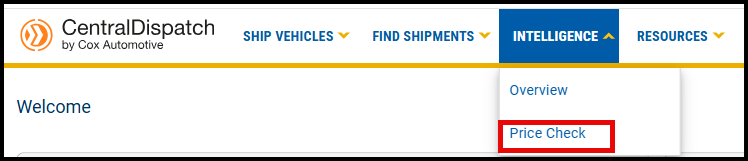
All clients can access at any time from the log-in home page by clicking on the Intelligence dropdown
When searching for vehicles on the Search Vehicles page, click on the drop down on the dispatch card and the Price Check

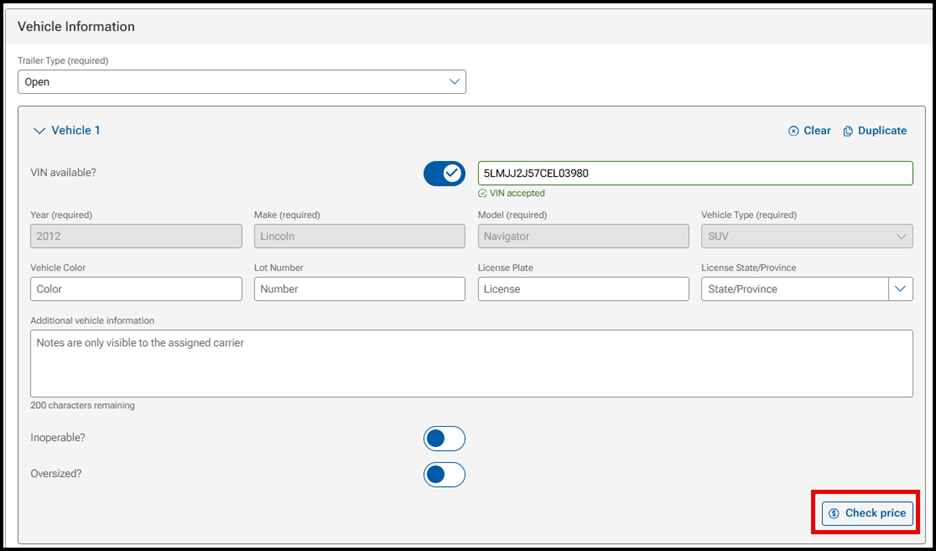
For Shippers on the Create Listing page, click on Check price under the Vehicle Information section
How Price Check and Price Check Plus Work
When accessing Price Check from the drop down on the Intelligence tab:
- Enter load information in the filters on the left side of screen to view pricing information for comparable loads
- For shippers, there will be a link to Create New Listing to easily create a listing from the information populated in the filters
- Note: Users with the Driver role will not have access to Price Check information
- Note: Users with the Driver role will not have access to Price Check information
View of Price Check from the Intelligence tab for an owner role
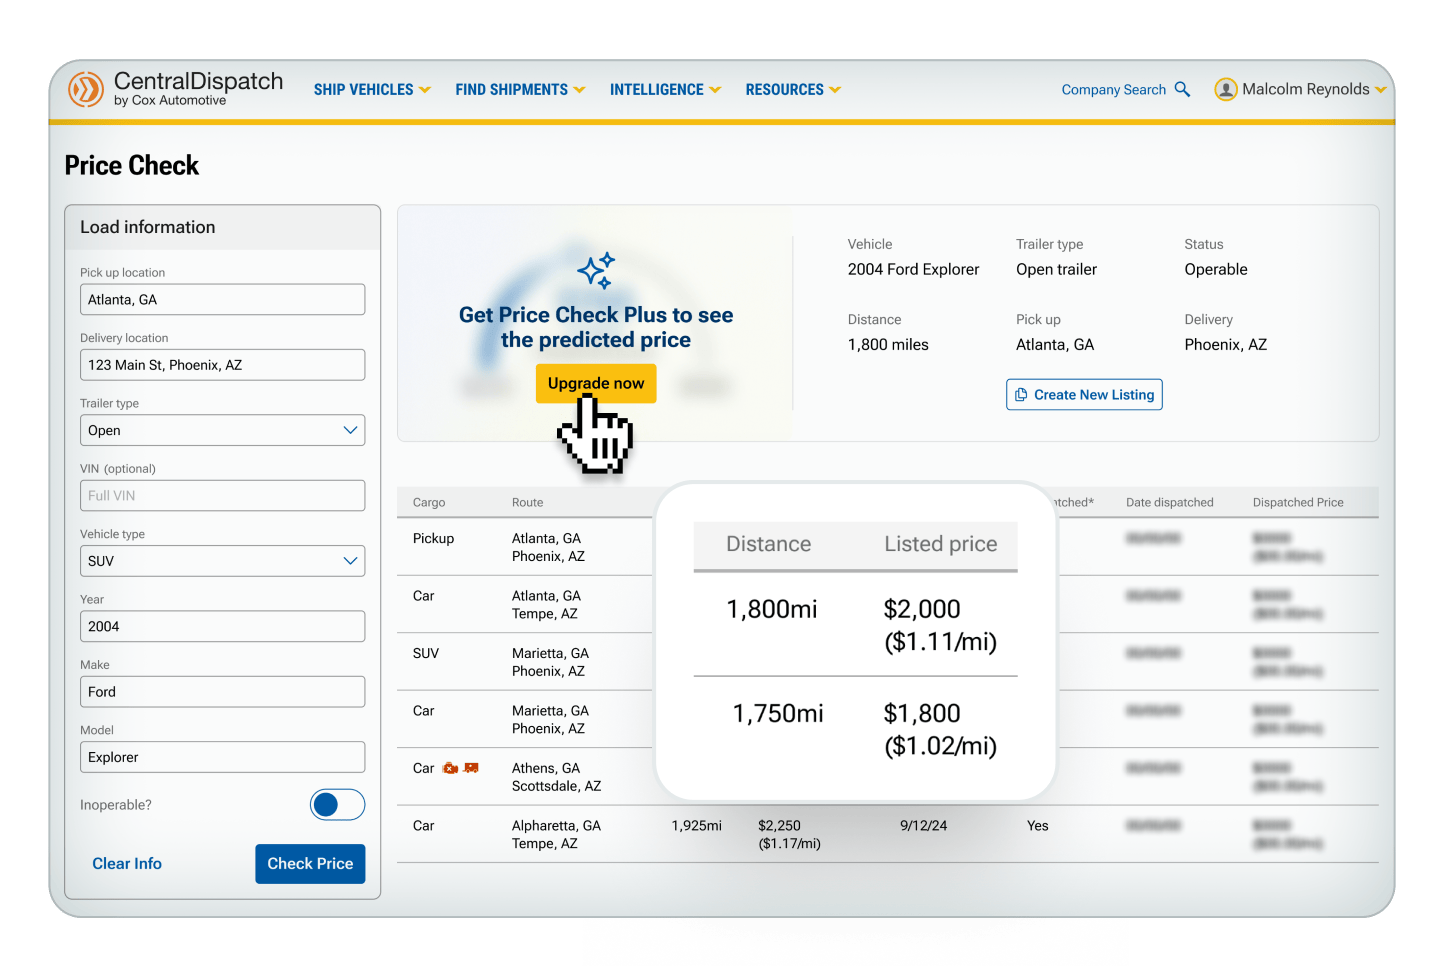
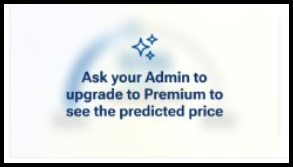
If user is not an owner role, a message will appear to ask admin to sign up
View of Price Check Plus from the Intelligence tab for subscribers
View from Search Vehicles
When displaying Price Check or Price Check Plus for multi-vehicle loads, there is a drop down to select the vehicle in the load to display for both Price Check and Price Check Plus

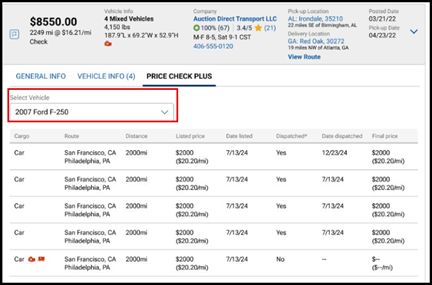
View from Create Listings
A slide out box will appear when clicking on the Check Price button in Create Listings
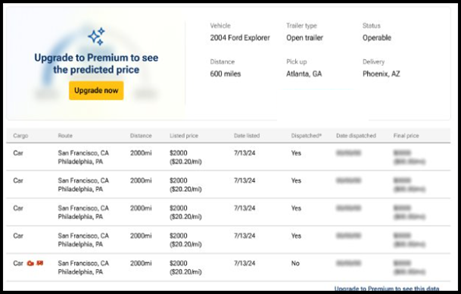
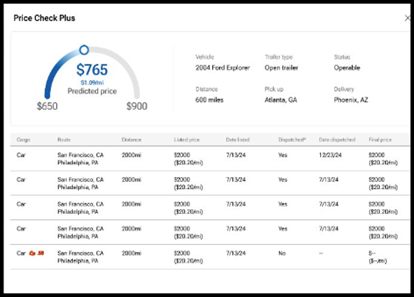
Value of Price Check Plus
Price Check Plus is designed to help you maximize profitability and accelerate your speed to transport.
The Predicted Price is one of the most valuable tools available in Price Check Plus and is built on industry-leading AI to provide real-time data reflecting current market trends.
The high and low price represent upper and lower bounds for what would be considered a reasonable price for the listing based on historical trends.

Use the predicted price along with the low range and the high range to make decisions that is best for your company.
- For a shipper: choose a price closer to the upper or lower bands depending on how fast you need the vehicle to move.
- For a carrier: review the price in relation to the upper and lower bands to determine how quickly you may need to act if you are interested in transporting.
The Estimated Time To Dispatch is the estimated time for a listing posted at the predicted price to get dispatched to a carrier.
The time to dispatch is built from the same AI model as the predictive price.
If the shipper needs to it to move it faster, the price can be increased.
- The estimated time to dispatch is not able to predict anything over 36 hours.
Use the Dispatch Date and Dispatched Price on the comparable loads to see if the negotiated rate was different than the listing and see how long it took to get dispatched at the listed rate.
The Transactional Ratings system from Central Dispatch lets you leave in-depth reviews about what it was like to work with a certain shipper or carrier on our platform.
You can rate a business overall and in three distinct categories for each job they perform. You can write reviews describing your experience in more detail, and even reply to comments written about your business.
Today we’ll show you how you can use this new rating system to give helpful, honest feedback, so that you and others can make better partnering decisions and grow your business.
The “Overview” page gives you a general idea of how you’re being rated on Central Dispatch.
You’ll see your company information, your current overall rating (calculated by average), and reviews of your business that have been marked as “most helpful” by other users.
Under “Average Detail Ratings” you’ll see your current rating for each distinct Transactional Ratings category — timeliness, communication, and documentation. Like your overall rating, these are calculated by average. Hover over the “i” for more information on how we define each category.
Scroll through the “Most Helpful Reviews,” to find out which reviews of your business are getting the most hits, and exactly what your partners are saying about you.
View how they’ve rated you in each category, their written review, how many total reviews they’ve left on the site, and how many other users have marked their review as “helpful.”
The Overview page also gives you a quick link to rate your recent transactions (under “Your Connection”) as well as a link to view all of your business’ reviews in more detail, here near the Helpful Reviews.
You can also get there by simply clicking the “All Ratings” tab near the top of the dashboard.
Ratings
On the “All Ratings” page, you’ll first see a visual breakdown of your current overall rating, and a complete list of every review of your business.
You can sort this list by the number of stars attached to each review, to quickly get a clear idea of what people liked about working with you, and what problems may have come up during a job.
You also have the option to reply to any review of your business. Please remember to be fair and courteous when replying to a review. Every reply goes through a 72-hour review period, to make sure our content policy is being followed.
Pending
The “Pending” page is where you’ll rate and review the businesses you’ve worked with in the past 60 days. After 60 days, any pending transaction ratings you have will disappear.
You can rate both completed and canceled transactions that were accepted by a partner. This ensures every partner on our platform is held accountable for their performance for jobs they finished — and for jobs they didn’t.
On the page, you’ll see the company’s name, order ID, and some more specific information about each job. To begin rating a transaction, simply give it an overall rating of 1-5 stars. This will bring up an expanded menu, where you can rate a shipper or carrier on their timeliness, communication, and documentation.
Note that your ratings for each category do not impact the overall rating. Also note that reviews cannot be edited after they’re submitted and star ratings go live on the website the moment you leave them. So it’s very important to understand what to be thinking about for each category before you rate. Let’s go over those in more detail.
For overall rating, youshould think about the general experience working with this person — not just the outcome of the job. Would you feel comfortable doing business with them again? Would you recommend them to others?
Timeliness refers to how closely they met timing expectations outlined in your contract for pickup, delivery, and any other checkpoints. Did they complete delivery or pickup within 72 hours of the estimated time? Were they late? If so, how late?
Your communication rating should consider how professional and responsive a partner was during a job. Did they promptly communicate information like updates, changes, and delays? Did you ever have trouble getting in touch with them?
Documentation includes the completion and accuracy of all job documents, such as eBOL, insurance information, transit forms, and invoices. Was everything filled out correctly? Did paperwork arrive late?
To give even more detailed feedback, leave a short written review describing your experience. What specifically did they do well? What kinds of problems, if any, did you run into?
Leaving a 1-2 star rating for a transaction will prompt you to leave a written review, to encourage responsible use of a negative rating.
You’ll also be prompted to reach out directly to the other party. So if you think any disputes can be solved privately, be sure to take advantage of this feature before posting.
However, it’s important to note that leaving a written review, and rating users in each of the three categories, are both optional. You can always just leave one overall rating if you’d like.
But we highly recommend going the extra mile. It helps everyone identify if a certain carrier or shipper is right for them, and gives other users a more complete picture of your business practices.
Well, that’s all for now. Thanks for taking a few minutes with us to discuss our new transactional ratings system. As always, please reach out to us with any further questions.
The all-new Central Dispatch user management feature lets business owners give employees their own personal Central Dispatch logins.
Account owners will now have more control over how they run their business on Central Dispatch. They’ll decide which employees or contractors can access certain features, decide who gets to view sensitive information, and eliminate the risks of sharing credentials of a single, universal login.
To access the Manage Users page, click your name from any page and select Manage Users from the account dropdown. Only users with the role of Owner, Admin, or Member Manager can access the Manage Users page.
Here, you’ll see your company name in the top left, along with a list of all your organization members who are active Central Dispatch users in the active tab.
You’ll also see their assigned role, contact information, and some actions you can take as the account owner.
Adding new users is easy. Just click the yellow “Add Users” button at the top right of your screen. This will bring up a window where you’ll enter their email and select their role. Read the descriptions to view permissions associated with the role.
Once you have their information entered, hit “Add User,” and an invitation will be sent out to the email address you entered. Members of your team will need to accept the invite before becoming active users.
To view users who you’ve invited that have yet to accept, go to the “Pending” tab. Here you can see the date you sent out the invite, and resend or cancel the invite if necessary.
Remember that the role you assign each team member will impact what they can and can’t do on Central Dispatch.
Drivers and Standard roles can only access and update their own profile, including email address, cell phone number, and username.
While Owners, Admins, and Member Managers are able to add new users and fully manage all other user profiles.
To change a person’s role, click “Edit” here in the Actions column, and select a new role.
To remove a user, simply click the “Remove” button in the Actions column, and click again to confirm the removal in the pop up window.
That’s all for now! We hope you’ll enjoy all the benefits of this new user management feature. As always, please reach out to us with any further questions.
Let’s take a look at what’s new in search. The new search layout allows you to filter and sort live results, all from a single page. We have also reduced the number of clicks. No need to click “search” or “enter” after selecting filters.
Saved searches and filters are found on the listings page. Just click into the saved search to open it. Easily see the saved search you were viewing, along with the number of listings associated with it.
Filters are also available to view for the search. Click the “X” to delete any of the filters, or scroll down the page to any of the filters and then click save. Click the “clear” button to return to a view of all listings.
The browser can be used to manually update listings. Sorting options are at the top of the listings page. And the listing card contains the most important information, including price and price per mile, the vehicle information, company information including ratings, hours of operation and the time zone, and phone number, pickup and delivery information, posted date, and desired pickup date.
And the information is available no matter the size of your screen. Thank you for using Central Dispatch.
