

Overview
The Find Carriers feature allows Premium Shippers to proactively identify and assign recommended carriers when a listing is not receiving enough engagement.
- Displays up to 10 recommended carriers based on internal models
- Designed to speed up dispatching and reduce time on the load board
- Available after a listing is posted
What’s New
- New Find Carriers button on the Manage Listings page
- Displays recommended carriers directly within the platform
- Allows faster assignment to a selected carrier
When to Use This Feature
- A listing is active but not receiving calls, bids, or carrier interest
- The shipper wants to proactively assign a carrier
- The shipper is a Premium Plan user
Find Carriers is NOT Available For
- Listings with non-U.S. origins or destinations
- Listings outside the supported price range (~$35–$20,000)
- Listings with a price per mile outside the supported range of $0.20–$25 (If the listing does not meet eligibility requirements, carriers will not be returned and the user may see an error message)
Step-by-Step Process
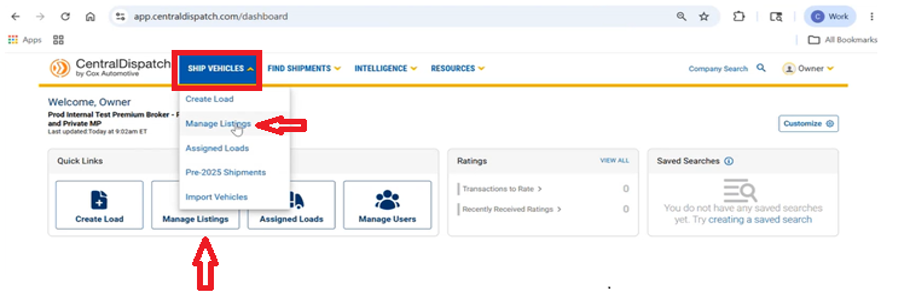
Step 1: Navigate to Manage Listings
- Log in to Central Dispatch
- Go to Manage Listings
- Via dashboard quick link OR
- Top navigation menu
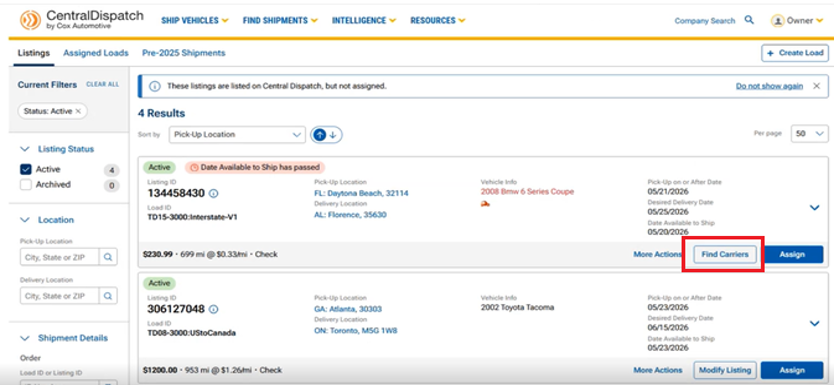
Step 2: Locate the Listing
- Find the listing you want to move
- Click “Find Carriers”
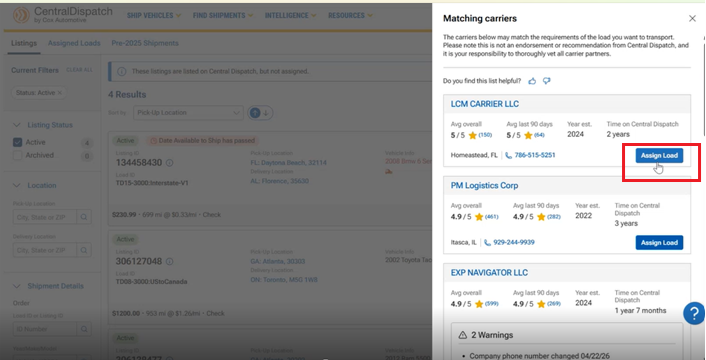
Step 3: Review Recommended Carriers
- The system displays up to 10 recommended carriers based on:
- Historical performance
- Lane data
- System insights
- Each carrier includes (For detailed information select a carrier from the list):
- Company details
- Contact information
- Ratings / Trust indicators
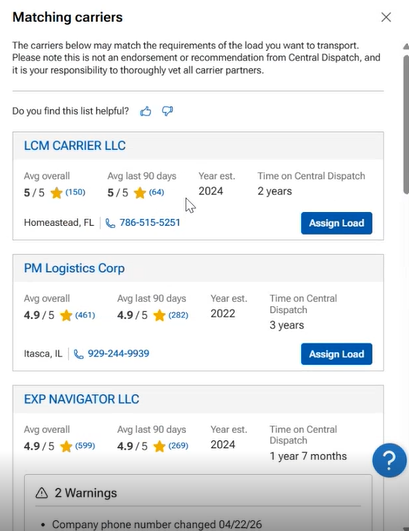
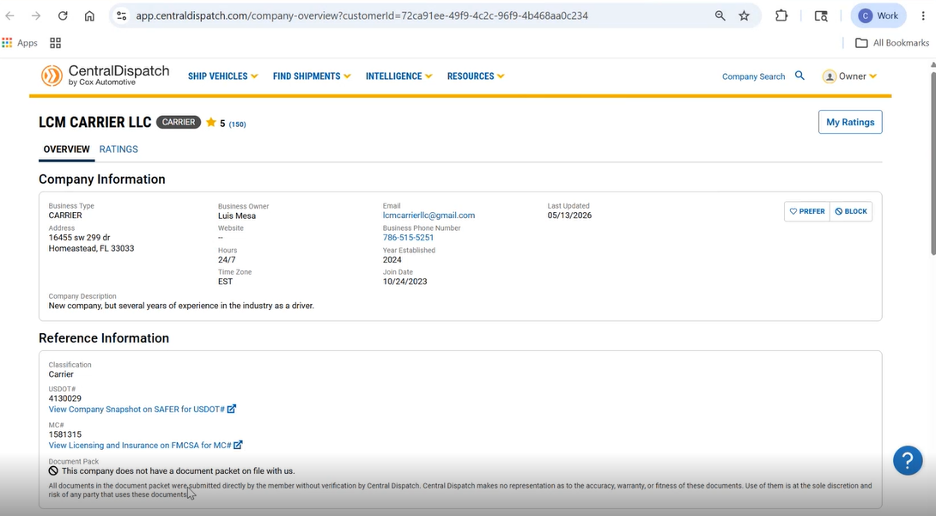
- Important:
- These are system-generated recommended carriers only
- Shippers must verify and vet carriers independently
Step 4: Assign Load to a Carrier
- Select a carrier from the recommended list
- Click “Assign Load”
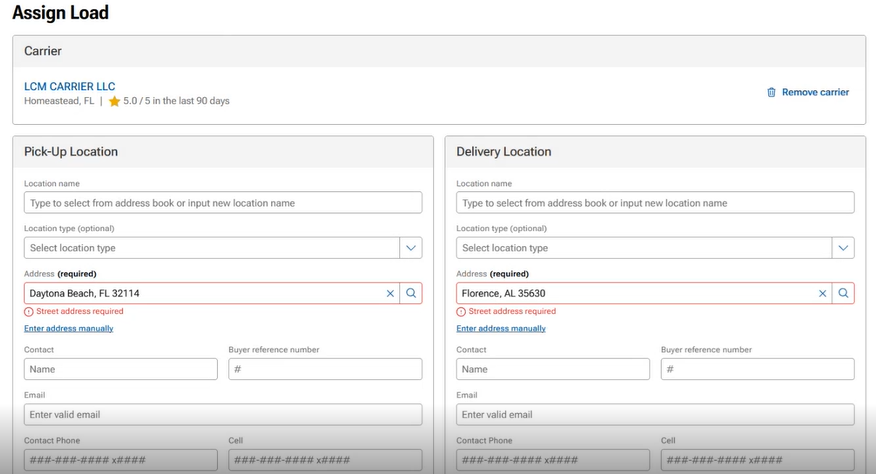
- System redirects to Assign Load page
- Shipper can view Pick-Up Location and Delivery Location information
- Shipper can view Pick-Up Location and Delivery Location information
Step 5: Complete Assignment
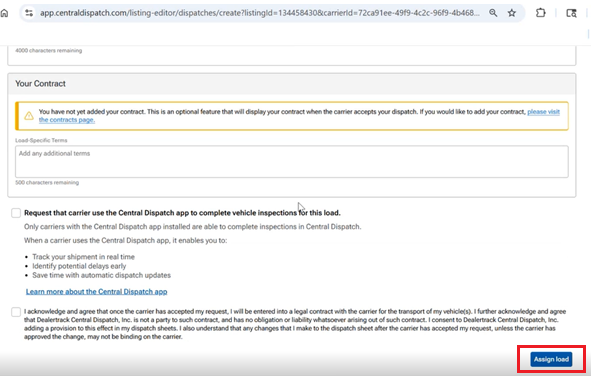
- Review pre-filled details
- Complete and confirm assignment by clicking Assign Load at bottom of the page
FAQs
Find Carrier is a tool available to Premium Shippers that recommends carriers for a listing based on historical data, lane activity, and system insights. It helps shippers to proactively identify carriers when a listing is not receiving enough engagement.
This feature is available exclusively to Premium Shippers as part of the Premium product offering.
Find Carrier helps shippers move from a passive approach of waiting for carriers to a more proactive approach by identifying and selecting potential carriers.
Shippers should use Find Carrier when their listing:
- Is active but not receiving calls or bids
- Needs additional visibility or engagement
- Requires a more proactive approach to finding carriers
Carrier recommendations are based on:
- Historical performance
- Lane activity and data
- System-driven insights
- Trust and reliability indicators
No. The carriers are recommendations only. Shippers are responsible for reviewing and verifying carriers independently before assigning a load.
No. This feature provides recommendations only and does not guarantee that a carrier will accept or complete the load.
The shipper is directed to the Assign Load page, where the carrier and listing details are automatically populated.
Yes. This enhancement is currently in progress and will allow shippers to remove carriers from their selection options.
Economic Insights from Central Dispatch
What we’re seeing
Based on recent activity from a broad sample across the Central Dispatch marketplace, transport prices per mile have risen from ~$0.75 earlier this year to $0.90+ in May, tracking recent increases in diesel costs.
Transport pricing trend
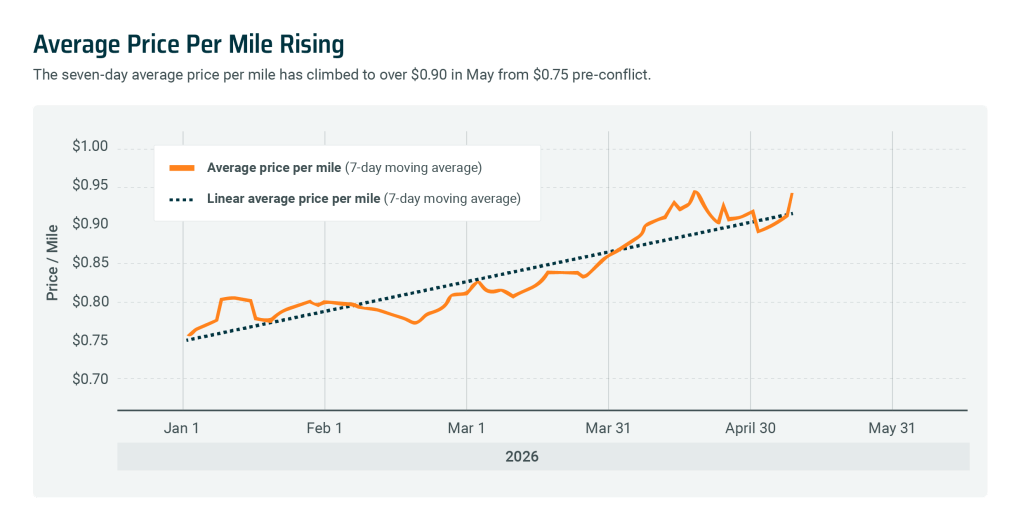
Transport pricing has increased steadily in recent weeks, reflecting higher operating costs driven by rising fuel prices.
Diesel vs. price per mile

Fuel costs are rising faster than transport rates, which may impact carrier margins and pricing strategies in the short term.
Monthly trends
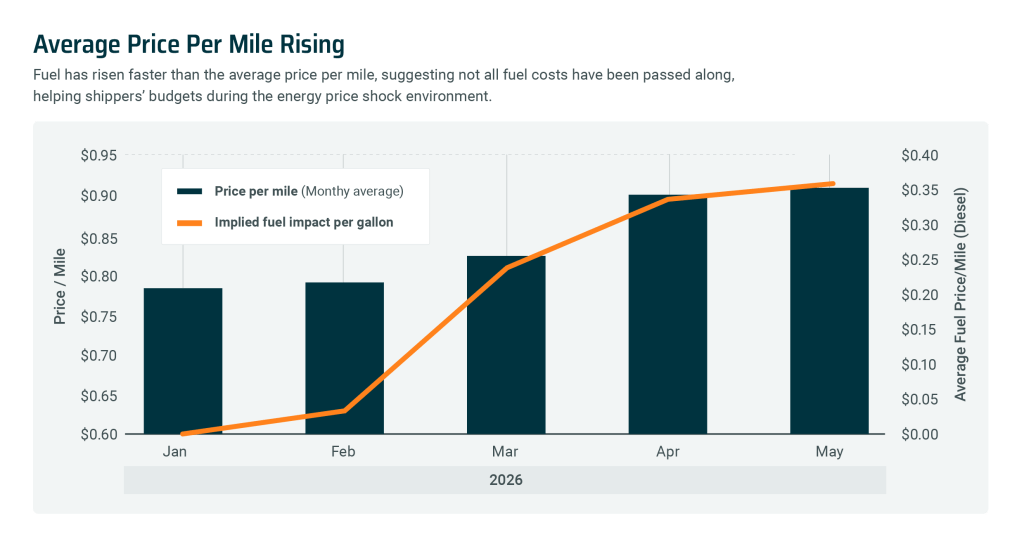
The sharpest increase occurred between March and May, aligning with recent diesel price increases.
What this means for you
- Transport costs remain elevated as fuel prices continue to fluctuate
- Carriers are absorbing part of the increase, rather than fully passing costs through
- Pricing conditions may remain dynamic in the near term
*Transport pricing reflects a representative sample of orders processed through the Central Dispatch marketplace and is adjusted to smooth short-term fluctuations. It may not reflect all marketplace activity.
In this month’s edition of Central Dispatch Highlights, we cover enhancements to Price Check, new dynamic rating windows, and more!
Rating windows now align with payment dates
We heard you: We’re moving away from fixed 14-day rating windows, to dynamic windows that adjust based on each load’s payment date. That means carriers can now rate shippers based on payment behavior and accurately capture their experience — giving everyone more clarity into each rating.
See the most relevant listings with new Price Check filters
Price Check’s new comparable listing filters help you focus on the listings that matter most. Just filter by trailer type or date to see the most relevant listings, and make faster, more informed decisions!
Read about our people-focused approach to AI
We’re using new AI technology to create tools like Price Check Plus that give you clearer data and smarter recommendations, so you stay in the driver’s seat.
There’s a moment every shipper and carrier knows well: The pause before setting a price or accepting a job. Is this rate too high? Too low? Will this vehicle sit on the load board for days, or get to my lot in time? Is the asking price competitive? Will it make money for my fleet?
For years, those questions were answered using gut instinct, a handful of recent comps, and luck. But with help from new AI insights, that’s changing — and it’s changing in a way that keeps shippers and carriers in the driver’s seat.
Pricing AI That Works with You
Central Dispatch is built on a foundation of real transactions between shippers and carriers: Millions of moves across every state, route, and market condition. It’s a huge part of why customers trust the platform.
Now, that same foundation of transportation data is powering something new: Price Check Plus, a tool that brings AI-driven pricing recommendations directly into the listing and load searching processes. But Price Check Plus doesn’t make decisions for you. It’s a guide — giving you clear, real-time information so you can make an informed decision with confidence and speed.
It’s a great example of what Cox Automotive Intelligence (CAI) means in practice. It’s not automation for automation’s sake. Price Check Plus leverages AI in a targeted way to solve a specific pain point for businesses, and help them work with greater efficiency and profitability.
How Price Check Plus Works
When you’re listing a vehicle or evaluating a load, Price Check Plus draws on millions of historical transactions to generate a pricing range for the load, and a recommended price within that range. It also generates an estimated time to dispatch, helping you understand the tradeoff between pricing higher and waiting longer, versus pricing competitively and moving faster.
With this information available with a single click, carriers can instantly see if a load’s asking price is competitive and decide if it’s worth it for their business, while shippers can easily balance their timing and budget needs.
Built on the Most Complete Transportation Data Available
AI is only as trustworthy as the data behind it, and Price Check Plus is powered by millions of real-world transactions and shipping outcomes from the Central Dispatch marketplace. Not estimates, but the actual prices loads were listed at, the prices they were dispatched at, and how long each took to move.
That breadth of data matters because transportation isn’t uniform. Routes vary. Trailer type availability fluctuates. Market conditions change week to week. Both shippers and carriers can trust these pricing recommendations because they dynamically reflect the full complexity of what’s happening in the marketplace, not just a simplified average.
Fewer Surprises, More Consistency
One of the most consistent frustrations in vehicle transport isn’t the big disruptions, it’s the small friction points that add up: Conflicting information, unexpected delays, uncertainty about whether a load will move.
Price Check Plus reduces that friction, giving both shippers and carriers access to the same quality of market data. Context becomes clearer. Timelines become more realistic. There’s less guesswork, and expectations on both sides of the transaction become more aligned.
That’s not a small thing. Predictable outcomes build trust, and trust is what keeps a marketplace healthy.
Human Oversight and Transparency
It’s worth reiterating that Price Check Plus is simply a recommendation tool. The AI shows you its read of the current market. You decide what to do with that read.
Plus, the tool doesn’t supply recommendations without context. You get full transparency into what loads and data points went into them. You can filter the comparable loads by date range, trailer type, and route, and look at each load’s listed price vs. its final dispatched price.
AI Across the Cox Automotive Ecosystem
Price Check Plus is just one part of a broader commitment at Cox Automotive to embed practical, outcome-focused AI throughout the tools that you rely on. Whether it’s market insights at Manheim, or transport pricing at Central Dispatch, the goal remains consistent: Clear data and smart recommendations that keep you in final control of decision-making.
Ready to Upgrade?
Price Check Plus is available as a standalone add-on for carriers, or as part of the Central Dispatch Premium plan for shippers.
Current Customers
Upgrade through your account or reach out to your Performance Manager to learn more.
New to Central Dispatch?
Control who can access certain features and shipping information for enhanced security with User Management. View the full list of permissions and actions available to each role.
Take control of your Central Dispatch User Management. Watch the video to learn how.
We heard you. More fair and balanced rating windows are here!
We’ve made an important fairness and trust improvement to our Transactional Ratings system, one driven directly by carrier feedback.
With the introduction of dynamic rating windows, Central Dispatch now automatically adjusts the rating period based on the load’s payment terms. That means carriers can now rate shippers after payment is due, ensure ratings reflect payment behavior, and more accurately capture their experience.
You may notice that rating windows vary from one load to another. That’s by design. Each window is tailored to match the agreed-upon payment terms, creating a more balanced and fair system for everyone involved. Most importantly, this update reflects real-world payment experiences and creates more transparency across the marketplace.
Learn more about Transactional Ratings here.
Esta guía también está disponible en ingles. Acceda a la versión en ingles aquí.
Central Dispatch está comprometido a ofrecer recursos educativos y valiosos que ayuden a los clientes a aprovechar al máximo su experiencia en la plataforma y a operar sus negocios de manera más eficiente. Si prefieres leer este contenido en otro idioma, la mayoría de los navegadores web ofrecen herramientas de traducción integradas que puedes usar en cualquier momento.
A continuación, encontrarás enlaces a las guías oficiales de los navegadores con las instrucciones más actualizadas.
Chrome:
- Usa el ícono de traducción
 en el lado derecho de la barra de direcciones o desde el menú de Chrome ⋮
 - O haz clic derecho en cualquier parte de la página y selecciona “Translate”
- Para obtener instrucciones más detalladas, consulta la guía de soporte de Chrome aquí: https://support.google.com/chrome/answer/173424
Edge:
- Usa el icono de traducción
 en la barra de direcciones
 - Según la configuración de tu navegador, este puede detectar automáticamente el idioma de la página y mostrar un menú para que confirmes la traducción
- Para obtener instrucciones más detalladas, consulta la guía de soporte de Edge aquí: https://support.microsoft.com/en-us/topic/use-microsoft-translator-in-microsoft-edge-browser-4ad1c6cb-01a4-4227-be9d-a81e127fcb0b
Safari:
- Usa el icono de traducción
 en el campo de búsqueda inteligente (barra de direcciones) o desde el ícono del Lector de Safari
 - Para obtener instrucciones más detalladas, consulta la guía de soporte de Safari aquí: https://support.apple.com/en-lb/guide/safari/ibrw646b2ca2/mac
Firefox:
- Usa el icono de traducción
 en la barra de herramientas o selecciona “Translate page” desde el menú
 - O resalta el texto que deseas traducir, haz clic derecho y selecciona “Translate selection to…” desde el menú
- Para obtener instrucciones más detalladas, consulta la guía de soporte de Firefox aquí: https://support.mozilla.org/en-US/kb/website-translation
This guide is also available in Spanish. Access the Spanish version here.
Central Dispatch is committed to providing educational, insightful resources that help customers maximize their platform experience and run their businesses more efficiently. If you prefer to read this content in another language, most web browsers offer built‑in translation tools you can use at any time.
Below are links to official browser guides with the most up‑to‑date instructions.
Chrome:
- Use the Translate icon on the right side of your address bar or via the Chrome menu ⋮
- Or right click anywhere on the page and select “Translate”
- For more detailed directions, view the Chrome support guide here: https://support.google.com/chrome/answer/173424
Edge:
- Use the translate icon in the address bar
- Depending on your browser settings, the browser may automatically detect the language of the page and a menu will appear asking you to confirm
- For more detailed directions, view the Edge support guide here: https://support.microsoft.com/en-us/topic/use-microsoft-translator-in-microsoft-edge-browser-4ad1c6cb-01a4-4227-be9d-a81e127fcb0b
Safari:
- Use the translate icon in the Smart Search field (address bar) or via the Safari reader icon
- For more detailed directions, view the Safari support guide here: https://support.apple.com/en-lb/guide/safari/ibrw646b2ca2/mac
Firefox:
- Click the translation icon in the toolbar or select “Translate page” from the menu
- Or highlight and right-click the text you want to translate, and select “Translate selection to…” from the menu
- For more detailed directions, view the Firefox support guide here: https://support.mozilla.org/en-US/kb/website-translation
Learn about the authenticator app, updates to the carrier app, how to share your feedback, and more in this edition of Central Dispatch Highlights.
Securely Sign In to Central Dispatch with the Authenticator App
The authenticator app gives you a secure way to complete multi-factor authentication and access your account without having to rely on email or SMS codes.
Do More in the Carrier Mobile App
Carriers can now add incremental expenses and view the eBOL directly from the mobile app! This helps carriers manage invoices, add new charges in real-time, and easily and dynamically access inspection details from anywhere, while making bills more transparent for shippers.
View Shipper Scorecards from the Search Results Page
Make more confident decisions, in fewer clicks. Carriers can now view any shipper’s scorecard from the search results page!
Share Your Feedback!
Help us shape the future of our highlights newsletter by sending us your feedback! We want to make these updates as informative and useful as possible for our customers. So suggest a topic, ask a question, or just provide general feedback.
