

Carriers will now be able to accept a load or decline a dispatch in the status of Not Signed on the mobile app instead of going through CentralDispatch.com. This enables additional functions in addition to current function of updating loads and taking inspections photos.
Note: Users with a Driver role will not have access to accept dispatches on the mobile app or see loads in the Not Signed status.
Viewing Dispatch Offers from Email Notification
When a shipper sends a new dispatch offer to a carrier, the carrier is sent an email notification with a View Dispatch link.
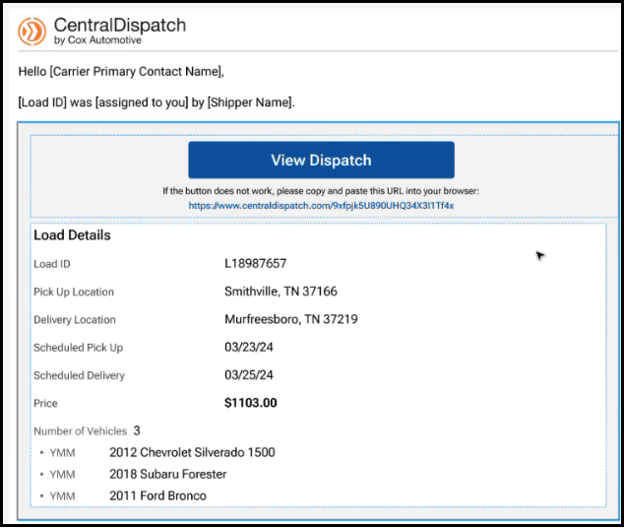
- If the carrier has the CD Mobile App downloaded, then clicking on the View Dispatch link opens the load on the Mobile App for the carrier to Accept Load or Decline the offer. Note: The Accept Load button will be updated to say ‘Accept Load’
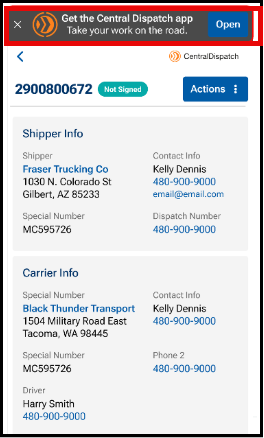
- If the carrier has not downloaded the CD Mobile App, then from the email, when the carrier clicks View Dispatch, they will be redirected to the web version of the Load Details page to view the load and click the Actions menu to accept the load.
Note: A banner will appear on the page to encourage the carrier to download the app.
Viewing Dispatch Offers on the CD Mobile App
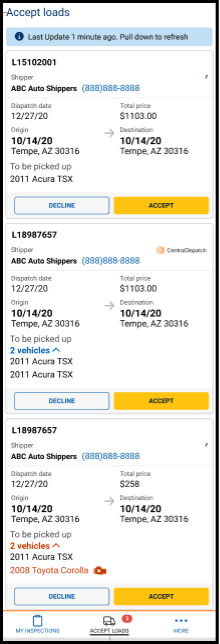
An Accept Loads tab is available at the bottom of the CD Mobile App to display offers from shippers.
- The Accept Loads tab has a bubble displaying the number of offers.
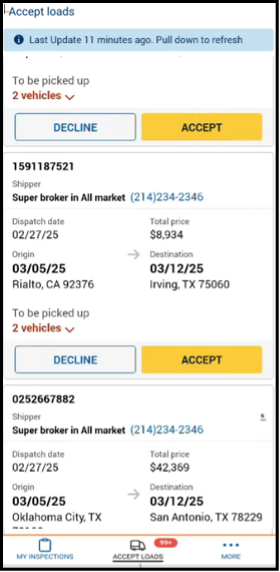
Note: If there are no offers, then the Accept Loads tab is empty when it is opened.
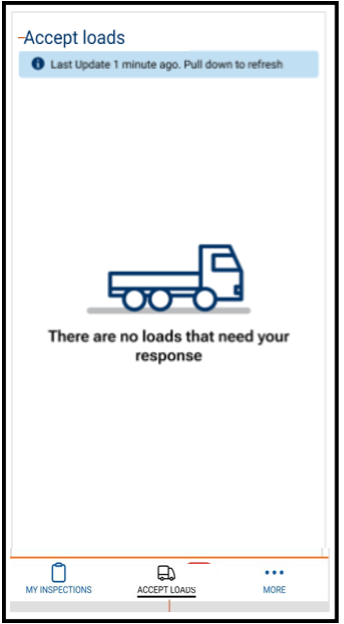
From the mobile app, the carrier is able to Accept or Decline offers.
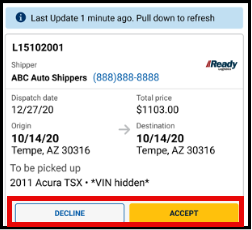
Accepting the dispatch from the mobile app
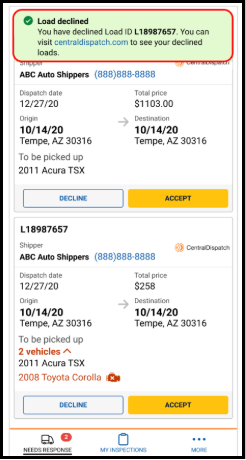
The Accept Loads tab displays a list of dispatches offered that need to be accepted or declined.
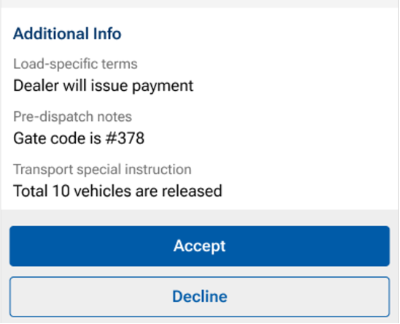
The carrier can click on the Accept Load button, the Load number, or the Decline button.
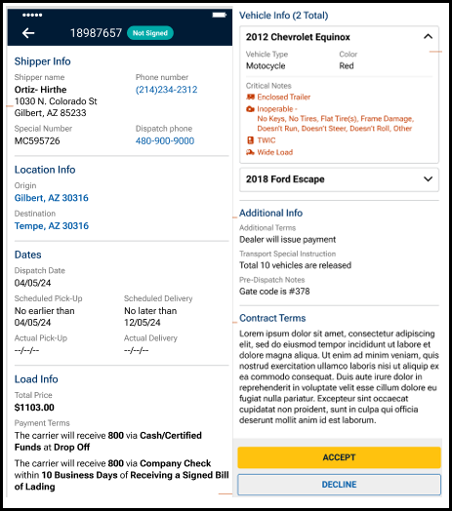
- A Not Signed status is displayed.
- Shipper information is presented in collapsible sections to show more/show less information for additional contact details
- Locations are tappable to open in map view
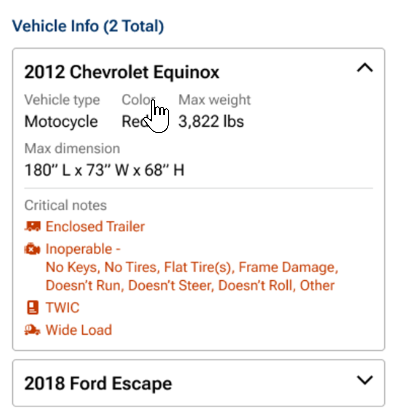
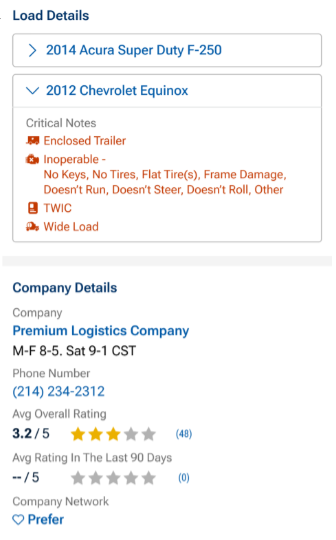
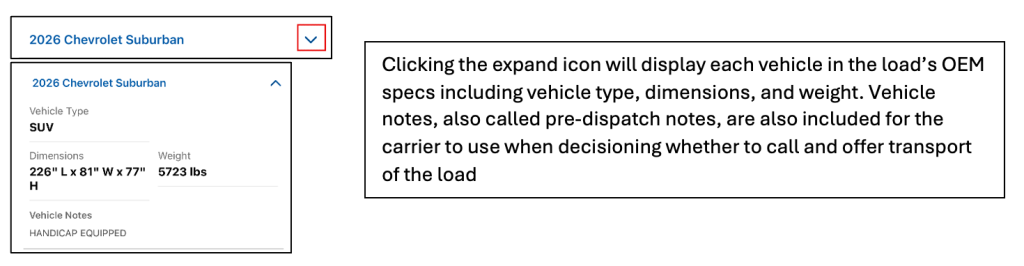
- Vehicle info has an expandable vehicle card displaying year, make, model, and critical notes.
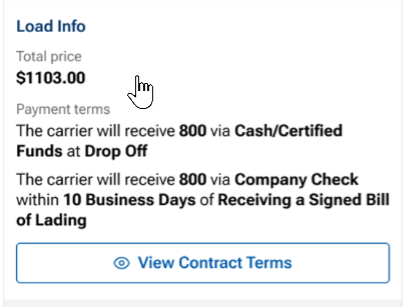
- View Contract Terms button is available. Contract Terms are accessible via a bottom-sheet modal triggered by a “View Contract Terms” button, rather than inline on the page.
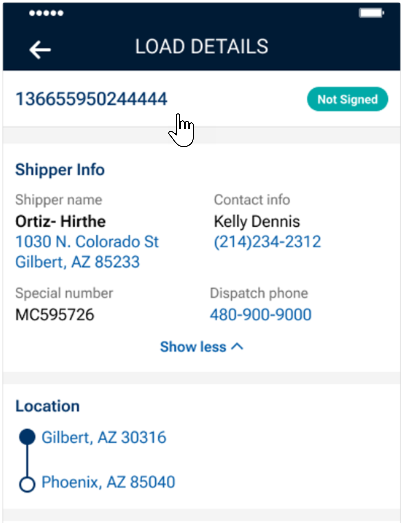
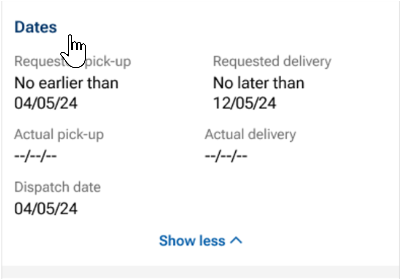
Accept Load
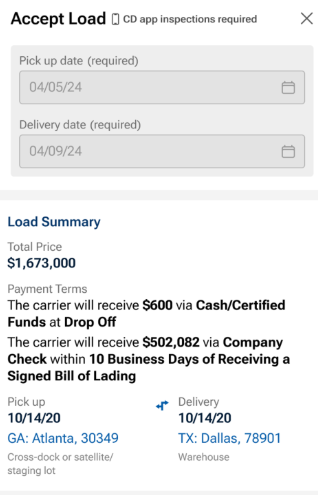
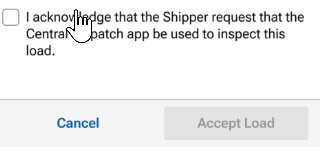
If the carrier clicks the Accept Load button, then the Load details screen appears for the carrier to review and acknowledge the terms and then click Accept Load.
- Flag is displayed informing carrier that shipper requires an inspection with CD mobile app
- Pick-up and Delivery locations are tappable to open map view
- Vehicle information is expandable to view year, make, model and critical notes
- Company details include contact information for shipper, ratings, ability to mark shipper as a preferred shipper, and warnings pulled from the FMCSA checklist
- The Accept Load button is disables until the carrier has scrolled to the button of page to review all information
Result:
- A confirmation message appears confirming that the load has been accepted or the load has been declined

Offline status
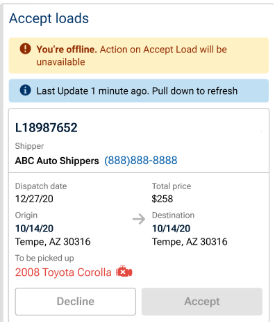
- Carriers now see an offline banner with the last connection time instead of a blocking full-screen modal.
- All action buttons are disabled while the device is offline.
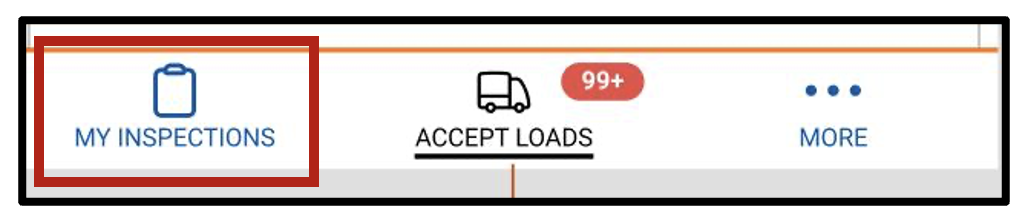
On the CD Mobile App under the My Inspections tab, the load is now available.
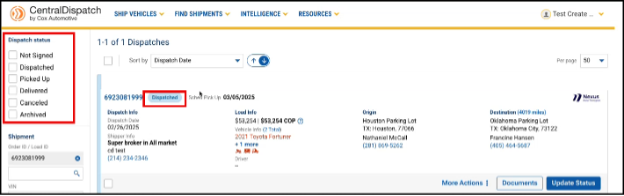
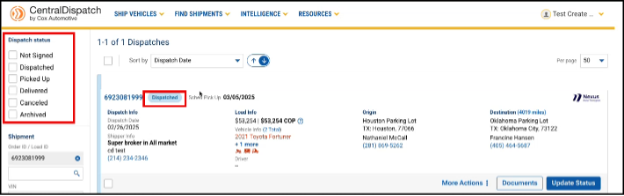
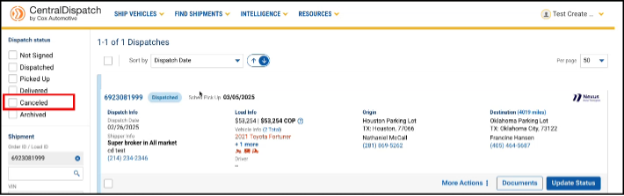
On Centraldispatch.com, on the Dispatches page, the load moves from the Not Signed status to the Dispatched status.
- If the carrier clicks on the load number on any of the offers, then the following additional information about the load displays for review.
- Shipper Information
- Location Information
- Load Dates
- Load Information
- Vehicle Information
- Notes
- Contract Terms
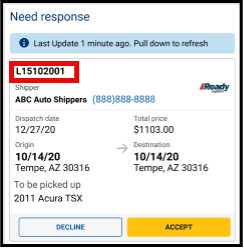
Note: The same information that appears on centraldispatch.com when accepting a load is visible on the mobile app.
- If the carrier clicks the Accept Load button, then a confirmation that load was accepted displays.

- On the CD Mobile App under the My Inspections tab, the load is available.

- On Centraldispatch.com the load moves from the Not Signed status on the Dispatches page to the Dispatched status
- If the carrier clicks on the Decline button
- The carrier will get a screen to confirm they want to decline the load.
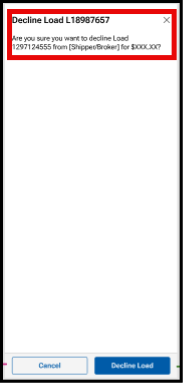
- A confirmation screen will appear, and the status of the load will change from Not Signed to Cancelled. Cancelled dispatches are not visible on the CD mobile app but display on the Dispatches page in centraldispach.com.
Invoices just got easier for carriers, and more transparent for shippers. Carriers can now add incremental expenses right from the mobile app! Whether it’s an unexpected toll, storage fee, or other incidental cost, any charge can be quickly and easily attached to an invoice in real-time, ensuring all expenses are clearly documented and instantly visible to shippers. All in one centralized platform!
No more off-platform communication or confusing bills. Carriers can just open the app, navigate to a load details page, and add a charge with a few taps. Plus, built-in notifications keep both parties up-to-date on invoice changes, while editable charges provide flexibility when updates are needed.
In addition, carriers can now more dynamically interact with the eBOL in the Central Dispatch app, bringing the same functionality available in the web experience. Now, there’s no need to transition back and forth from the web experience to view and interact with inspection data and photos while on-the-go.
View the step-by-step guides on adding invoices and viewing eBOL, and download the Central Dispatch mobile app today!
Allowing carriers to add incremental expenses to an invoice on the Central Dispatch Marketplace from the mobile app provides transparency and allows carriers to manage their entire book of business on Central Dispatch, including incidental charges.
1. Carriers are able to add incremental expenses from the mobile app.
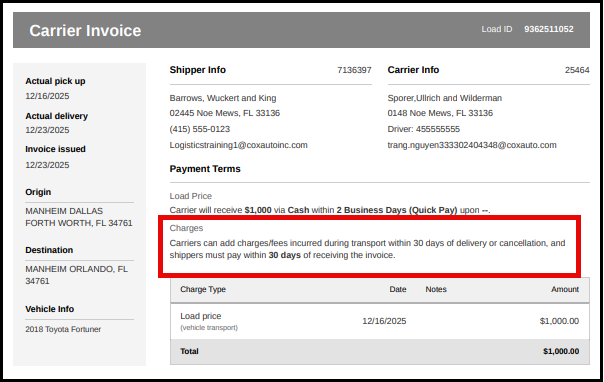
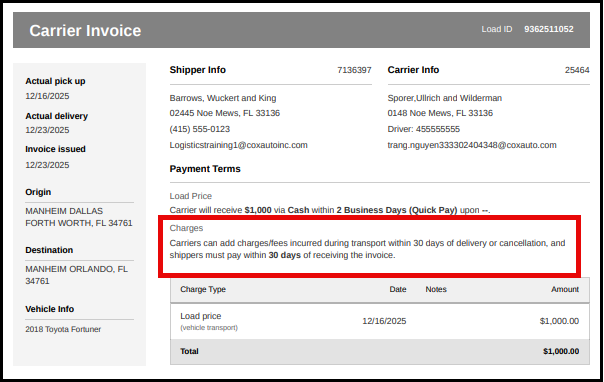
Carriers can add an expense to an invoice up to 30 days after delivery or cancellation
- Adding expenses from the mobile app:
- From the Load Details screen, users with the role of Owner, Admin, and Driver can click the More menu button, and then click Manage Charges from the drop down.
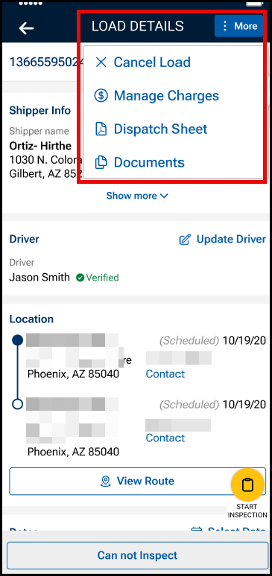
- From the Load Details screen, users with the role of Owner, Admin, and Driver can click the More menu button, and then click Manage Charges from the drop down.
- Click the +Add a Charge button to add an expense to the invoice
- Users can add up to 8 expenses per invoice
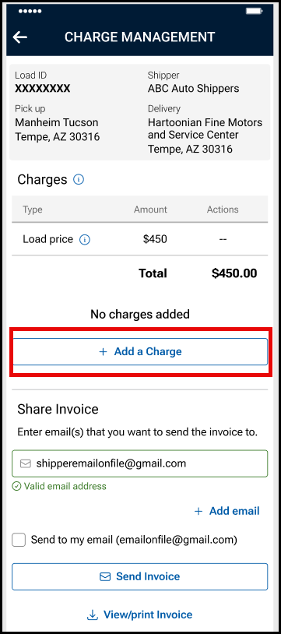
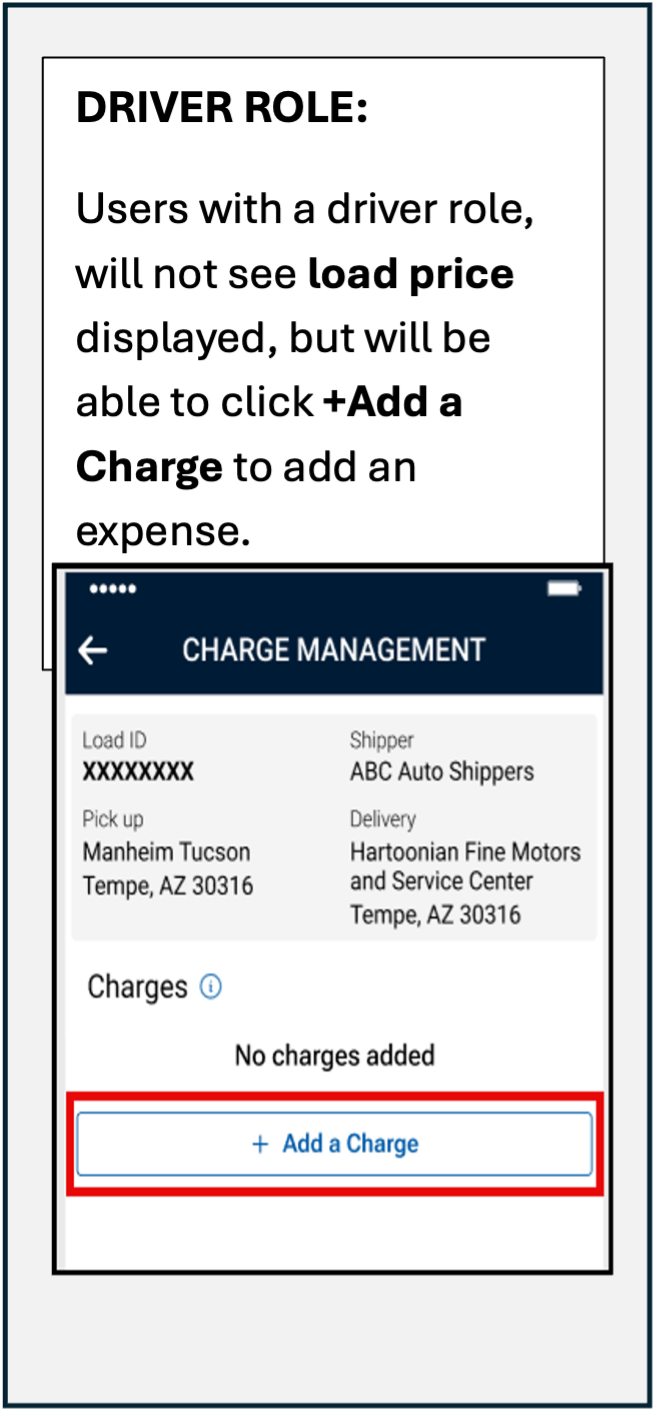
- Users can add up to 8 expenses per invoice
- Use the drop down menu to select the Charge type
- An option of “other” is available in the drop down
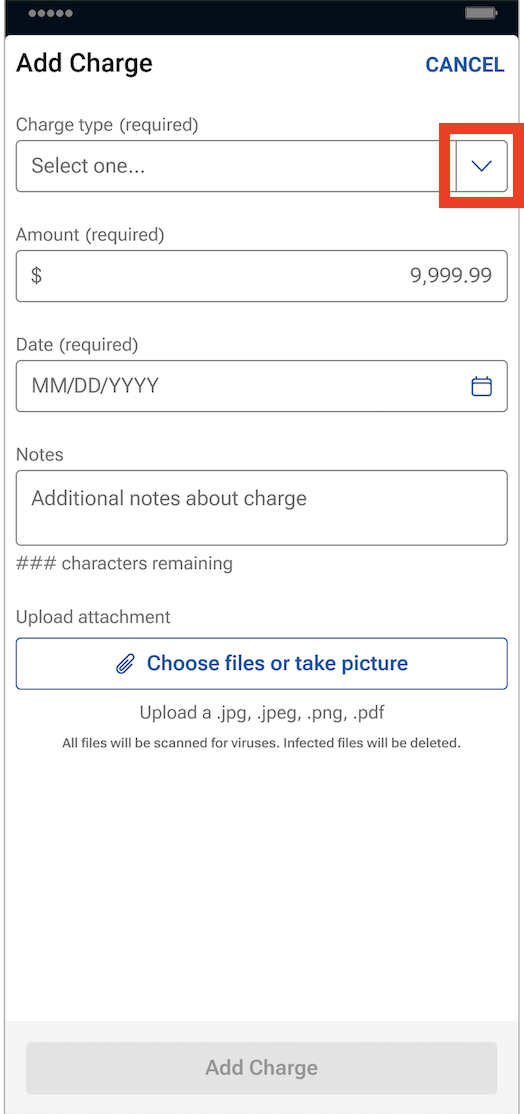
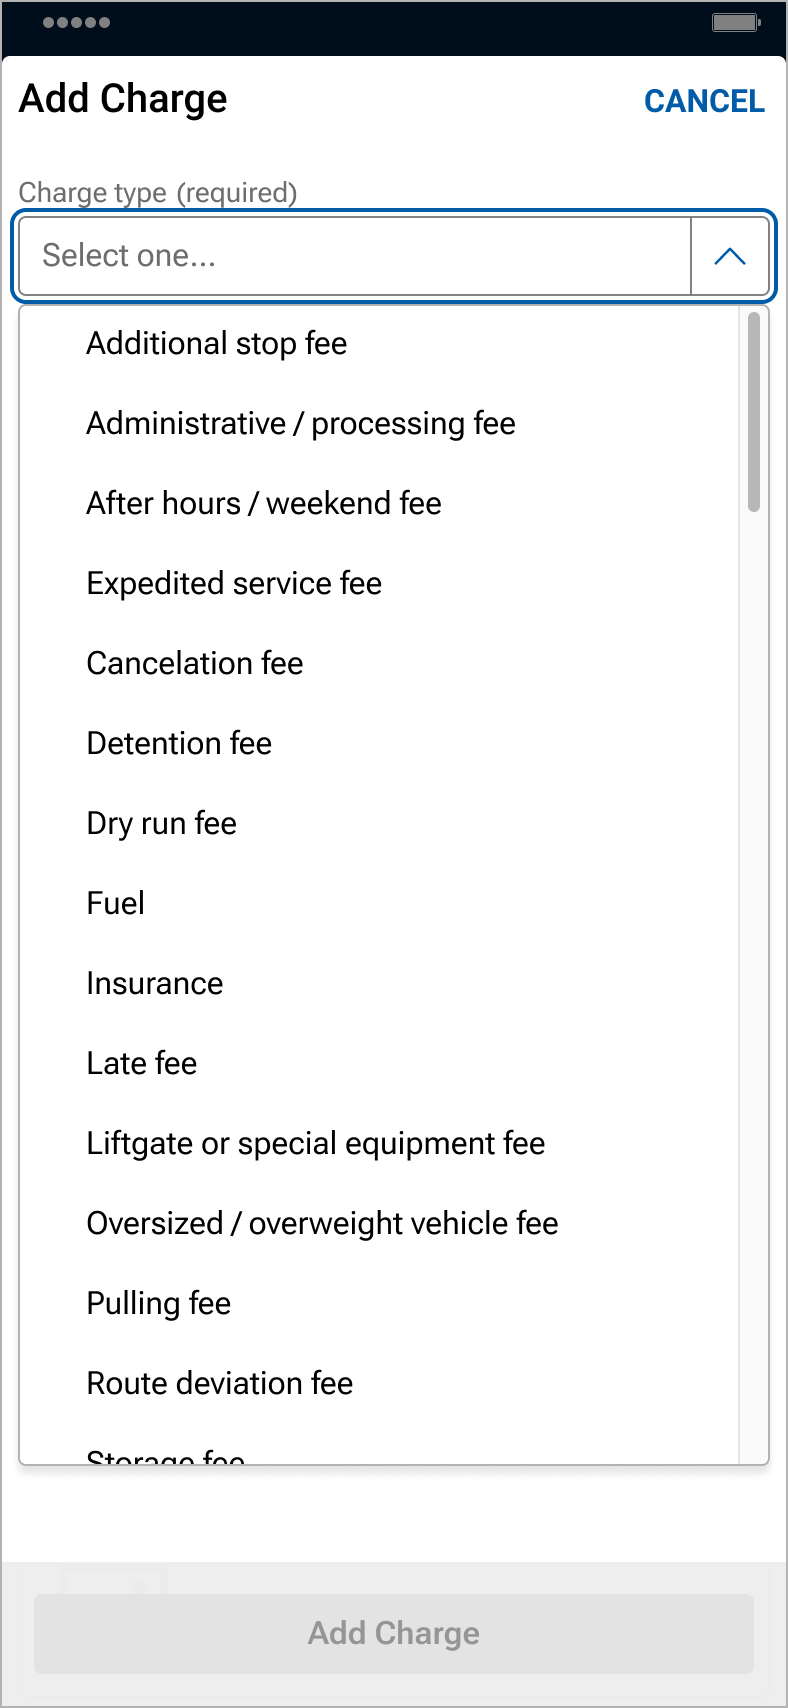
- An option of “other” is available in the drop down
- Enter expense information, including the charge name, the amount and date of the expense, and then click Add Charge
- The additional notes field is optional
- Up to 5 files can be uploaded from your files, camera roll, or by taking pictures
- NOTE: Back-up documentation can also be uploaded and added in Central Dispatch.com.
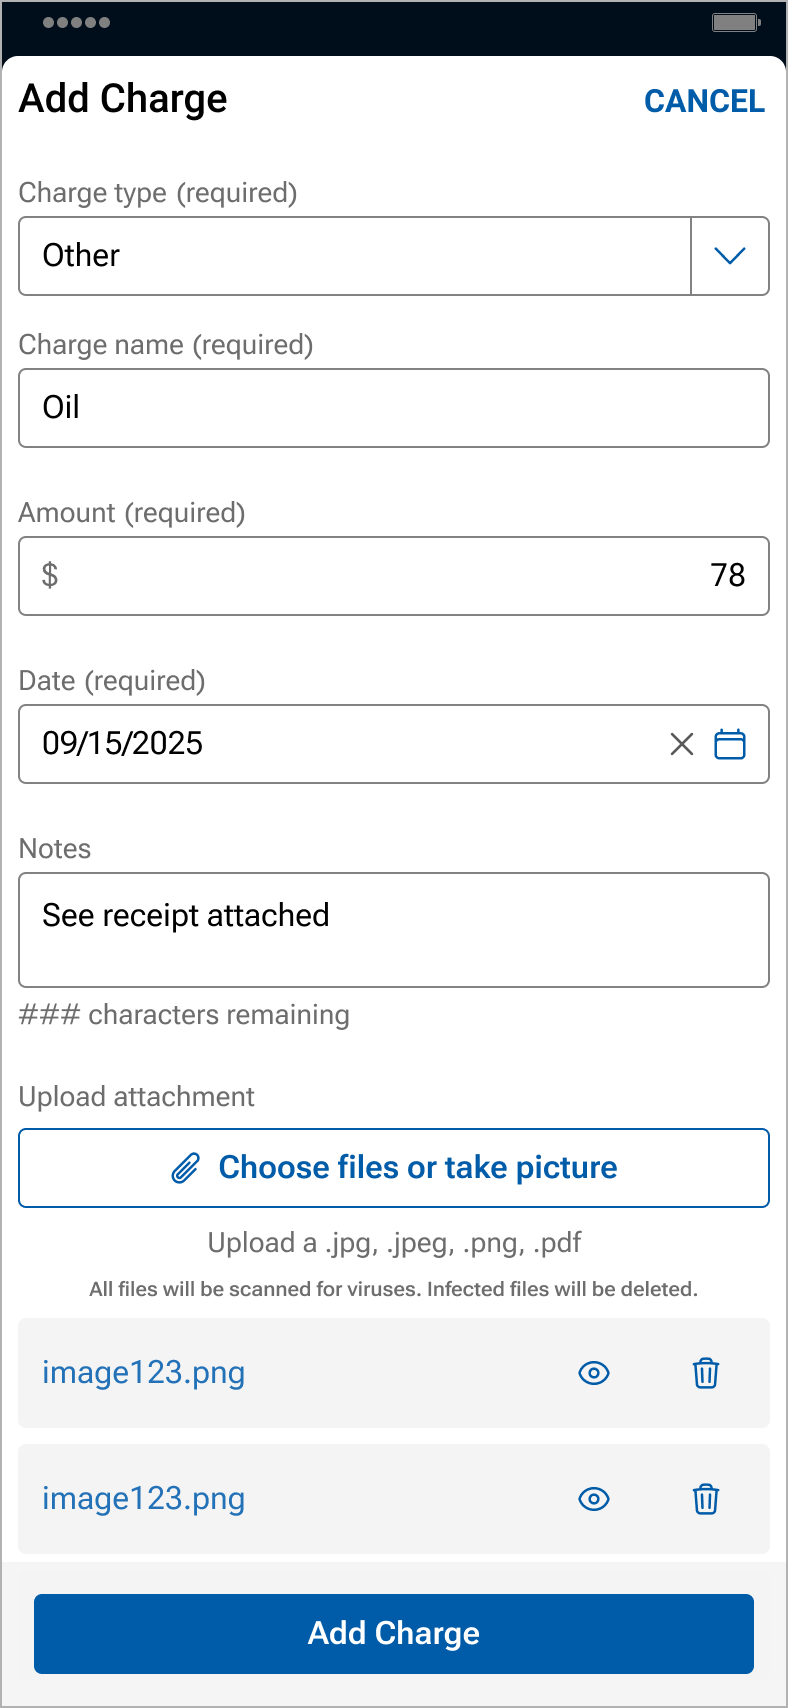
- NOTE: Back-up documentation can also be uploaded and added in Central Dispatch.com.
- Invoices, including expenses, can be viewed by the shipper and carrier on the web browser and the mobile app
- Carriers can delete or modify an expense by clicking on the icon in the expense line
- Carriers can email, download, view, or print the invoice
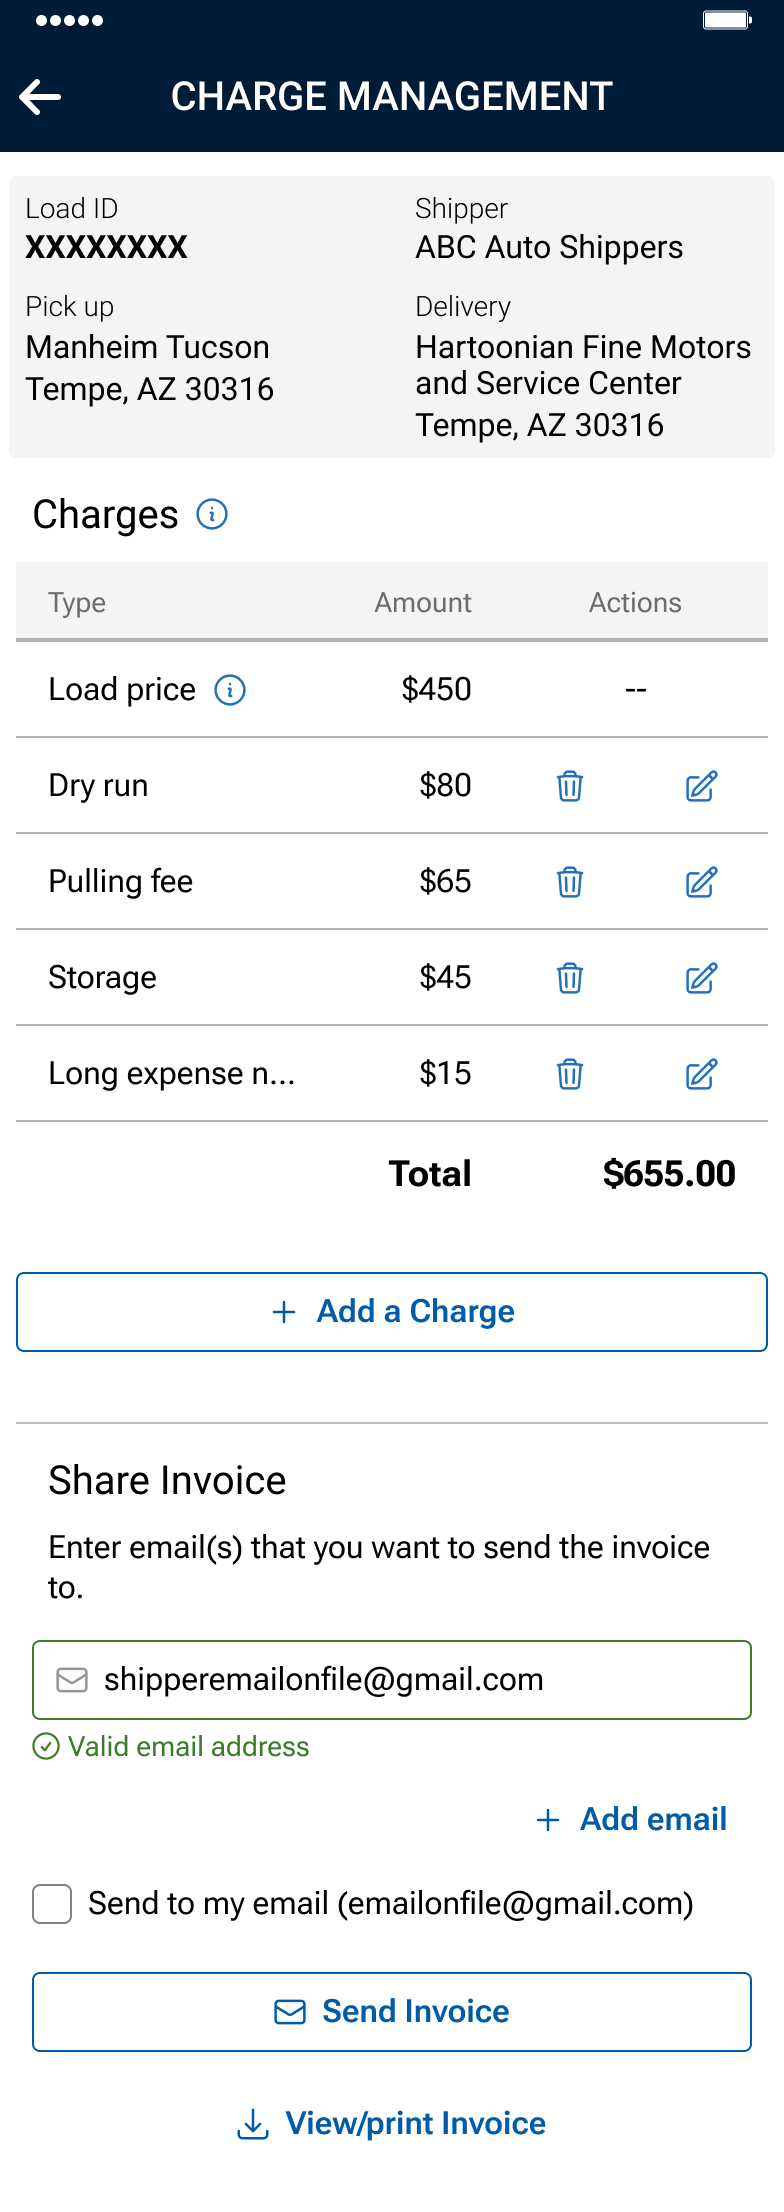 Driver role: Will not display load price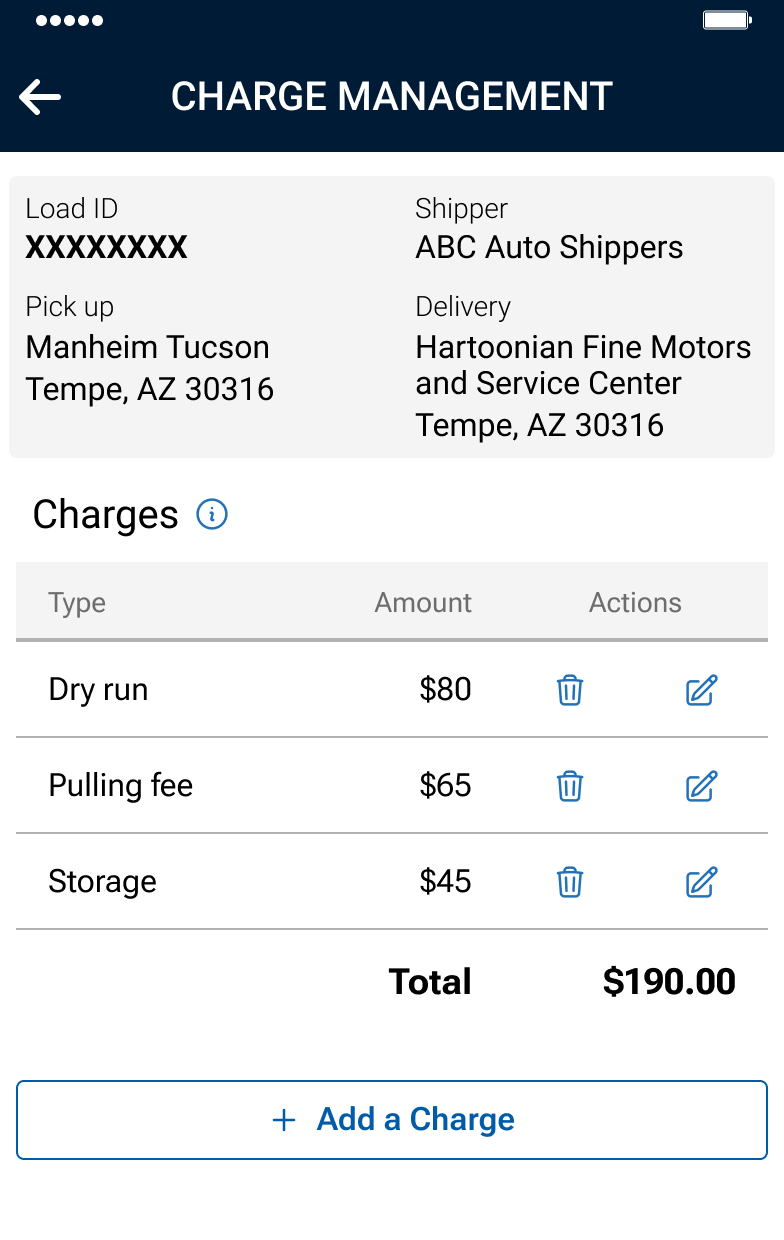
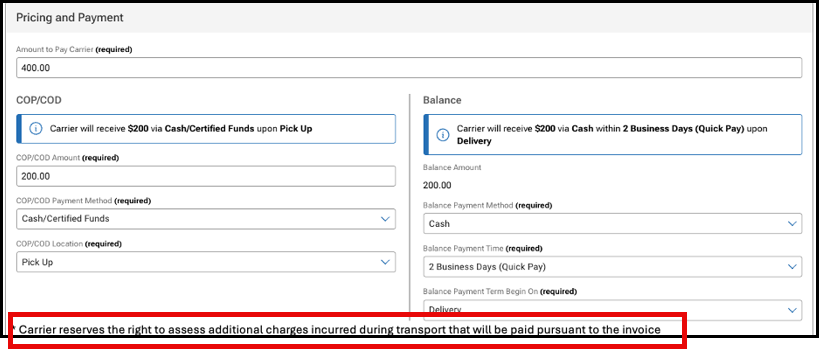
2. When creating loads or dispatching, a notice is displayed to the shipper regarding the carrier’s right to add expenses to the load.
Carriers reserve the right to assess additional charges incurred during transport that will be paid pursuant to the invoice.
3. A disclaimer will display on the invoice notifying carriers and shippers about adding expenses and the timing
NOTE: Users with a Driver role will not see load price when viewing the invoice
FAQs
Carriers on occasion incur expenses when transporting vehicles, and we want to provide a process on the platform to add transparency for both shippers and carriers rather than communicating the expenses off platform
Adding expenses to an invoice on the web will be a fast follower. Expenses can only be added by a carrier from the Central Dispatch mobile app to start.
Yes, expenses are added based on the load, not individual vehicles in a load.
Expenses are added to the load rather than to a specific vehicle in a load. You are able to add a note when adding expenses, and can indicate the Vin the expense is associated with in that field.
If the shipper does not agree with an expense that was submitted, we encourage them to reach out to the carrier directly to discuss the expense.
If the shipper does not pay the expense, we encourage the carrier to reach directly to the shipper to discuss as they currently do with load payment.
There is not a dispute process since Central Dispatch is not party to the transaction. We encourage the carrier and the shipper to work together to resolve any questions regarding expenses.
If you are not able to resolve the dispute with the other party to the transaction, you can include details in the rating system if the rating window is open. If you do not want to do business with the shipper or carrier in the future, you are able to put the company on your blocked list.
Yes, the carrier can delete or modify an expense from the load page on the mobile app for up to 30 days after the load is delivered or cancelled. The shipper is not able to delete or modify an expense.
The carrier can add expenses up to 30 days after the load has been delivered or cancelled. This information is displayed on the invoice.
Download the app today!

|

|
Digital tech has brought so many changes to automotive transportation. So why manage loads the same old way? The Central Dispatch carrier app puts some of the most critical platform features right at your fingertips, helping you work with more speed and ease, from anywhere you need to.
NEW: Find Loads On-the-Go
You don’t need to be at the office to keep your trucks full and moving. The mobile app brings all your favorite load board features into a simplified mobile interface, so you can find, apply for, and secure profitable shipments from anywhere.
Search for loads with a specific origin and destination, look along your preferred routes, and enjoy all the same filters available in your desktop workflow. Learn more about searching for loads in the app here.
Instant Delivery Updates
Forget the back-and-forth phone calls. The carrier app’s Real-Time Tracking feature lets you send live delivery and status updates straight to a shipper’s desktop or mobile phone!
Just enable Real-Time Tracking in the app’s “Settings” menu, and shippers will see the exact location of their vehicle on an interactive GPS map, and receive automatic pickup and drop-off updates. There’s no better way to give customers more transparency and peace-of-mind.
Faster Inspections
Vehicle inspections are one of the most critical parts of any logistics operation, and now they can be the smoothest, most efficient part too! The carrier app lets drivers complete the entire inspection process from start to finish, right from the convenience of their phone.
Simply take photos, mark damages, write notes, and collect signatures — all in one smooth and intuitive process. Whether picking up or dropping off, your drivers will be able to quickly get vehicles verified and get back on the road.
Shippers can even request that inspections be completed on the app directly from the dispatch experience in order to streamline the process for everyone.
Easier EBOL Sharing
Stay flexible on the road. With dynamic EBOL viewing and sharing available right in the app, you can keep shipments running smoothly from anywhere. All you need is the shipper’s email address, and you’re ready to seamlessly send over documents and shipment updates for stronger, easier connections with customers.
Add Expenses
The mobile app lets you add incremental expenses for greater transparency with shippers, and easier bookkeeping on-the-go. Just add a new charge, fill out all the details, and the invoice will be updated automatically.
Manage Loads from Anywhere
With inspections, load search, tracking, and document sharing all in your pocket, the Central Dispatch carrier app helps carriers stay efficient and connected on the go. Start managing your loads with more speed and simplicity today — download and try out the app!
Want to learn more about the Central Dispatch carrier app? Watch the demo video >
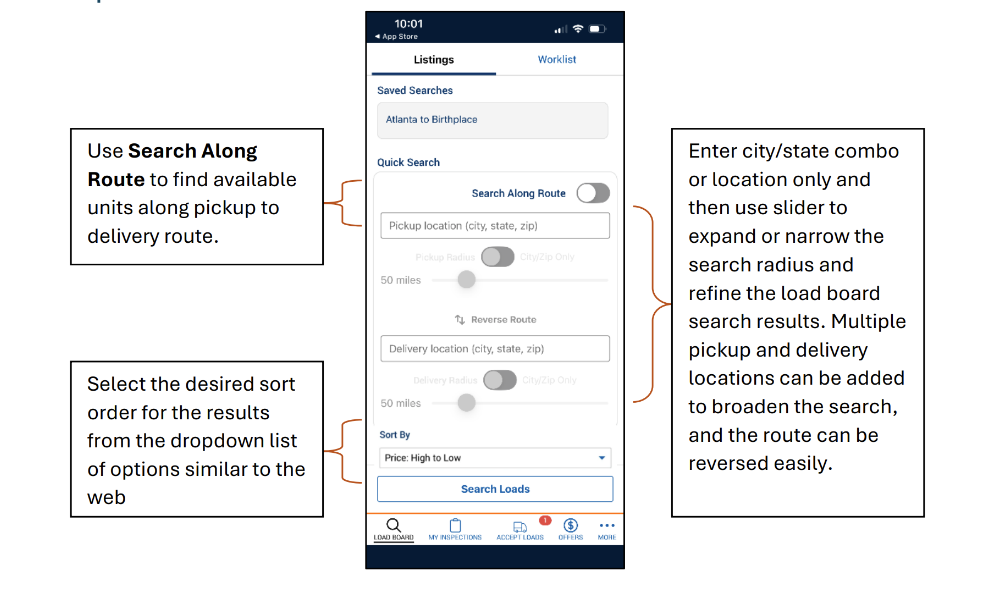
The Search feature in the Mobile App is similar to the web functionality. This provides carriers with a single source to handle most of their transportation tasks.
Navigating the Load Board from the Mobile App
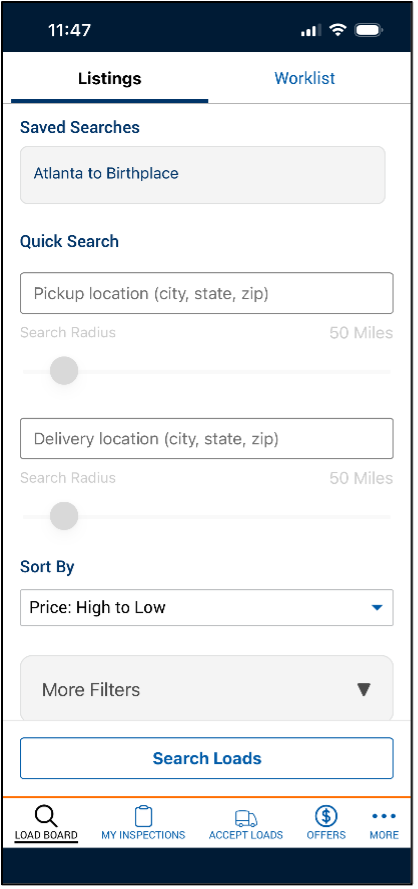
- To open the load board, use the Load Board icon in the menu bar at the bottom of the Mobile App screen.

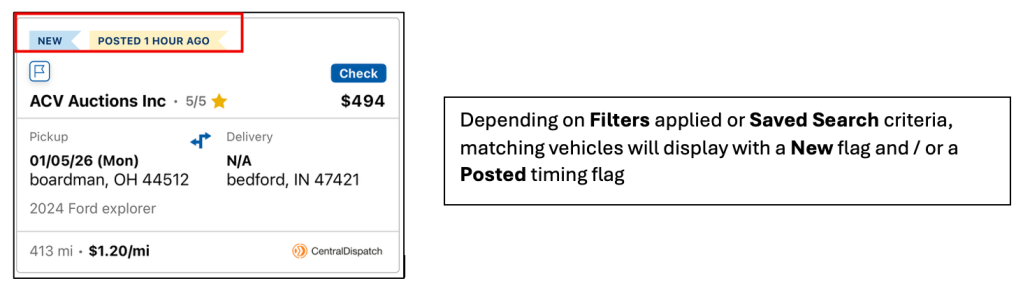
- From the Listings tab, find loads by selecting a saved search, adding filters, or simply by clicking Search Loads.
Filter Options:

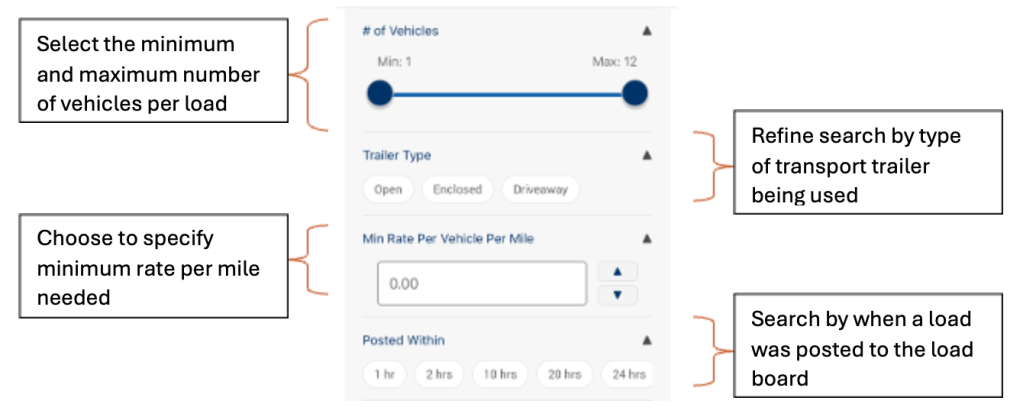
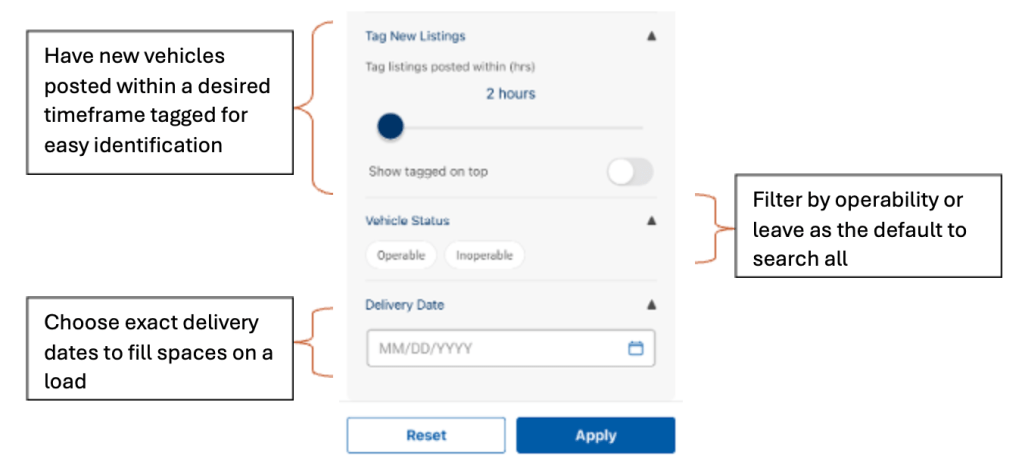
- Once filters are applied and results are visible, then they can be removed by clicking the Filter & Sort button to make changes or by using the X next to the applied filter that needs removed.

Understanding Search Results
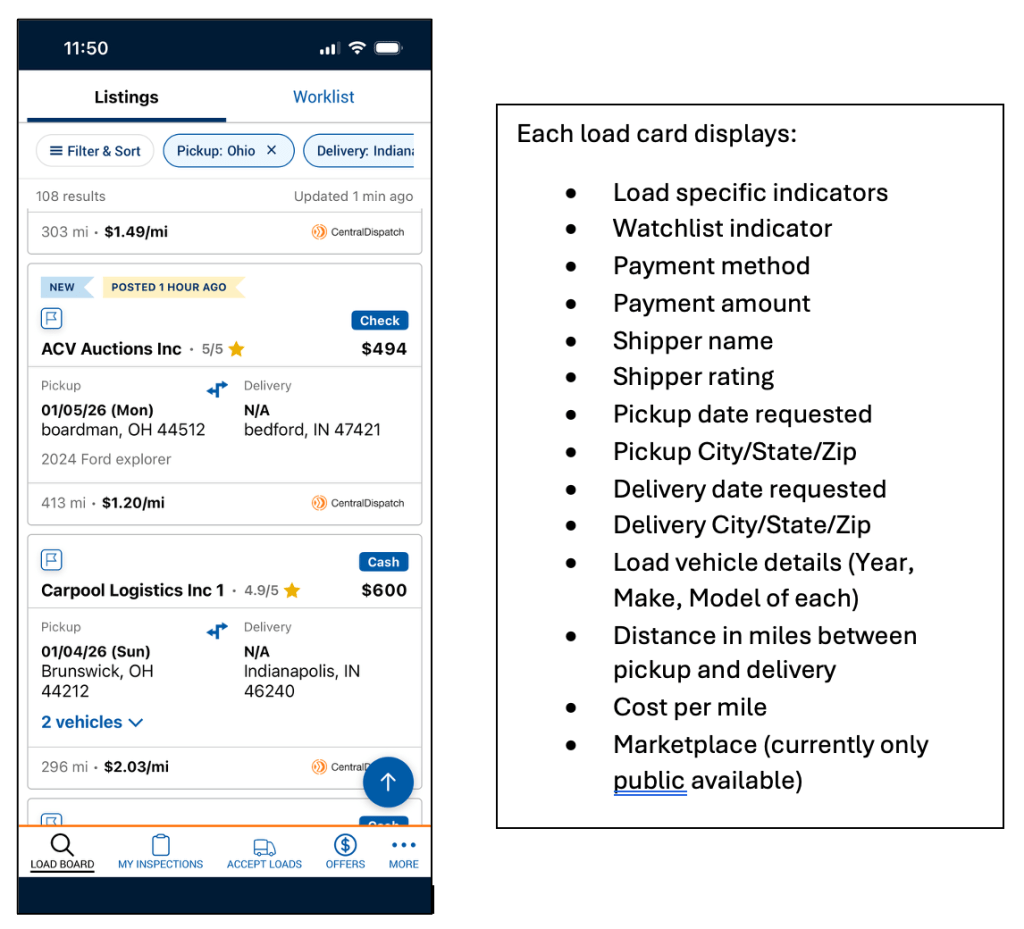
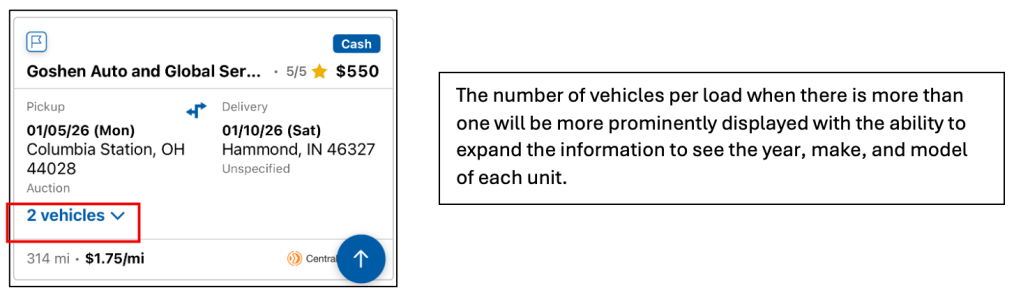
- Each vehicle card will display similar information to the web version including the pickup and delivery location details, the payment amount and method, shipper rating, and the vehicles per load.
NOTE: Driver roles are unable to access the load board with their permissions and can’t see the carrier payment amount.
Additional Load Details Page
When a carrier clicks into the load card, the additional details display for that load.
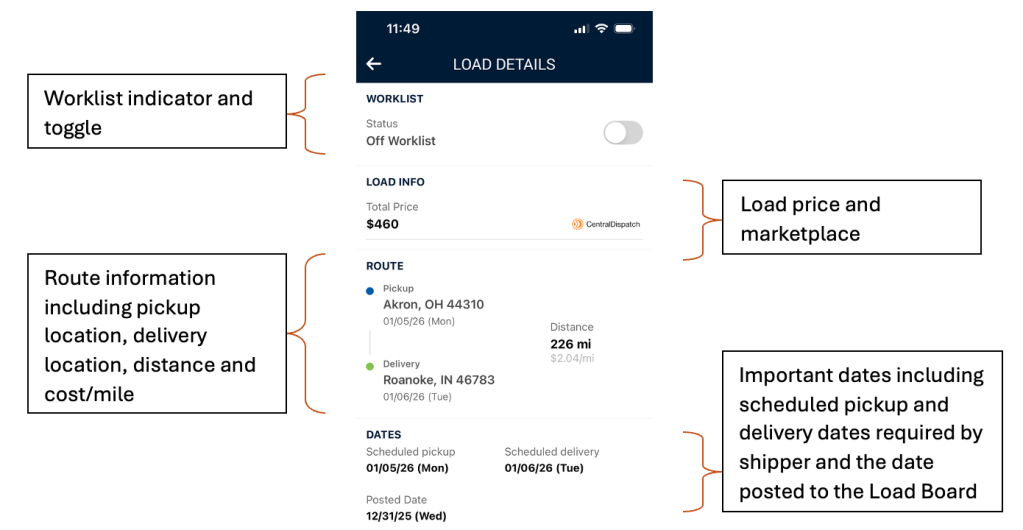
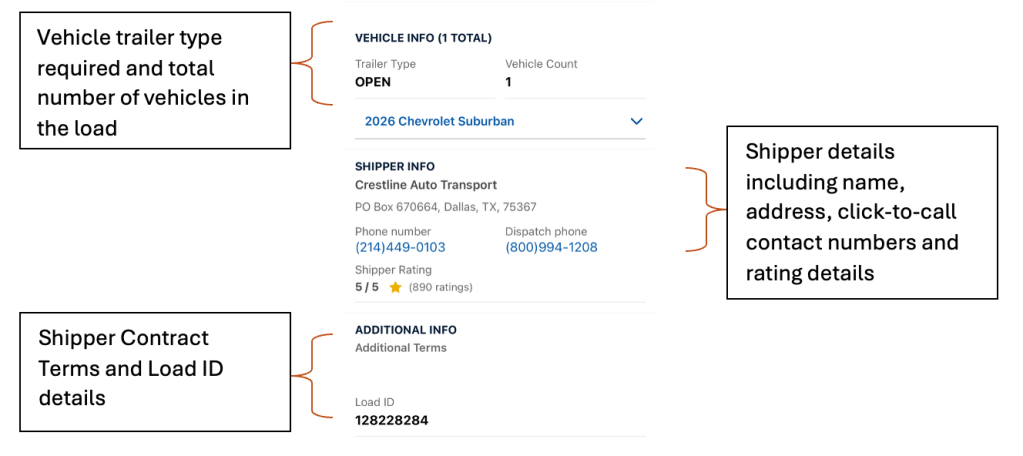
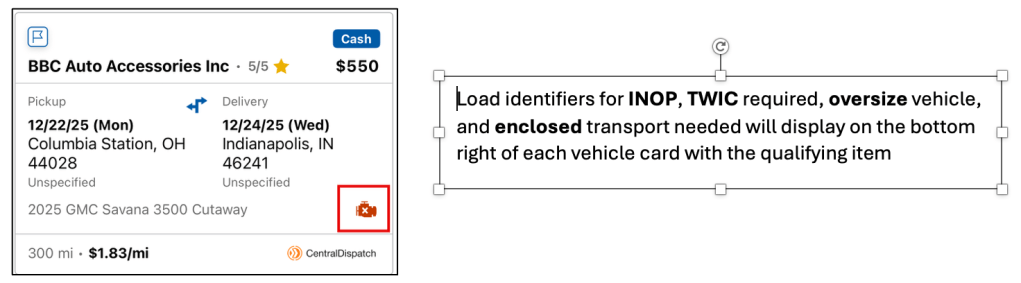
Load Specific Messages / Callouts

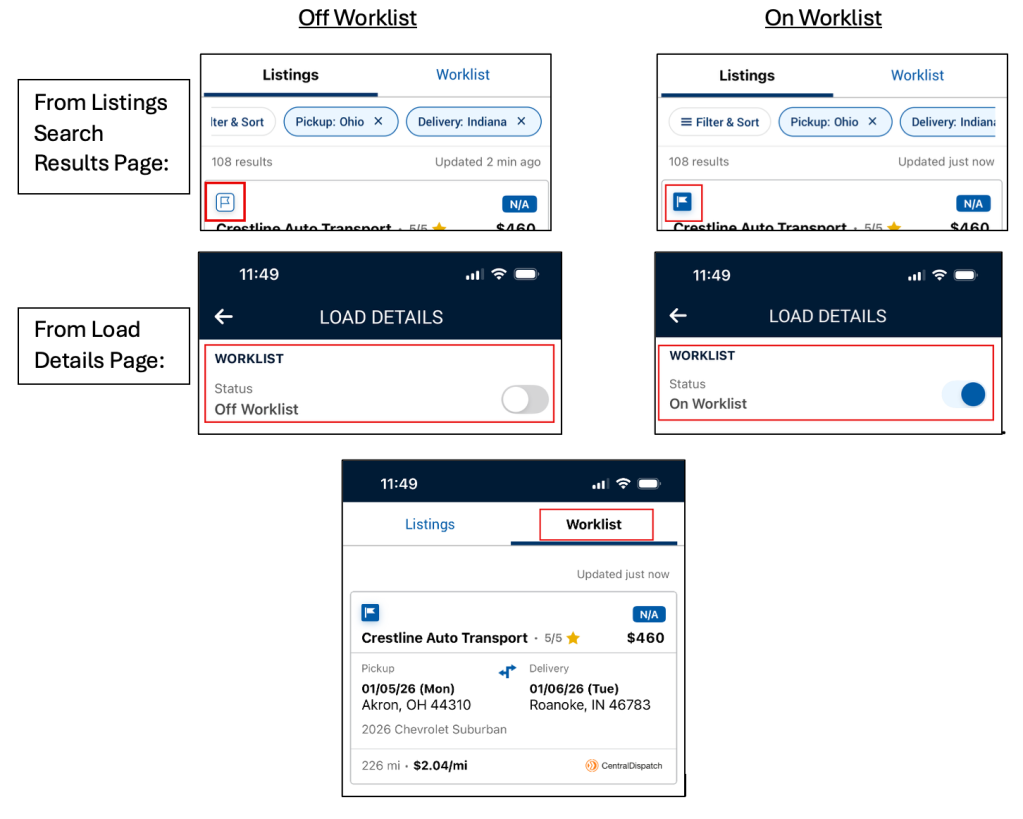
Worklist from the Mobile App
Any changes done on the Worklist on the web and on the mobile app will sync to the other.
Adding to the Worklist
To add a vehicle load to the Worklist the carrier can use the icon on the Listings Search Results tab or they can toggle from the Load Details Page.
Loads on the Worklist can be viewed on the Worklist tab and removed with the same actions that added them to the list.
Execute moves, complete inspections, and connect with shippers from anywhere with the Central Dispatch mobile app! It’s a one stop where you can access every public and private load.


Transcript:
The Central Dispatch carrier mobile app lets you search for loads, complete vehicle inspections, and more right from your mobile device. So you can run your business and keep trucks on the road earning money, wherever and whenever you need to.
To search for new loads, log into the app and tap the load board icon. Here you can search by location or filter by vehicle type, payment type, minimum payment, delivery date, and more—or select from one of your saved searches to quickly find what you’re looking for. From the list of results, just tap to see all the details about the load.
To start any inspection, tap the yellow icon in the bottom right of your screen. You’ll be prompted to scan the vehicle’s VIN, or search for it manually.
For loads with missing VINs, scan or enter the vehicle VIN, and the app will find a matching load. If there’s no match, it will show you a list of current VIN-less loads. Select the one that matches your delivery details, and tap to associate the load with that VIN.
Once on the main inspection page, simply click on any photo card to begin capturing images for each required area of the vehicle.
Here, you can easily get the correct camera angle using the vehicle outline, or turn on your phone’s flashlight to brighten dark areas. When you have a clear image, just tap to take the photo.
Next, you’ll record any damages to that section of the vehicle, or retake the photo if needed.
To record damages directly onto the photo, tap the damaged area, select a damage type, and it will be annotated right in the photo. You can mark as many damaged areas as you need to for each image.
If you need to add additional details about the vehicle’s condition, make a note by tapping the “Notes” icon, and typing it into the text box.
When you’re finished notating, just tap “Next,” and repeat the same process for each required vehicle photo.
You can go back to the main inspection page anytime by tapping “Cancel” on the top left, and all your progress will be saved. So if you missed any damages or need to make a new note, you can easily tap back into any photo and add to it before you submit the inspection.
If you want to submit a vehicle image that is not part of the required list, tap “Add New Photo” toward the bottom of your screen, capture the image, and select the photo type.
Once you’ve taken all the required photos, tap “Inspection Complete.” This is where you’ll select from one of three sign-off options — agent agrees with assessment, agent has refused to sign, or agent is unavailable. Tap the appropriate option, and enter the required information and signatures. No matter what you choose, all three options lead to the successful completion of the inspection.
Note that for mutli-vehicle loads, not all vehicles in the load need to be completed to submit a successful inspection. Simply perform inspections for the vehicles that are ready, and mark the rest as “can not inspect.”
If any inspections fail to upload due to a poor internet connection, those will appear in the “Error Tab” back on the home screen. So be sure to check there to re-upload outstanding inspections once you find a stable connection.
If you’d like to view or send the inspection EBOL, tap the vehicle card, then tap “View EBOL.” To send, just enter the shipper’s email address from the “Share EBOL” section at the bottom of your screen.
Then, you’re all set! The inspection will upload and be marked as delivered or picked up in real-time, so you can quickly move on to additional inspections, or get back to transporting vehicles.
You can also add incremental expenses from the mobile app for greater transparency with shippers, and easier bookkeeping on-the-go. To add a new expense, go to any Load details page, tap the “More” menu button, tap “Manage Charges,” then hit “Add a Charge.” From here you can fill out all the charge’s details, including the type of charge, dollar amount, date, and any additional notes.
Thanks for watching. And be sure to take advantage of the Central Dispatch app whenever you can so you can easily find cars, execute moves, and seamlessly relay information back to shippers — all in one place!
