

This guide is also available in Spanish. Access the Spanish version here.
Central Dispatch is committed to providing educational, insightful resources that help customers maximize their platform experience and run their businesses more efficiently. If you prefer to read this content in another language, most web browsers offer built‑in translation tools you can use at any time.
Below are links to official browser guides with the most up‑to‑date instructions.
Chrome:
- Use the Translate
 icon on the right side of your address bar or via the Chrome menu ⋮
 - Or right click anywhere on the page and select “Translate”
- For more detailed directions, view the Chrome support guide here: https://support.google.com/chrome/answer/173424
Edge:
- Use the translate icon
 in the address bar
 - Depending on your browser settings, the browser may automatically detect the language of the page and a menu will appear asking you to confirm
- For more detailed directions, view the Edge support guide here: https://support.microsoft.com/en-us/topic/use-microsoft-translator-in-microsoft-edge-browser-4ad1c6cb-01a4-4227-be9d-a81e127fcb0b
Safari:
- Use the translate icon
 in the Smart Search field (address bar) or via the Safari reader icon
 - For more detailed directions, view the Safari support guide here: https://support.apple.com/en-lb/guide/safari/ibrw646b2ca2/mac
Firefox:
- Click the translation icon
 in the toolbar or select “Translate page” from the menu
 - Or highlight and right-click the text you want to translate, and select “Translate selection to…” from the menu
- For more detailed directions, view the Firefox support guide here: https://support.mozilla.org/en-US/kb/website-translation
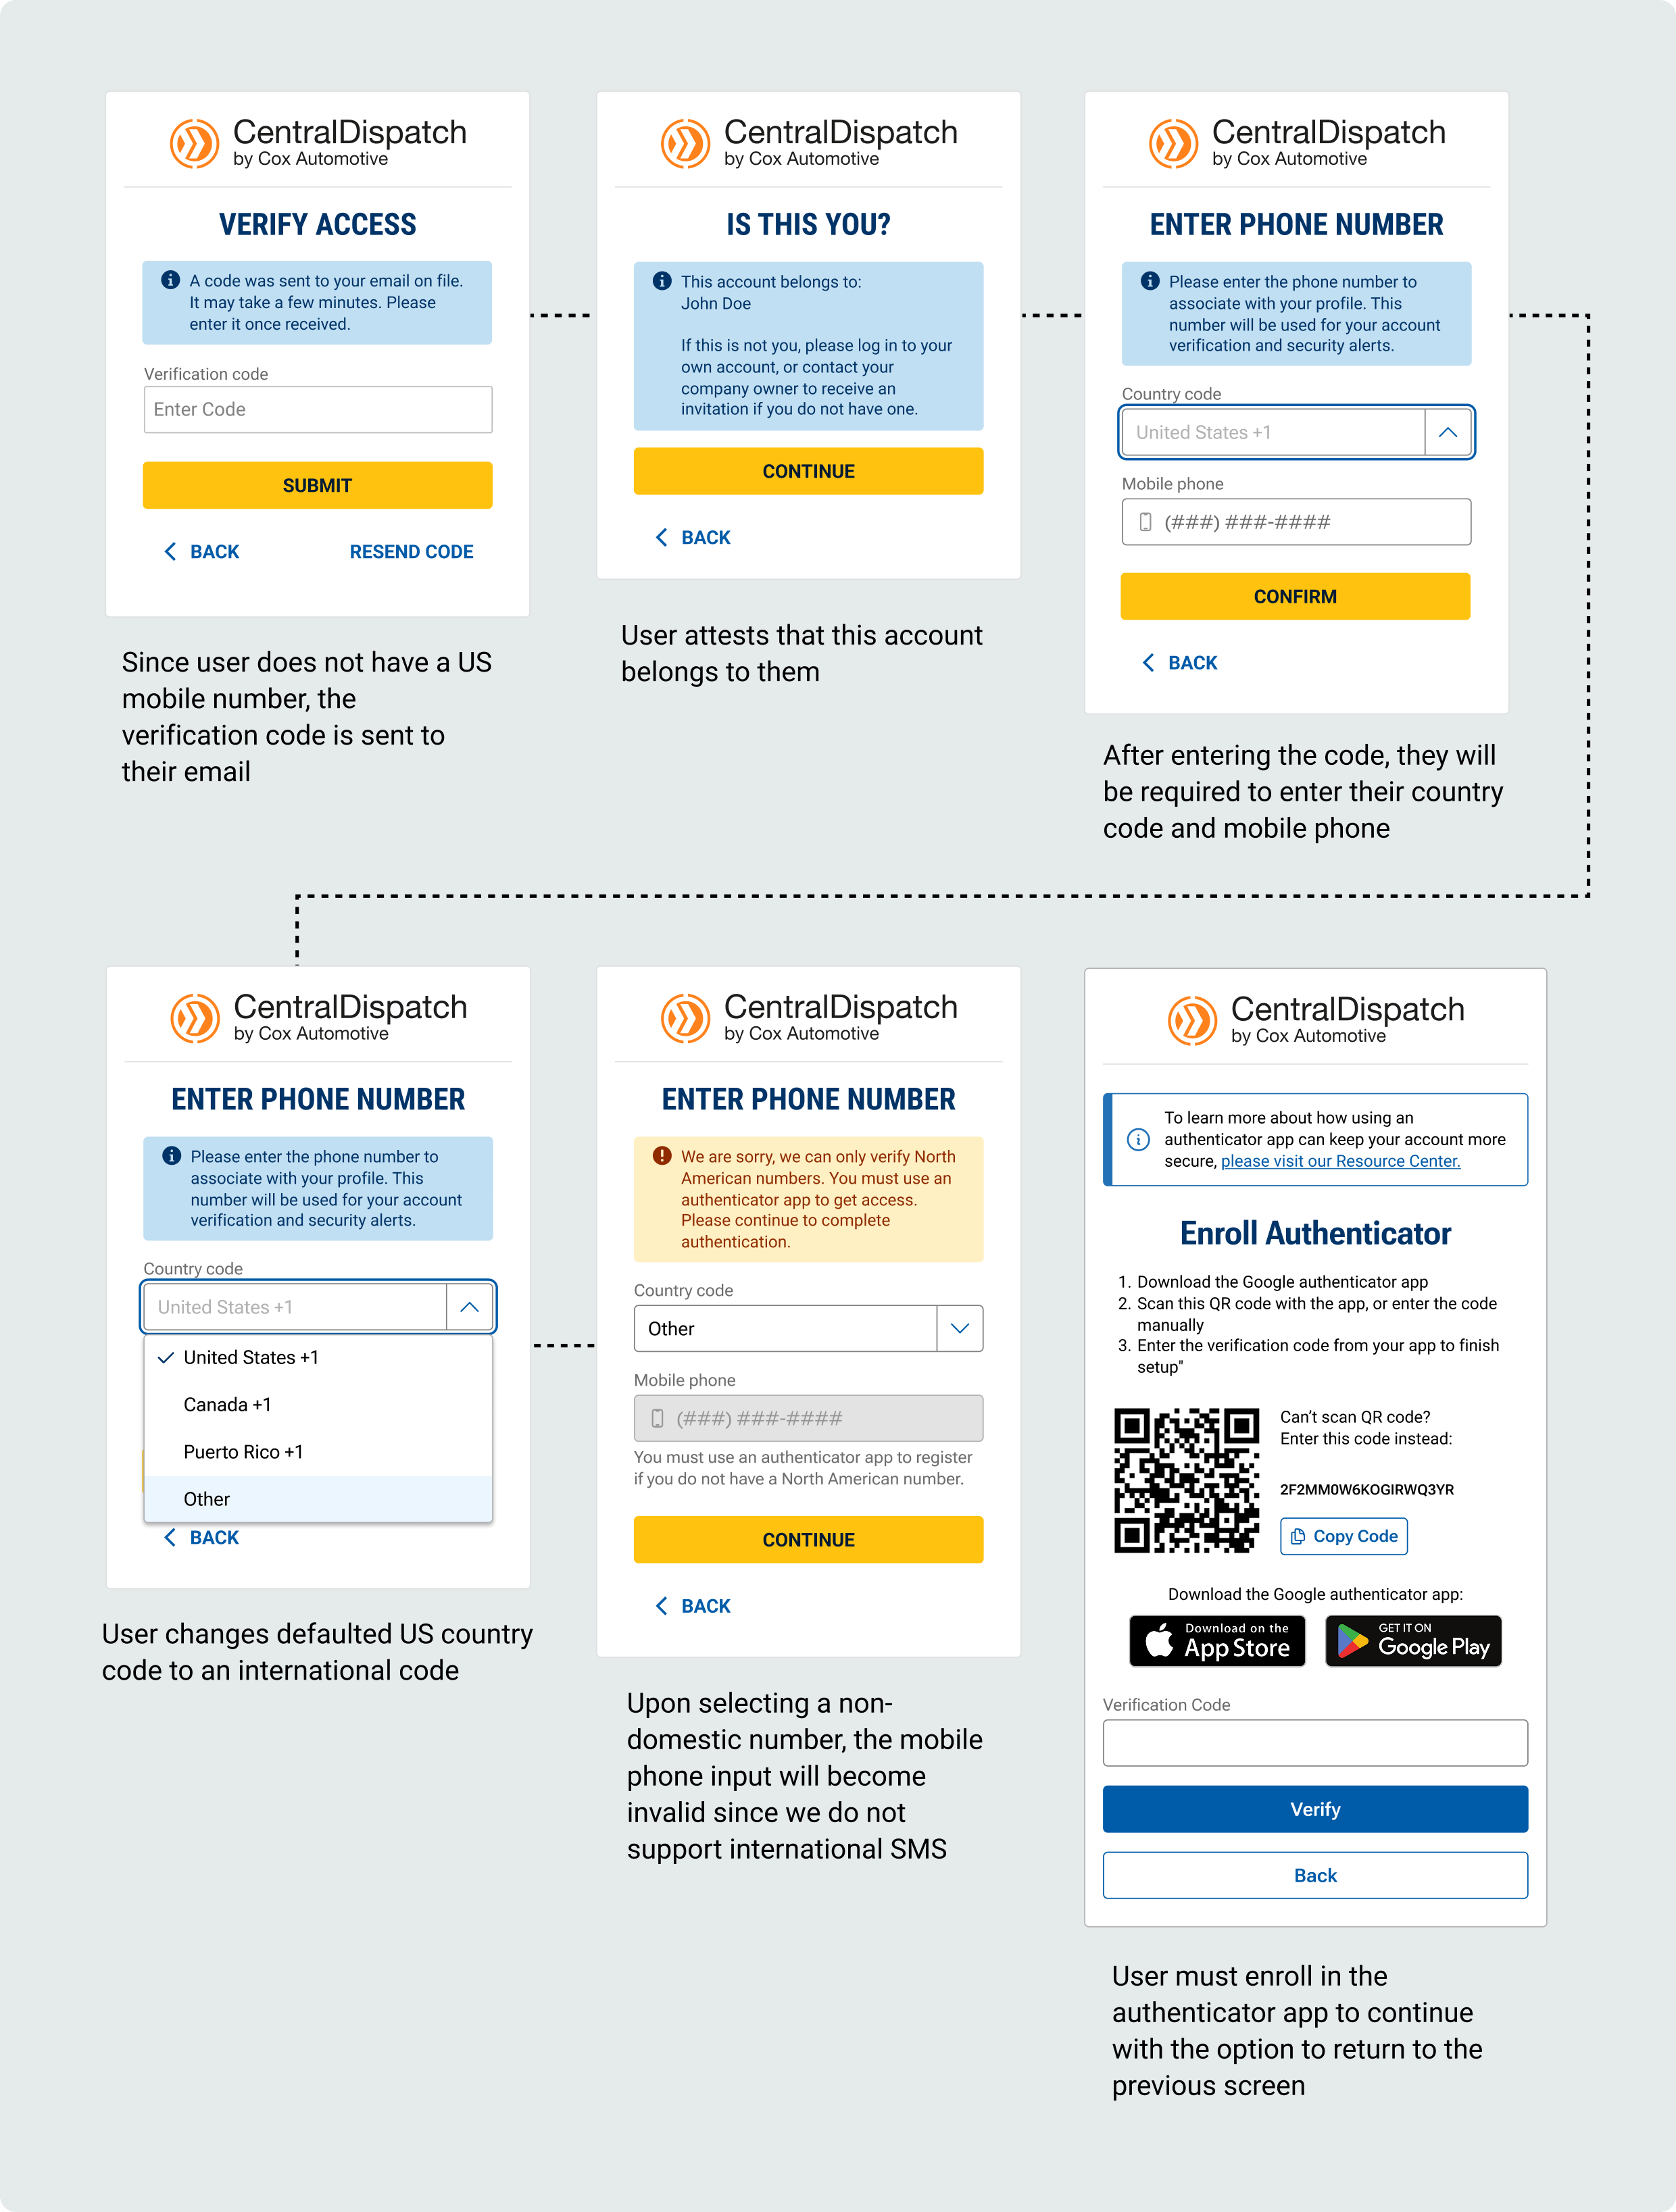
The authenticator app provides a MFA (multi-factor authentication) process for users that do not have access to a supported phone number for SMS verification and as an additional option for users other than SMS verification.
Central Dispatch does not support SMS verification for international phone numbers, users outside of the U.S., Canada, and Puerto Rico. These users are currently verifying using email; the authenticator app is a more secure process.
Table of Contents:
- Authenticator App Overview
- First time log in for users after Authenticator App rollout
- When verifying using an Authenticator App
- Installing an Authenticator App
Authenticator App Overview
- The authenticator app is offered as an alternative to phone-based MFA.
- Domestic Users (U.S., Canada, Puerto Rico)
- Users are required to have a recovery phone number listed in My Profile
- Users can also enroll in the authenticator app as an alternative option, if they do not want to use their phone
- Note: If the user is not enrolled in the authenticator app, they cannot change the MFA method to authenticator app during login (example, Verizon goes down, user cannot switch to authenticator app instead of phone number during log in.) The user would need to enroll in the authenticator app through My Profile.
- Users Outside the U.S., Canada, or Puerto Rico
- Phone numbers outside of the U.S., Canada, Puerto Rico are not supported for MFA.
- Users are automatically taken to the authenticator app page when logging in.
- Email verification will not be available
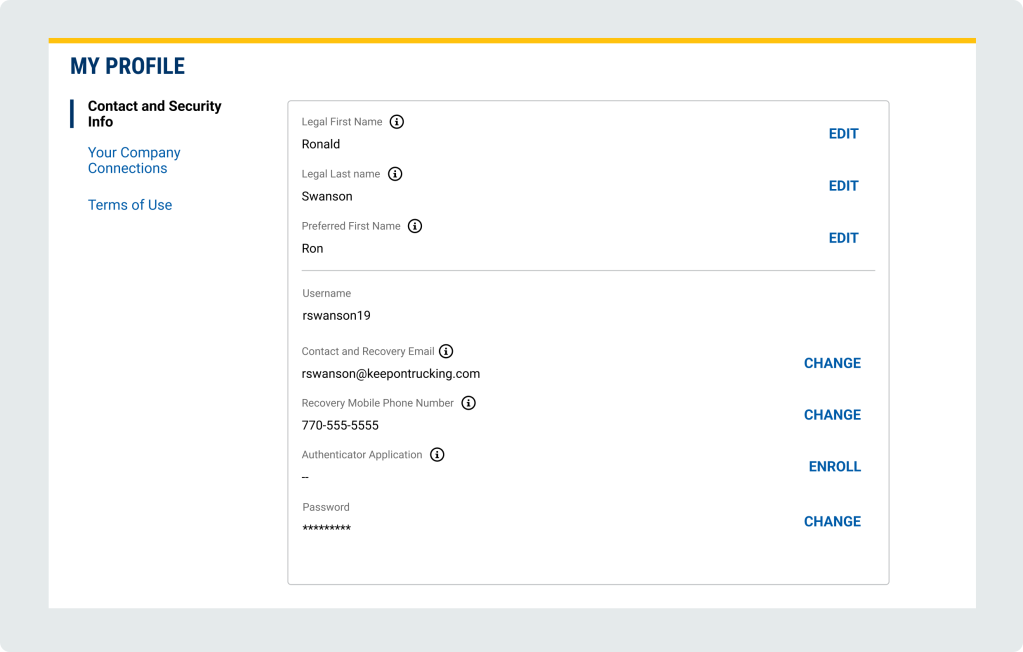
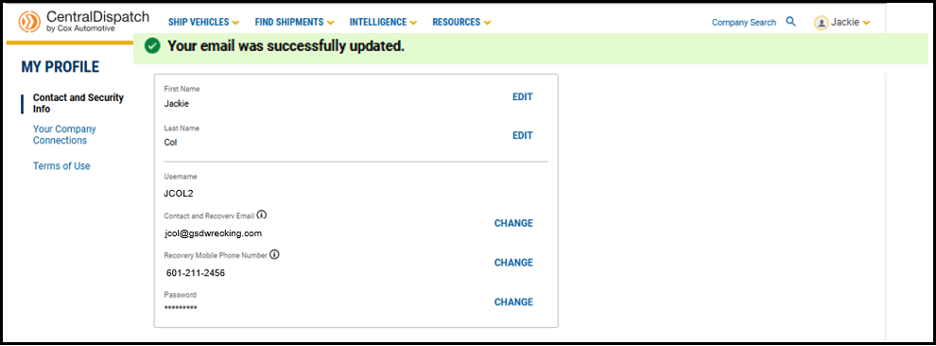
My Profile – Contact and Security Info
- Legal First Name and Legal Last Name: must match what is present on driver’s license, passport or other legal documents
- Preferred First Name: used in communications to clients and on users’ profile
- Username: used to log in to an account
- Recovery email: will only use to verify account if authenticator app or phone number is not available. Will not be displayed on account or shared
- Recovery phone number: Only used to verify or recover the account. Will not be displayed on account or shared
- Authenticator Application: Used to verify or recover the account for or users outside of U.S., Canda, Puerto Rico. domestic users. Can be used as an alternative to phone numbers for domestic users.
- Password: Used to log in to an account
First time log in for users after Authenticator App rollout:
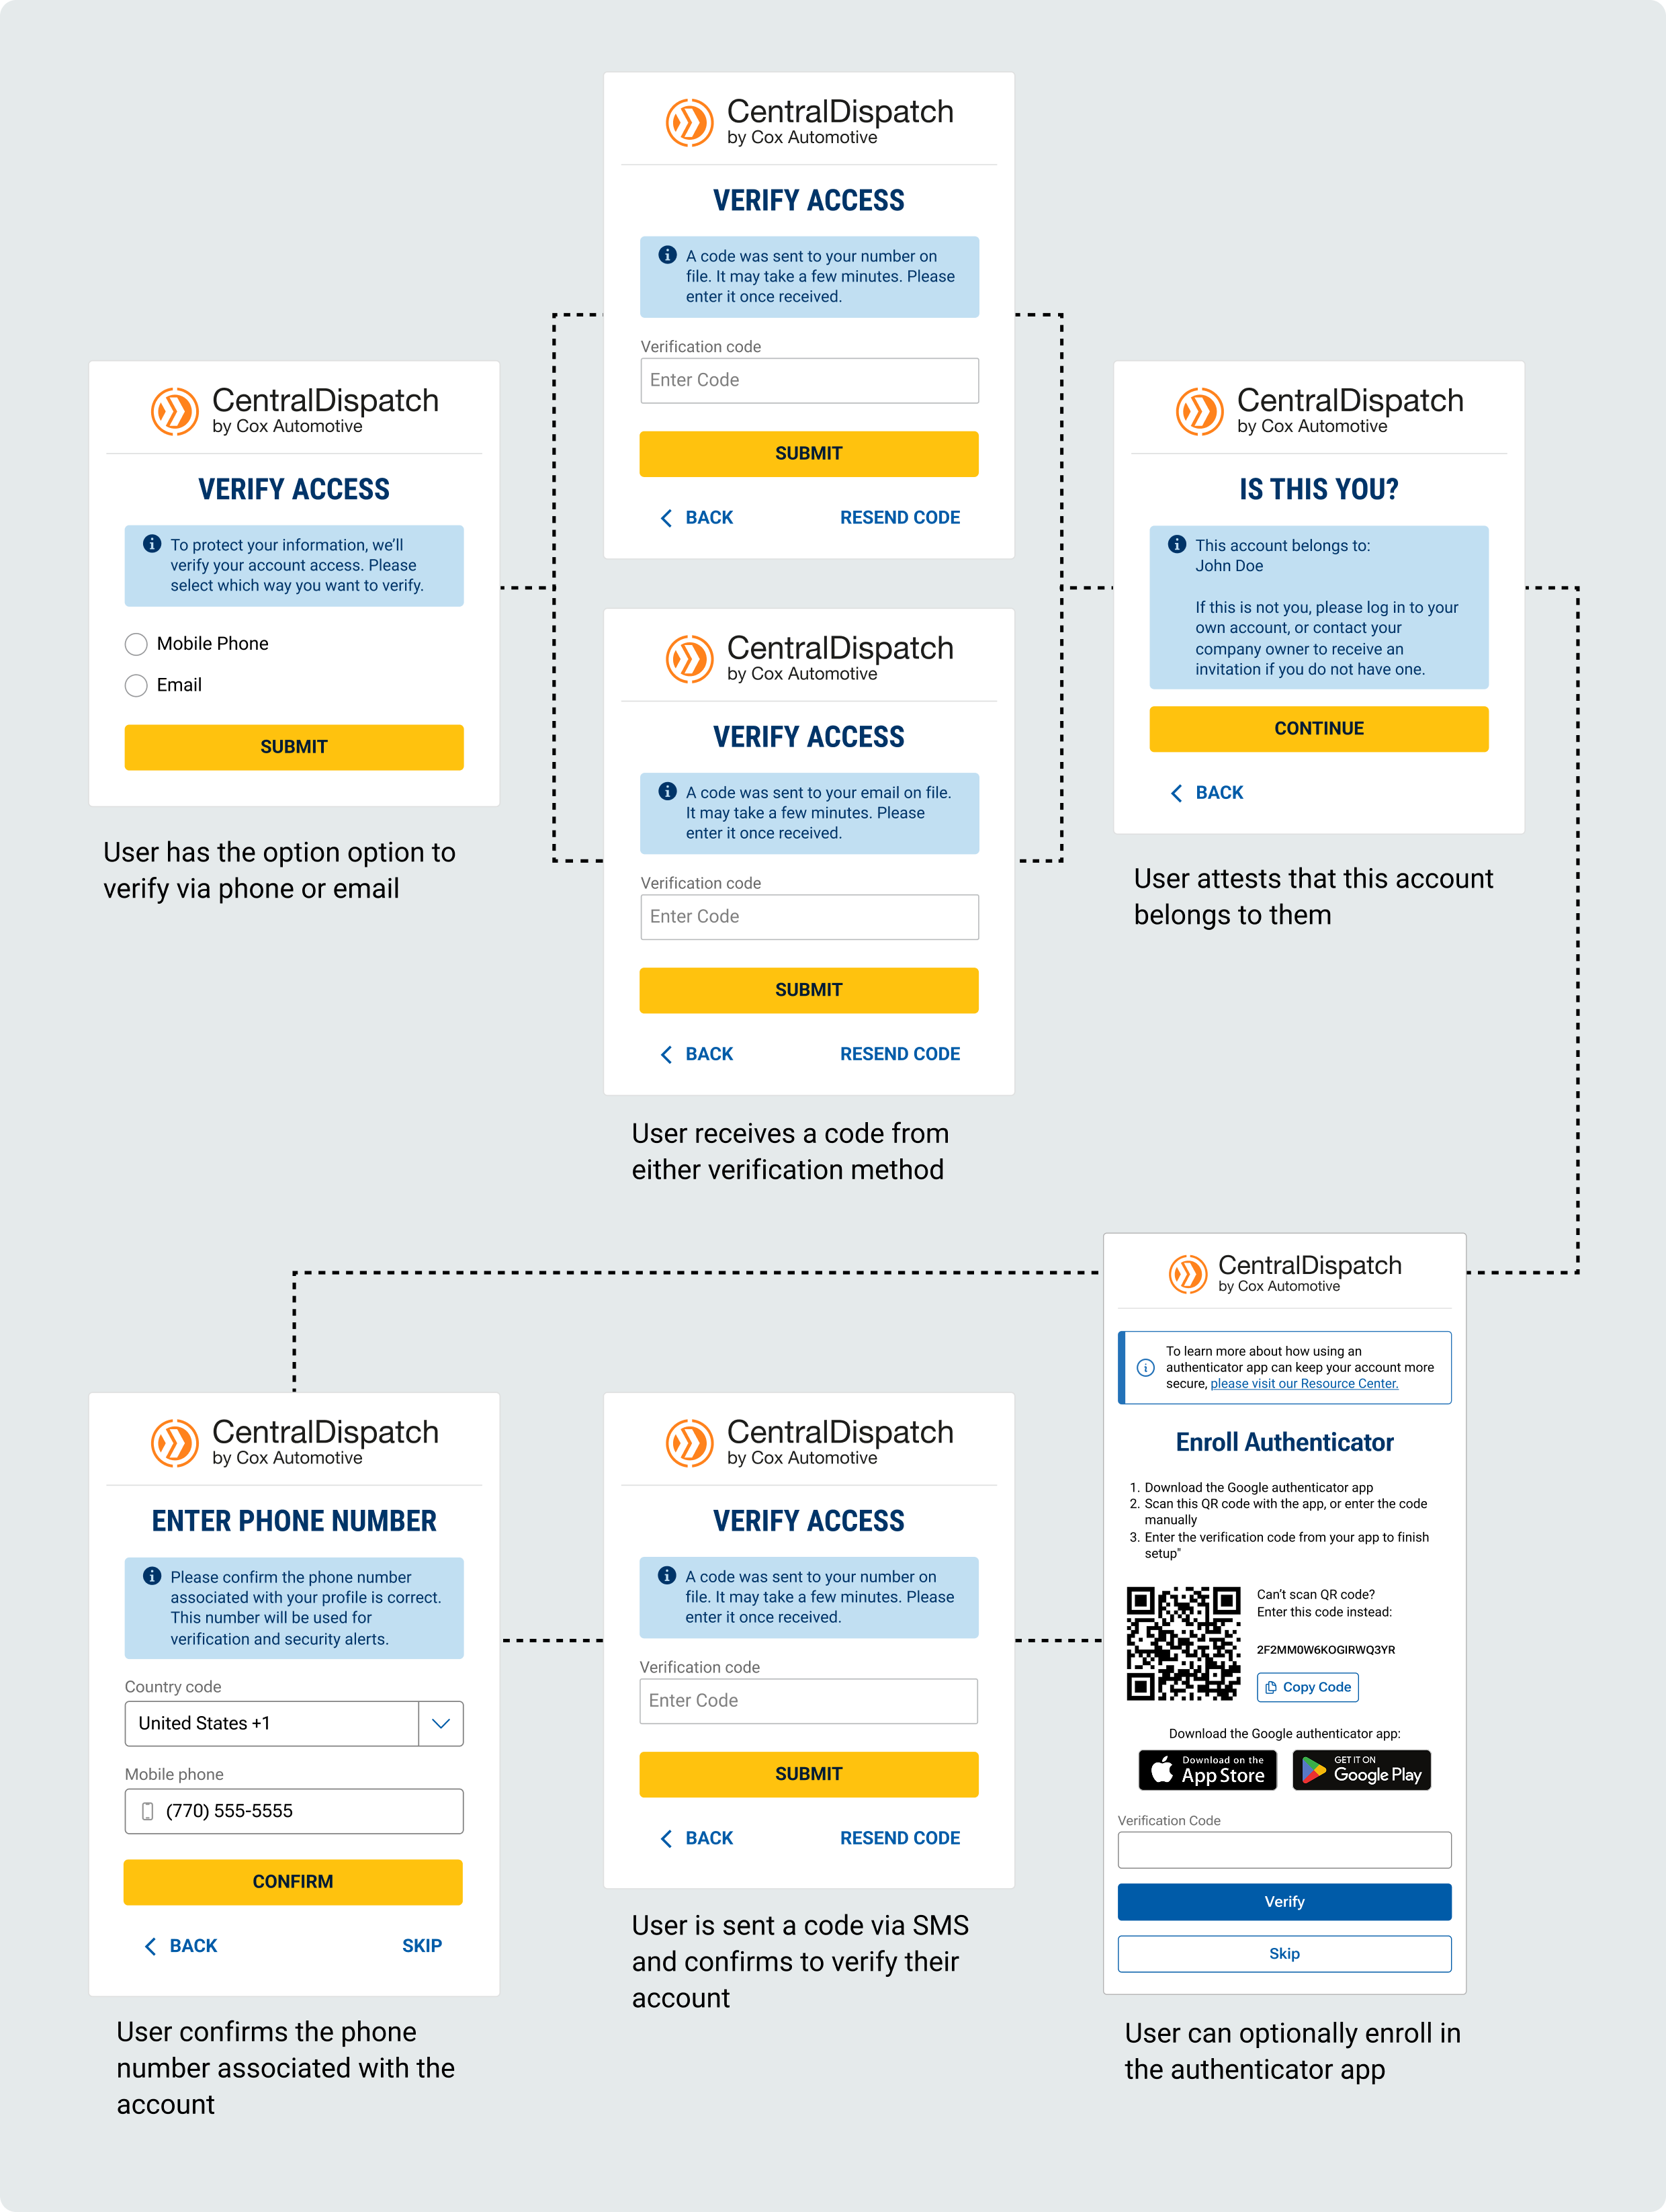
Scenario 1: User has a phone number listed in My Profile:
- User will verify account using the recovery email or recovery phone number in My Profile
- After successful verification the user will be taken to the authenticator app screen and can enroll, user can also Skip enrollment in app
- Note: if users skip enrolling in authenticator app, they can enroll at any time through My Profile
- Note: if users skip enrolling in authenticator app, they can enroll at any time through My Profile
- After the initial log-in after authenticator app roll-out
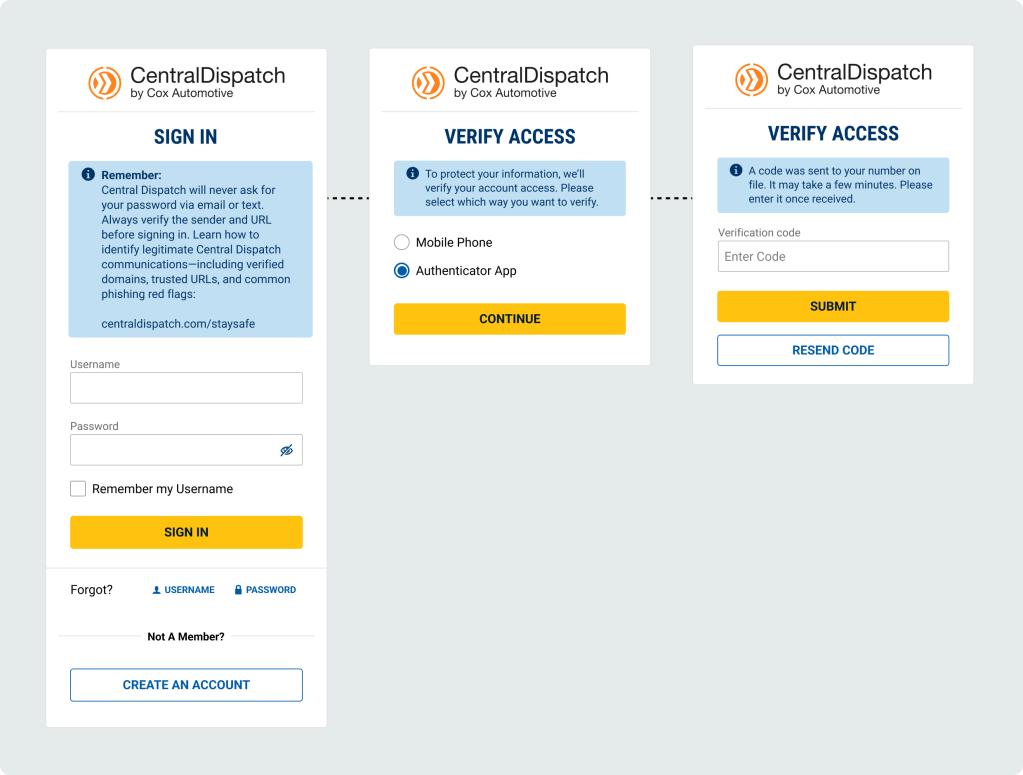
- Users that enrolled in authenticator app will have option to verify using authenticator app or Mobile Phone
- Users that did not enroll in authenticator app will automatically have verification code sent to mobile phone (will not see middle screen)
Scenario 2: User does not have a phone number listed in My Profile, but is a domestic user with a phone inside the U.S., Canada, or Puerto Rico
- User will verify account using the recovery email in My Profile
- After successfully entering the verification code, the user will be taken to a confirmation screen to attest the account belongs to them
- Users will be asked to enter a recovery phone number to their profile by entering the country code for the phone number
- Since country code is U.S., Canada, or Puerto Rice, the user will be taken to the authenticator app screen and can enroll, user can also Skip enrollment in app
- Note: if users skip enrolling in authenticator app, they can enroll at any time through My Profile
- Note: if users skip enrolling in authenticator app, they can enroll at any time through My Profile
- After the initial log-in after authenticator app roll-out
- Users that enrolled in authenticator app will have option to verify using authenticator app or Mobile Phone
- Users that did not enroll in authenticator app will automatically have verification code sent to mobile phone (will not see middle screen)
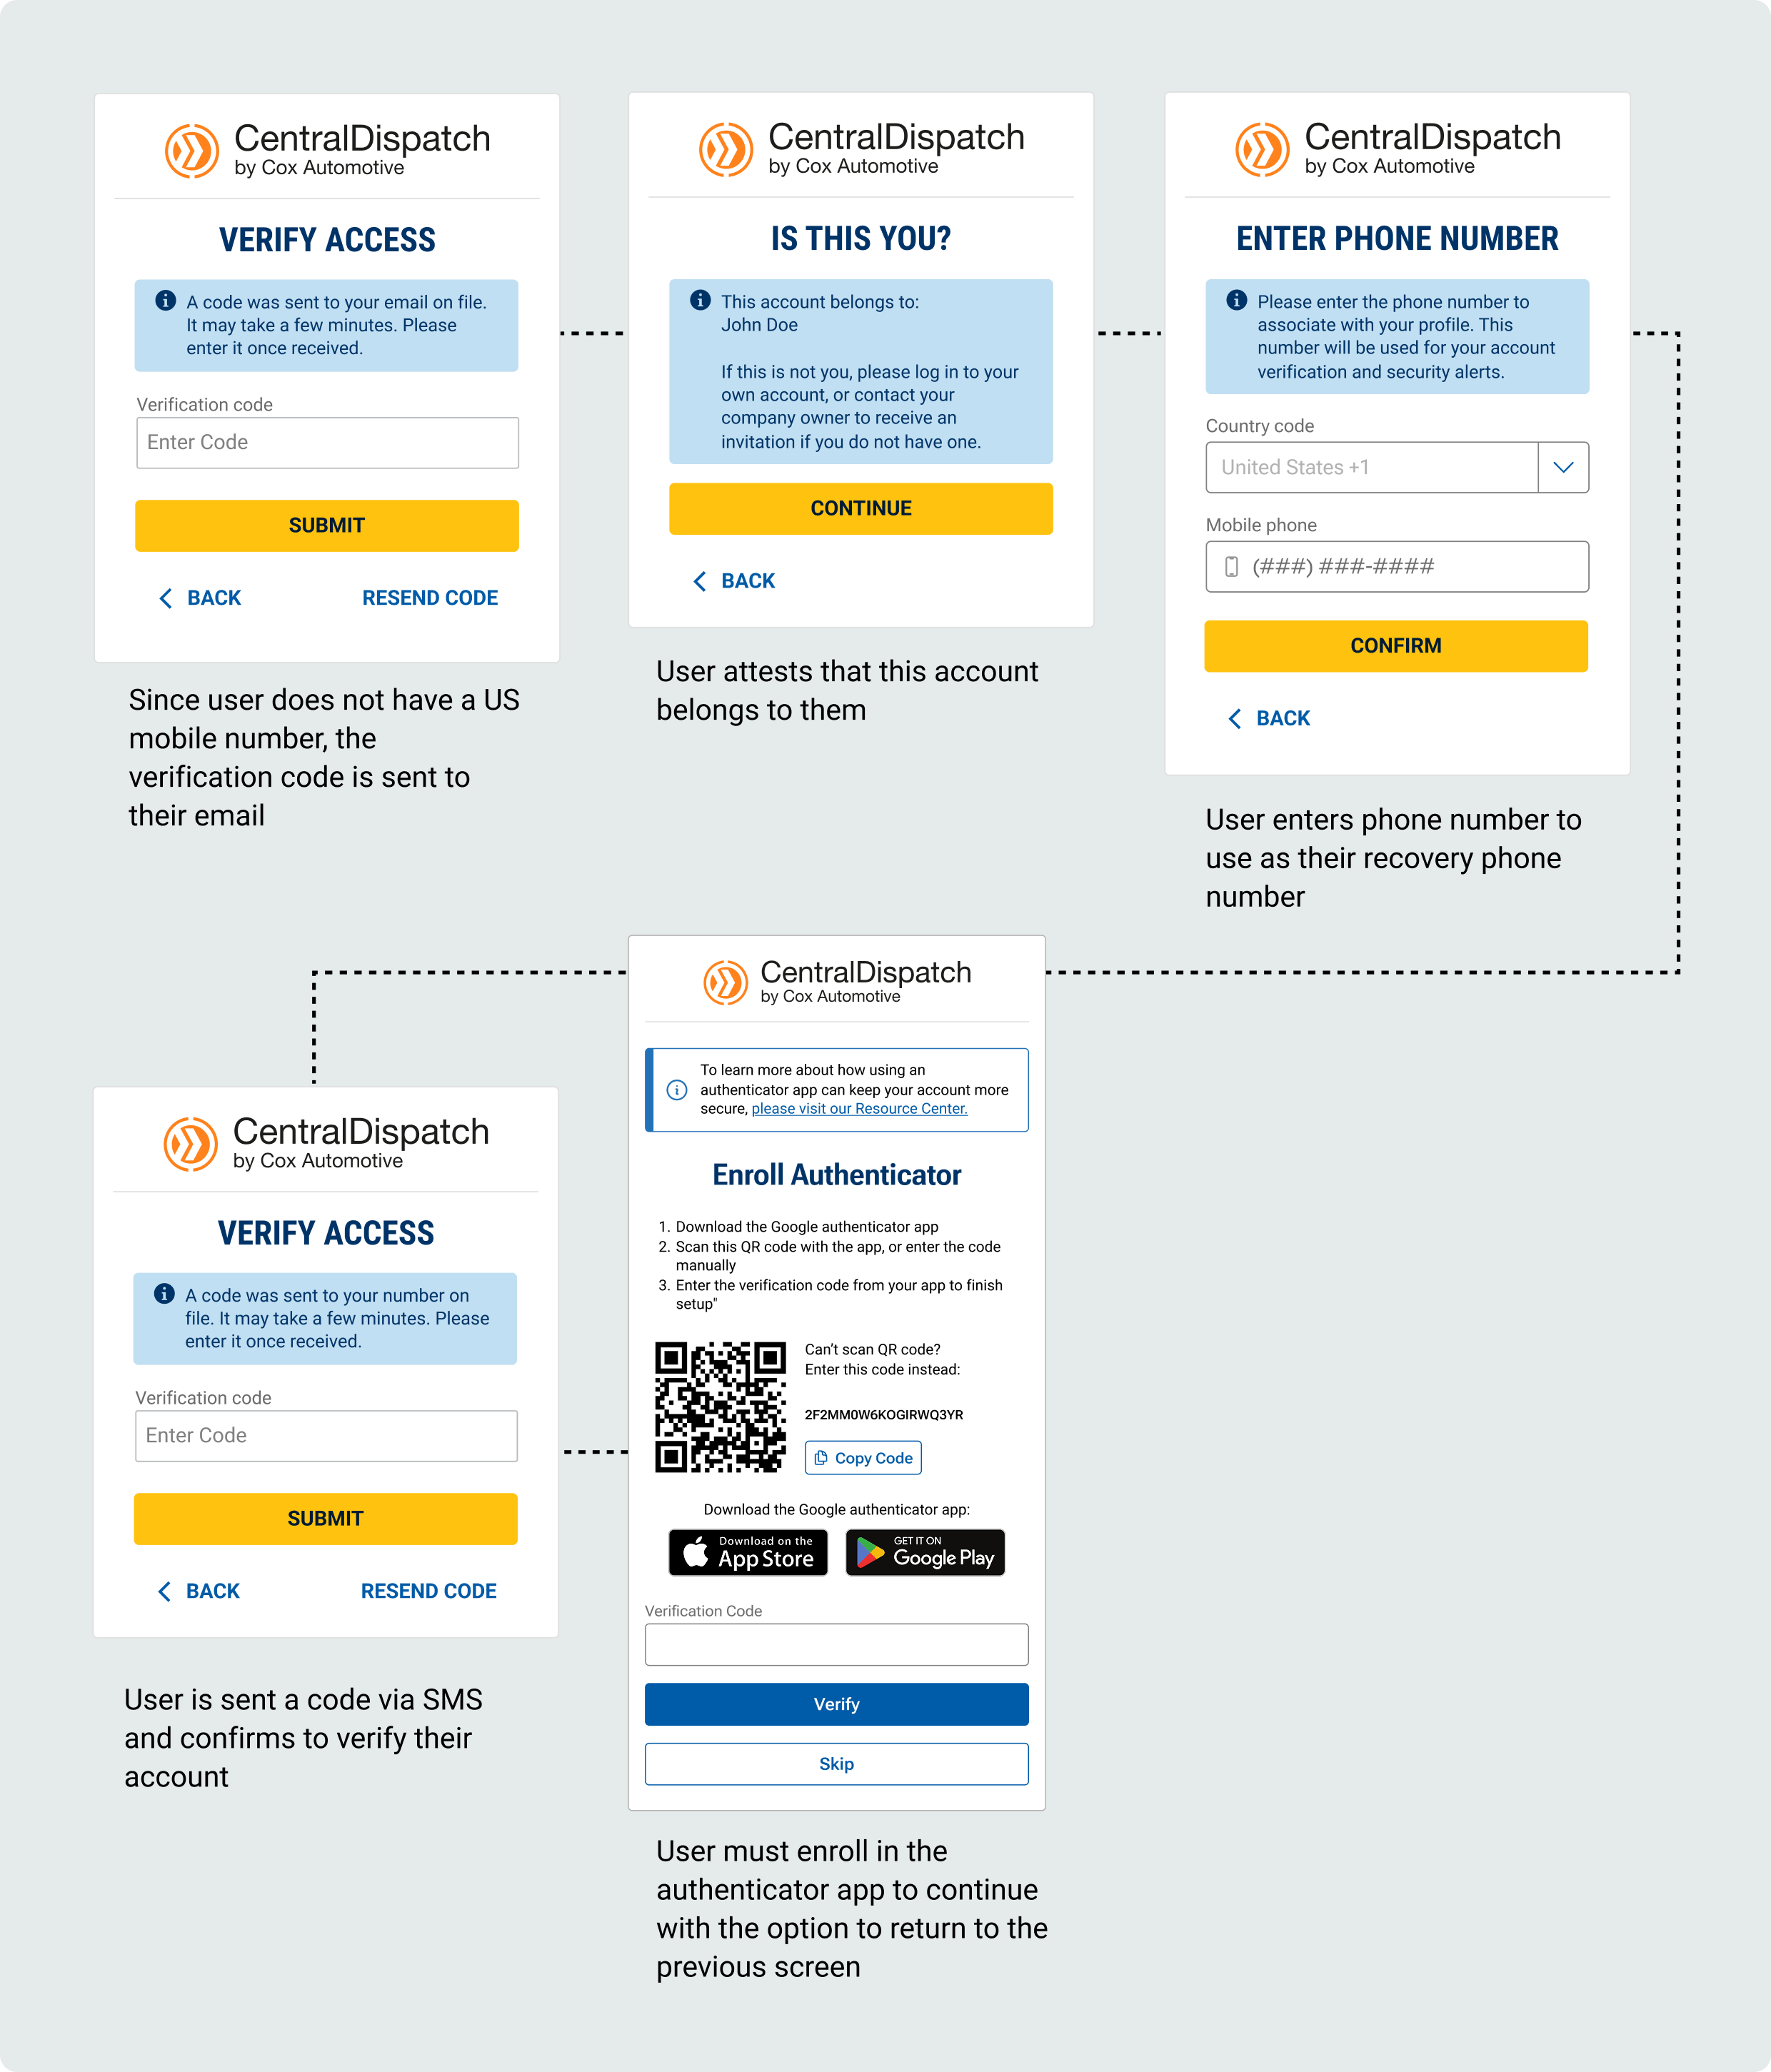
Scenario 3: User does not have a phone number listed in My Profile and is outside the U.S., Canada, or Puerto Rico
- User will verify account using the recovery email in My Profile
- After successfully entering the verification code, the user will be taken to a confirmation screen to attest the account belongs to them
- Users will be asked to enter a recovery phone number to their profile by entering the country code for the phone number
- If the Other code is selected, the user will not be able to enter the mobile phone number with a message that we do not support international SMS
- User will be taken to the Enroll Authenticator screen
- User will not be able to skip enrolling in authenticator
- User will not be able to skip enrolling in authenticator
- After the initial log-in after authenticator app roll-out
- Users with a mobile number outside of the U.S., Canada, Puerto Rico will be automatically taken to the screen and instructed to enter the code generated in their authenticator app to verify
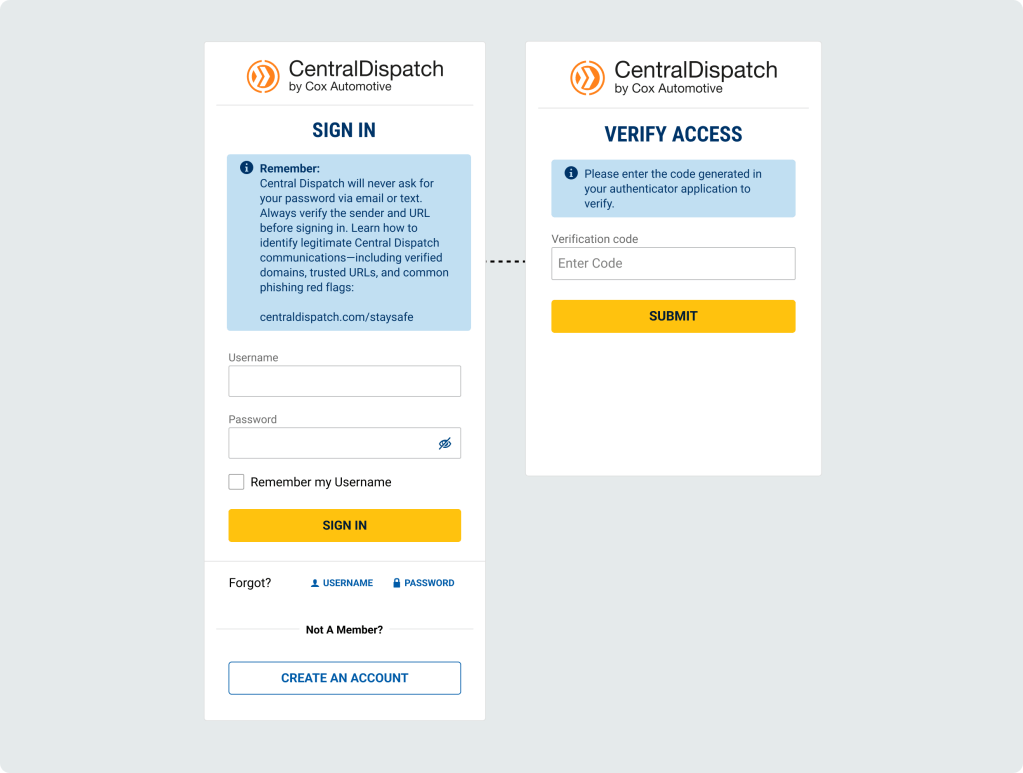
When verifying using an Authenticator App:
When prompted for a verification code:
- Open the Authenticator app
- Find your account name
- Use the 6‑digit number shown
- The number changes every 30 seconds — this is normal
SMS Verification text message:

Installing an Authenticator App
Step 1: Download the App
On your phone:
- Scan the QR code on the Enroll Authenticator screen or open the App Store (iPhone) or Google Play Store (Android)
- The QR code will direct user to Google Authenticator, but user is able to use authenticator of their choice
- Download the app
Step 2: Open the App
- Open the app
- Allow notifications (if asked)
- Allow camera access (if asked)
This helps the app work correctly
Step 3: Set Up Your Account (One Time Only)
In the app:
- Tap Add account, Begin setup, or the + sign
- Google authenticator will ask for users Gmail account, users do not need to use a Gmail account, can add any email address (example, Gmail, outlook, etc)
- Follow the on‑screen steps to finish setup
Step 4: Get Your Code When Signing In
When prompted for a verification code:
- Open the Authenticator app
- Find your account name
- Use the 6‑digit number shown
- The number changes every 30 seconds — this is normal
Quick Tips
- You do not need internet to see the code
- If a code expires, wait for the next one
- Keep the app installed — you’ll use it each time
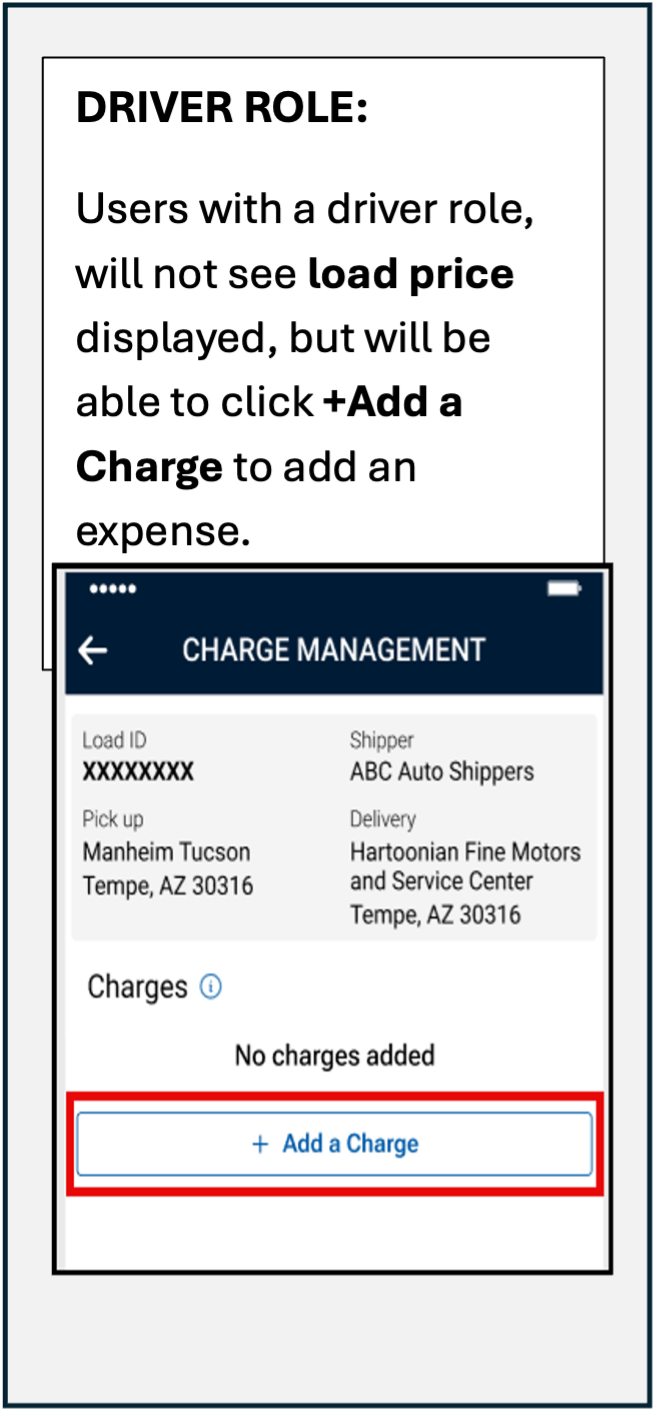
Allowing carriers to add incremental expenses to an invoice on the Central Dispatch Marketplace from the mobile app provides transparency and allows carriers to manage their entire book of business on Central Dispatch, including incidental charges.
1. Carriers are able to add incremental expenses from the mobile app.
Carriers can add an expense to an invoice up to 30 days after delivery or cancellation
- Adding expenses from the mobile app:
- From the Load Details screen, users with the role of Owner, Admin, and Driver can click the More menu button, and then click Manage Charges from the drop down.
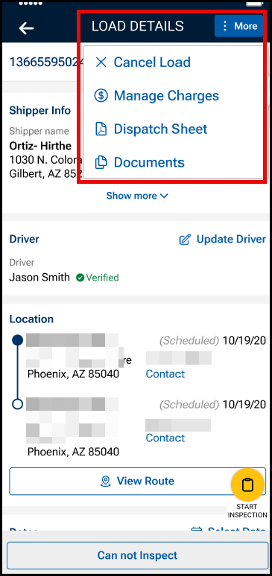
- From the Load Details screen, users with the role of Owner, Admin, and Driver can click the More menu button, and then click Manage Charges from the drop down.
- Click the +Add a Charge button to add an expense to the invoice
- Users can add up to 8 expenses per invoice
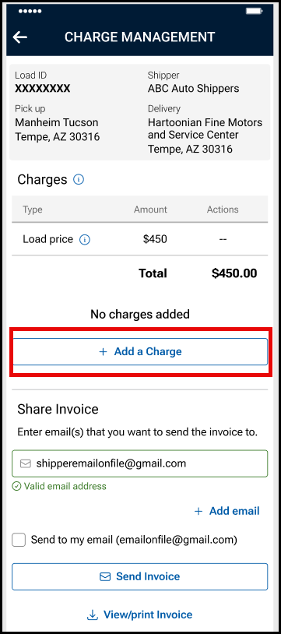
- Users can add up to 8 expenses per invoice
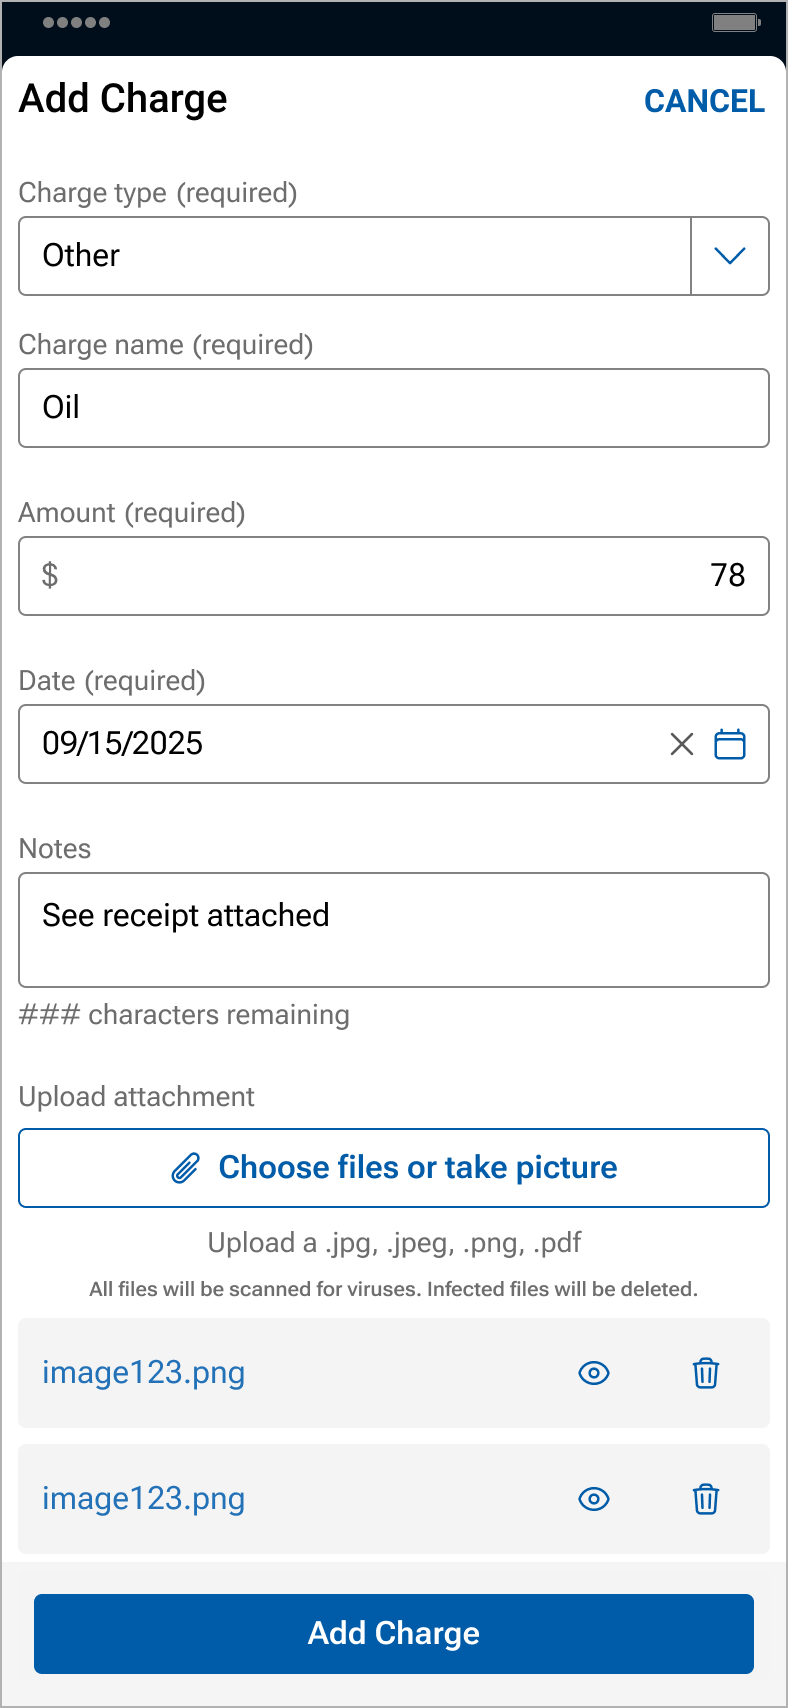
- Use the drop down menu to select the Charge type
- An option of “other” is available in the drop down
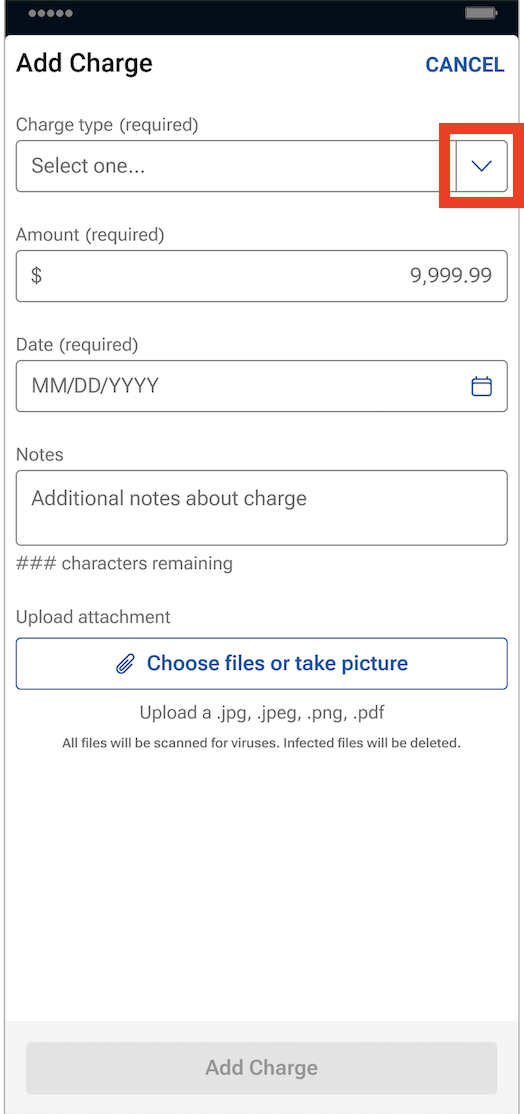
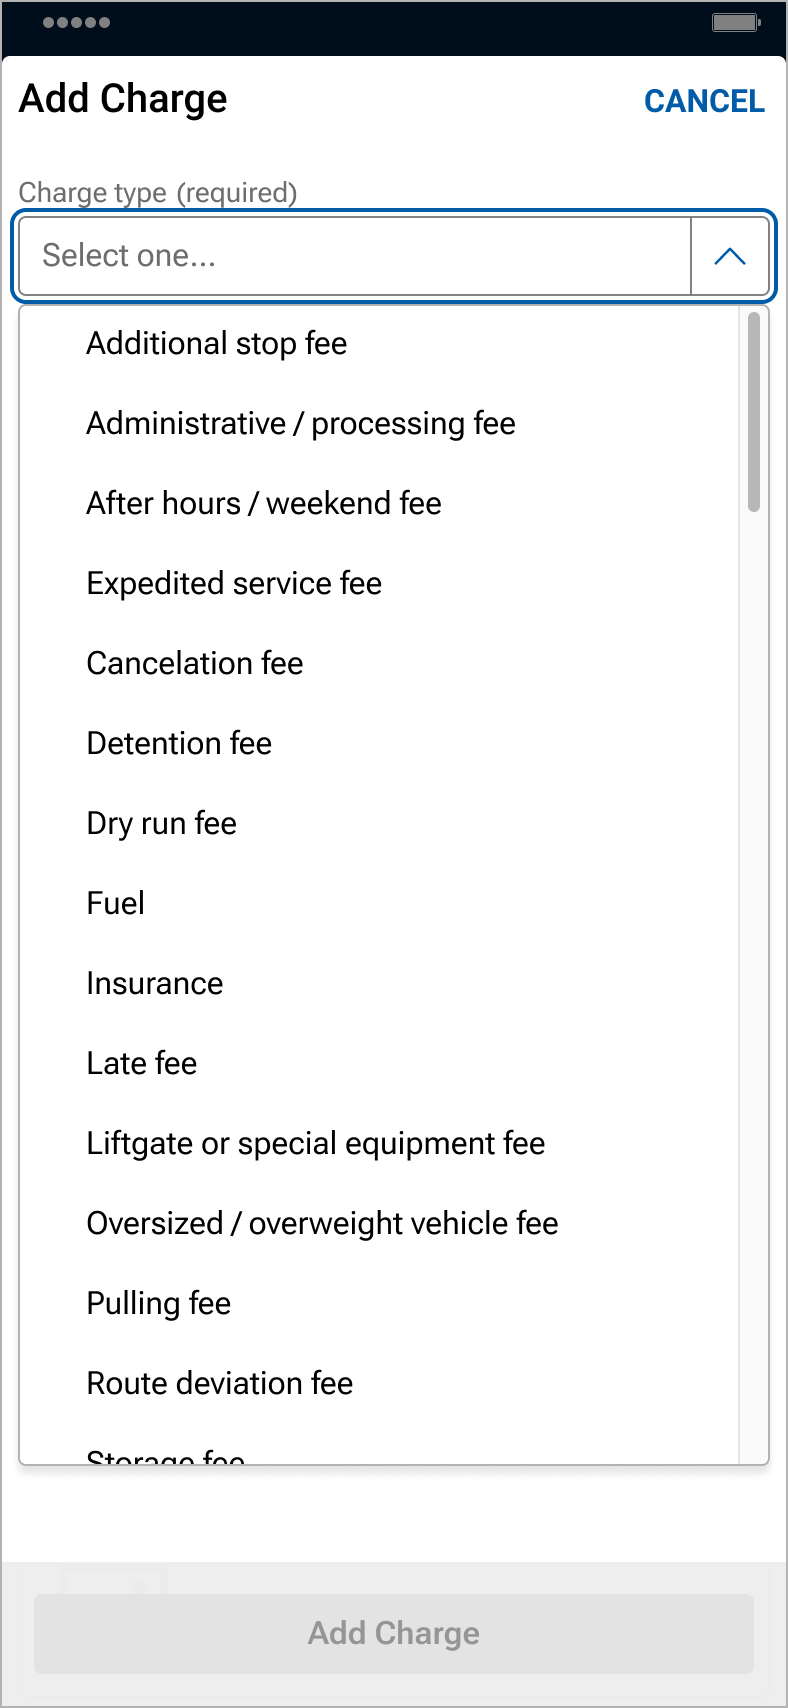
- An option of “other” is available in the drop down
- Enter expense information, including the charge name, the amount and date of the expense, and then click Add Charge
- The additional notes field is optional
- Up to 5 files can be uploaded from your files, camera roll, or by taking pictures
- NOTE: Back-up documentation can also be uploaded and added in Central Dispatch.com.
- NOTE: Back-up documentation can also be uploaded and added in Central Dispatch.com.
- Invoices, including expenses, can be viewed by the shipper and carrier on the web browser and the mobile app
- Carriers can delete or modify an expense by clicking on the icon in the expense line
- Carriers can email, download, view, or print the invoice
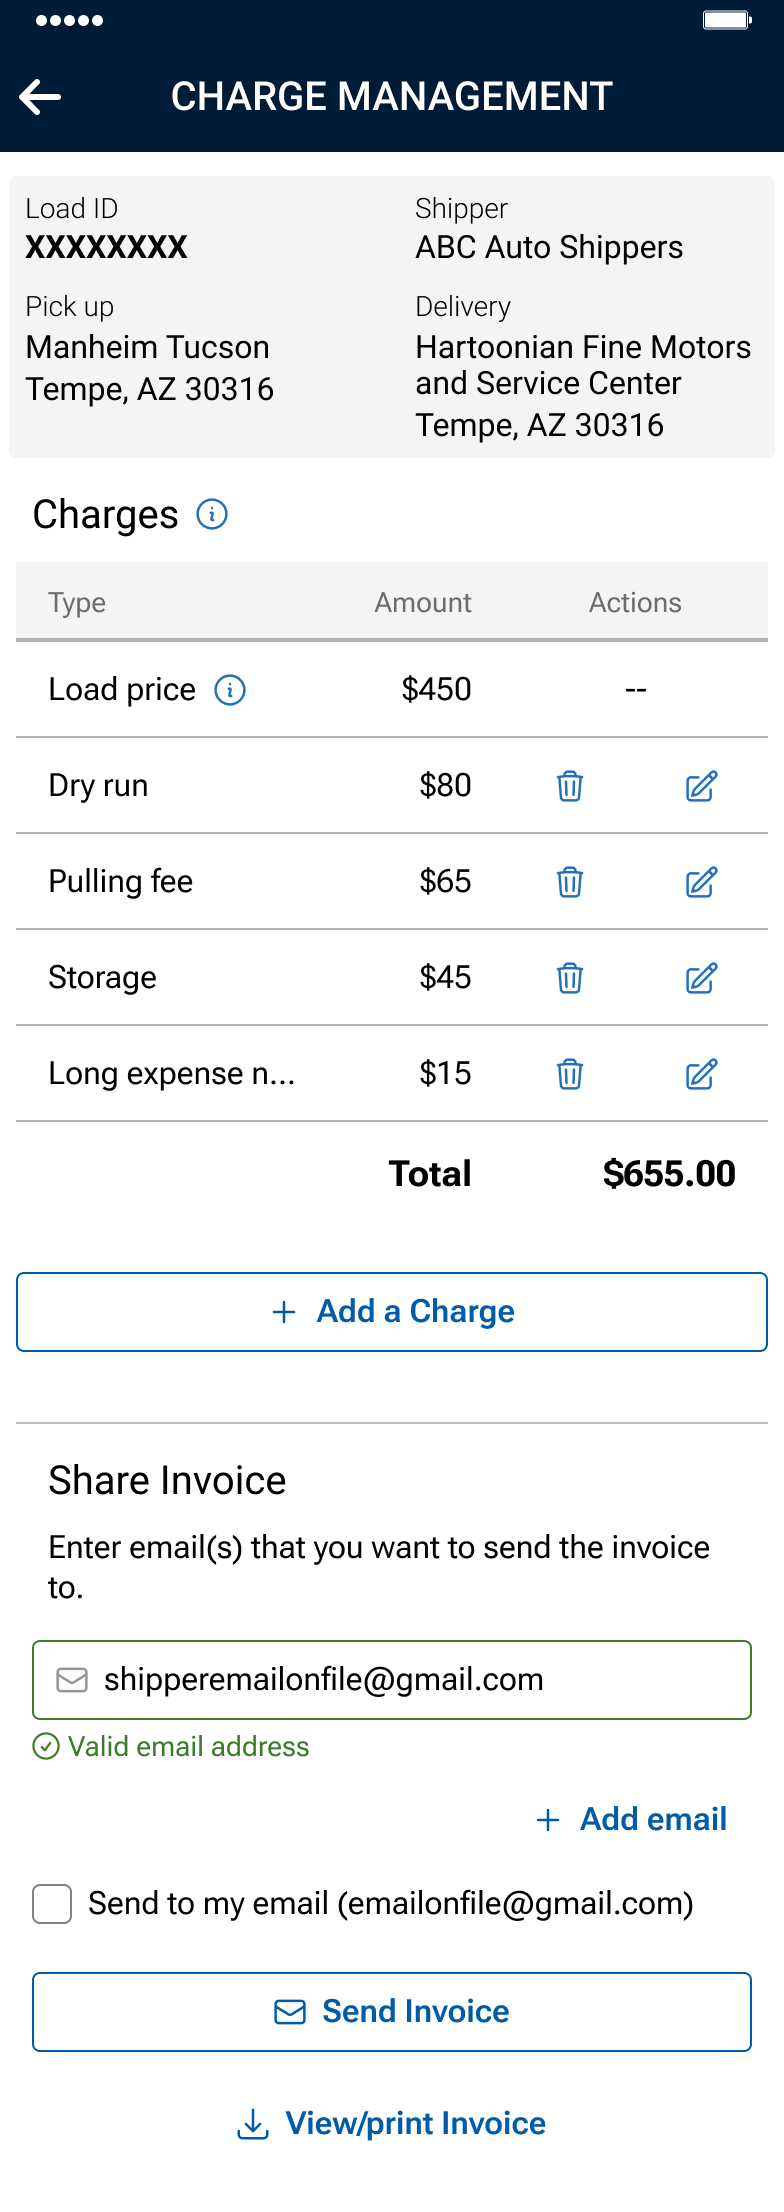 Driver role: Will not display load price
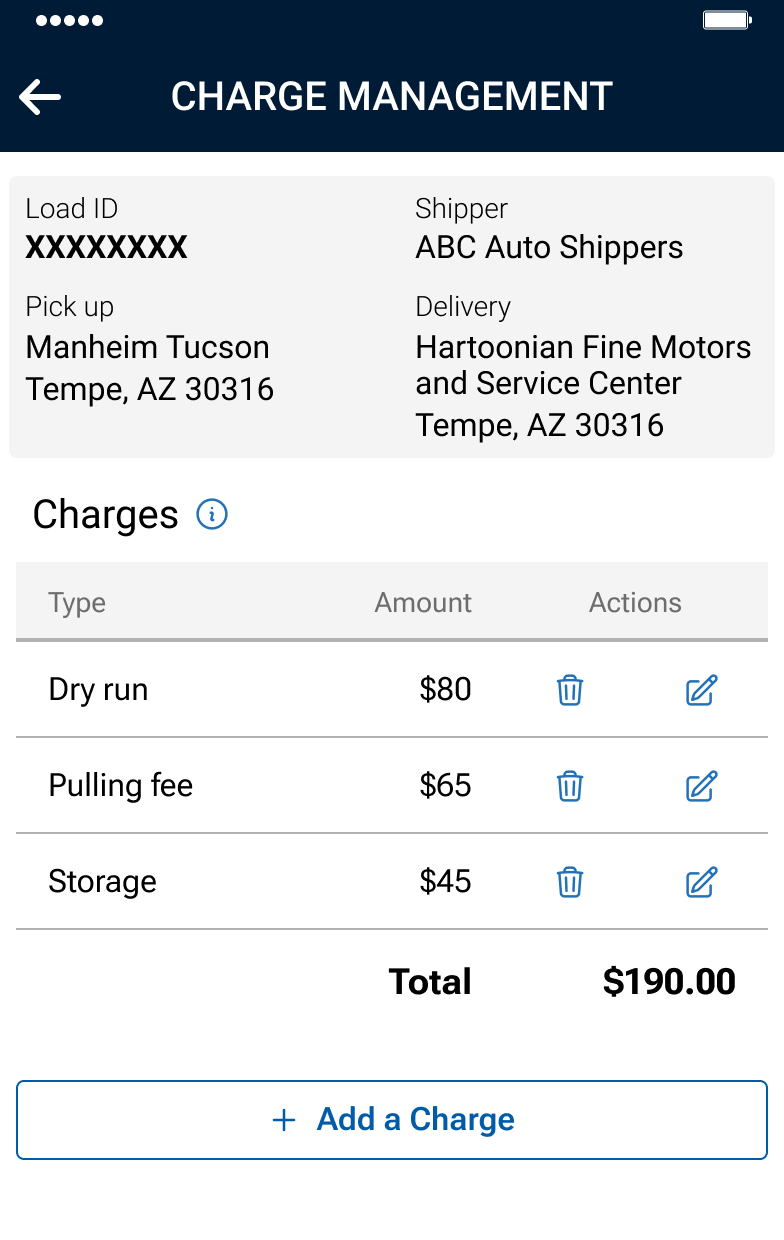
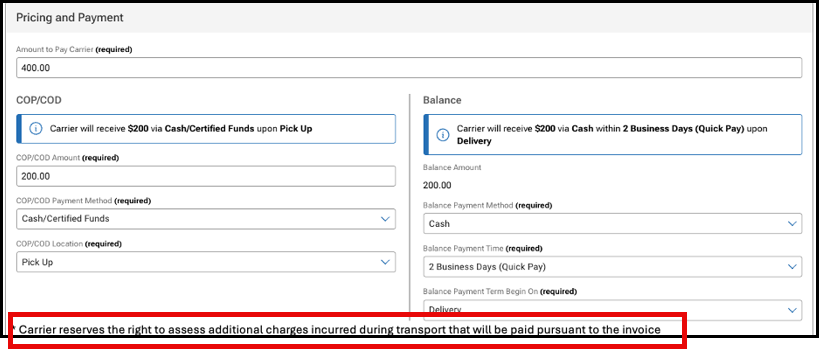
2. When creating loads or dispatching, a notice is displayed to the shipper regarding the carrier’s right to add expenses to the load.
Carriers reserve the right to assess additional charges incurred during transport that will be paid pursuant to the invoice.
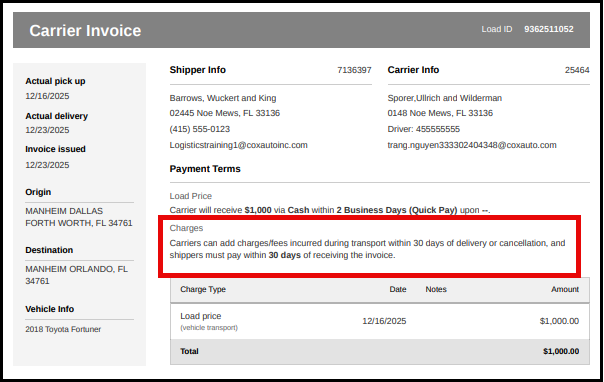
3. A disclaimer will display on the invoice notifying carriers and shippers about adding expenses and the timing
NOTE: Users with a Driver role will not see load price when viewing the invoice

FAQs
Carriers on occasion incur expenses when transporting vehicles, and we want to provide a process on the platform to add transparency for both shippers and carriers rather than communicating the expenses off platform
Adding expenses to an invoice on the web will be a fast follower. Expenses can only be added by a carrier from the Central Dispatch mobile app to start.
Yes, expenses are added based on the load, not individual vehicles in a load.
Expenses are added to the load rather than to a specific vehicle in a load. You are able to add a note when adding expenses, and can indicate the Vin the expense is associated with in that field.
If the shipper does not agree with an expense that was submitted, we encourage them to reach out to the carrier directly to discuss the expense.
If the shipper does not pay the expense, we encourage the carrier to reach directly to the shipper to discuss as they currently do with load payment.
There is not a dispute process since Central Dispatch is not party to the transaction. We encourage the carrier and the shipper to work together to resolve any questions regarding expenses.
If you are not able to resolve the dispute with the other party to the transaction, you can include details in the rating system if the rating window is open. If you do not want to do business with the shipper or carrier in the future, you are able to put the company on your blocked list.
Yes, the carrier can delete or modify an expense from the load page on the mobile app for up to 30 days after the load is delivered or cancelled. The shipper is not able to delete or modify an expense.
The carrier can add expenses up to 30 days after the load has been delivered or cancelled. This information is displayed on the invoice.
Click on the shipper’s name on the listings page to open a slide-out that displays the Shipper’s Scorecard, allowing the carrier to make faster, more informed decisions and reduce risk.
Clicking on shipper’s name from the listing card opens a slide-out form with comprehensive shipper information, including:
- Company details: Name, type, address, owner, phone, and email
- Performance data: Overall rating, number of ratings, average rating for the last 90 days (or “No recent ratings” if none), year established, and membership duration with Central Dispatch (with warnings for accounts less than 30 days old)
- Key metrics: Percentage of time payment terms were met, percentage of time carriers said they would work with the shipper again
- Warnings: Recent changes (last 30 days) to company email, phone number, address, or owner name
- Legal disclaimer: Please note, this data is for informational purposes only, and it is your responsibility to independently verify the information of anyone you do business with through the site
- Carriers can click on View Company to view full company overview in a new tab or dismiss the slide-out form and return to the listings page.
Features:
- A Cleaner design, making it easy to find the information you need available on Central Dispatch.com and the mobile app
- Vehicle information is located along the left side of the invoice, which includes pick-up and delivery dates, invoice date, origin and destination, and vehicle information
- Load ID, along with Shipper and Carrier information, is located at the top
- Payment terms is located in the main section
- Note: Users with a Driver role will not see load price on the invoice
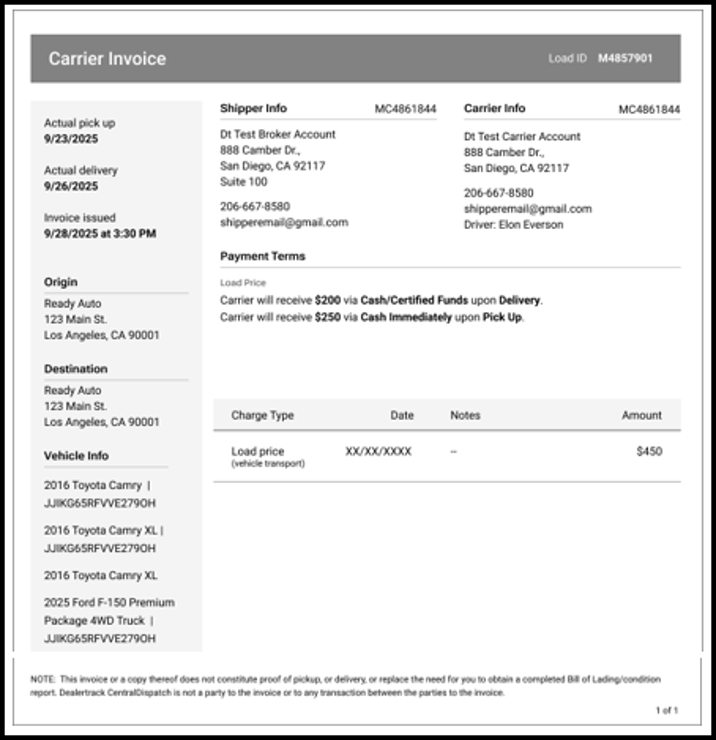
Note: The Notes and Contract Terms sections were removed since they are relevant to the dispatch function, and are part of the Dispatch Sheet.
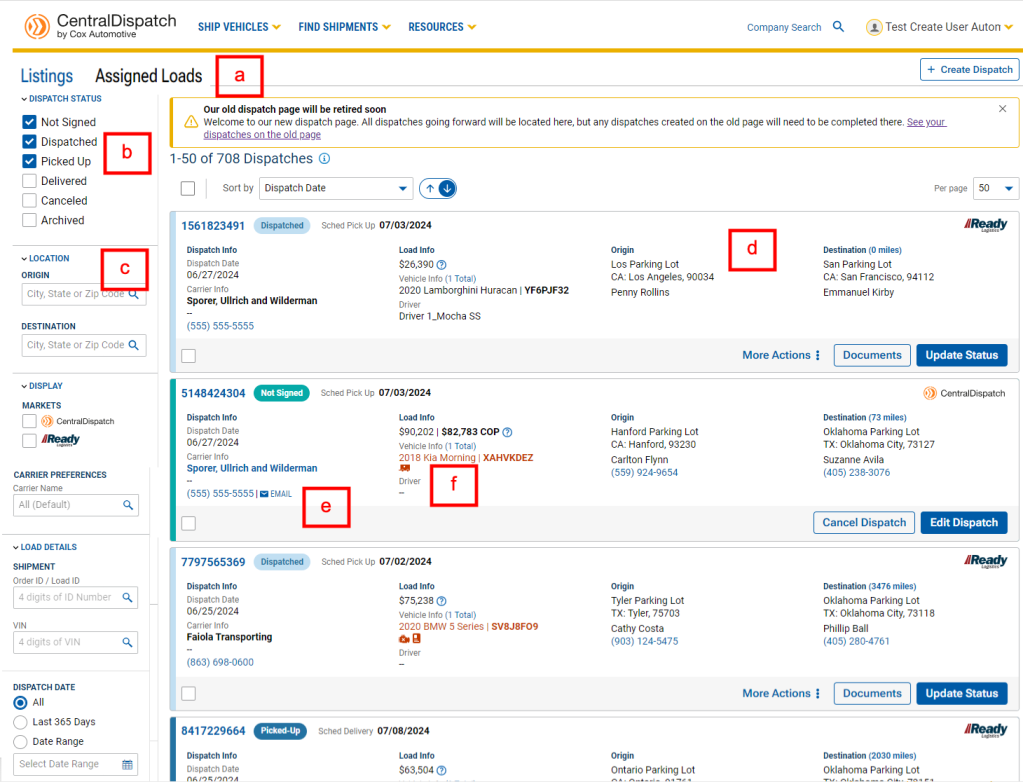
Overview
The Assigned Loads tab allows shippers to view, update, and manage loads that have been assigned to a carrier. From this tab, you can track dispatch status, access load details, manage documents, and take action on active, archived, or cancelled dispatches.
At the top of the page, you can easily switch between:
- Assigned Loads (loads assigned to a carrier)
- Listings (loads not assigned to a carrier)
Assigned Loads Page
The Assigned Loads page displays dispatches that have been created and assigned to a carrier.
- Tabs available to easily switch between pages
- Filter listings by DISPATCH STATUS
- Additional filter selections
- LOCATION: Enter pick-up/dropoff locations
- MARKETS: Custom views based on the marketplace, if the user belong to multiple
- CARRIER PREFERENCES: Filter for a specific carrier
- LOAD DETAILS: Filter by Load ID or VIN
- DISPATCH DATE: Filter by date
- Carrier contact information, including a link to send an email
- Any critical tags for a load, including INOP, Enclosed, OS, TWIC
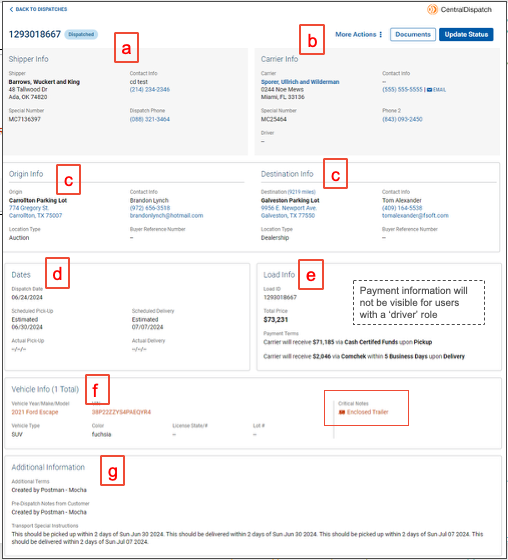
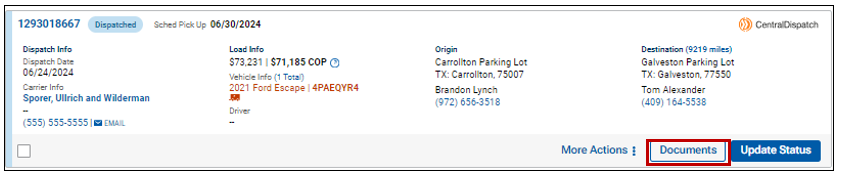
Dispatch Sheet (Transport Order)
Click on the load number to view dispatch details.
•May also be known as the Dispatch Sheet or Transport Order
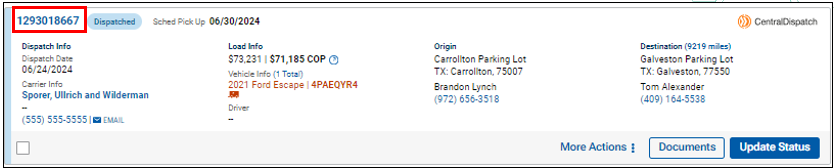
Information available on the Dispatch Sheet:
- Load number and dispatch status
- Action buttons (based on status) to view documents, update status, cancel
- Origin and destination info
- Dates
- Load information
- Vehicle information, including any critical notes, such as enclosed, inop, OS, TWIC
- Additional information, including notes for the carrier
Check box is available on all dispatch listings for easy Bulk Actioning:
- Downloading documents
- Archiving dispatches
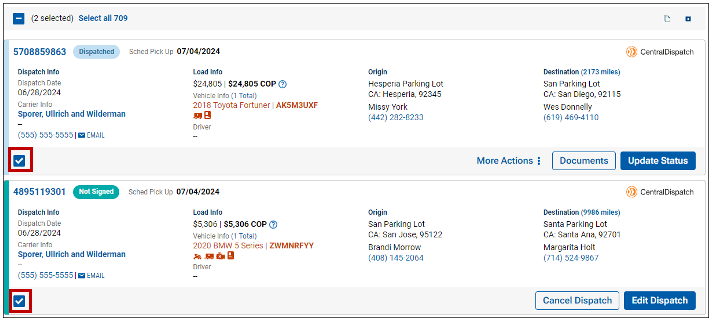
Action Buttons Based on Dispatch Status
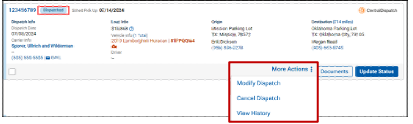
Dispatches in Not Signed status can be cancelled or modified, and you can view documents (i.e. Dispatch Sheet).
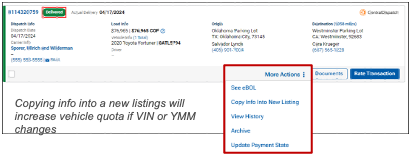
- Modifying a dispatch increases vehicle quota count if additional vehicles are added to the load, or the VIN or YMM are changed

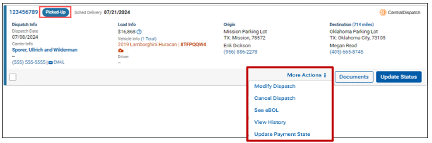
Actions available for dispatches in Picked Up status include Modify Dispatch, Cancel Dispatch, view/send eBOL for pickup if available, view change history, and Update Payment Status.
Actions available for dispatches in Dispatched status include Modify Dispatch, Cancel Dispatch, and view change history.
- Modifying dispatch increases vehicle quota count if additional vehicles are added to the load, or the VIN or YMM are changed
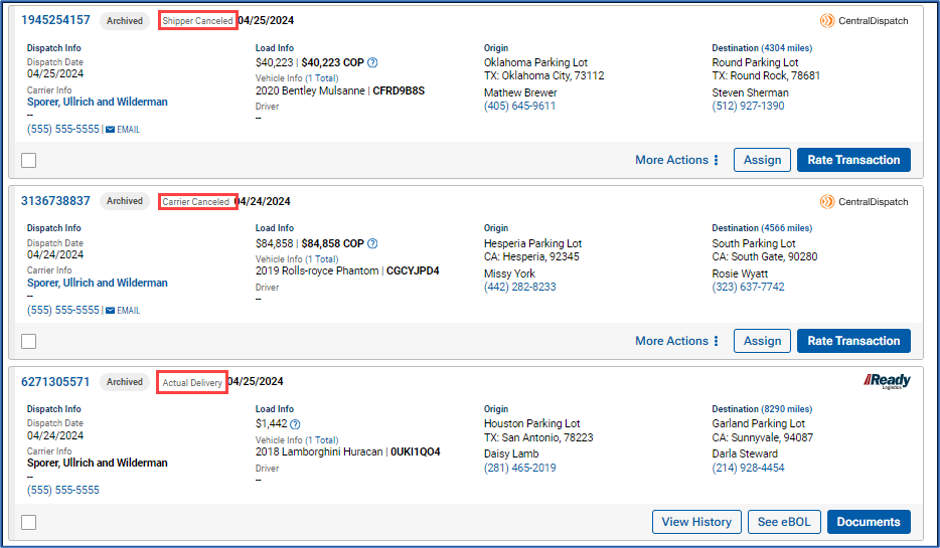
Actions available for dispatches in Delivered status include view/send eBOL if the app was used, Copy Info Into New Listing, view change history, archive listing, Update Payment Status.
Archived Dispatches
Displays status of dispatch when archived
Cancelled Dispatches
Status displays if cancelled by carrier or shipper
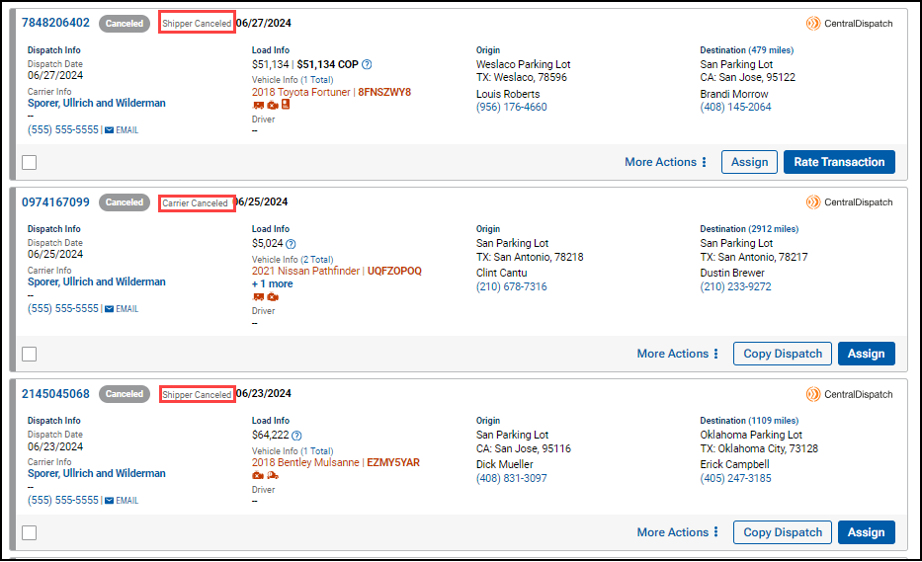
- Action buttons available on Archived and Cancelled status based on status when cancelled or archived
- The Assign button is available on loads that were cancelled prior to being archived, and can be assigned to a carrier
- The Rate Transaction button is available if eligible to rate. If it is past the rating period, the button will be visible, but no rating will be available when clicked
- The Documents button is only available if the load was delivered, which includes the dispatch sheet, eBOL, and invoice
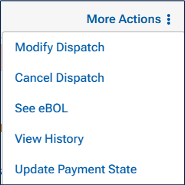
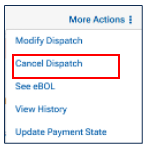
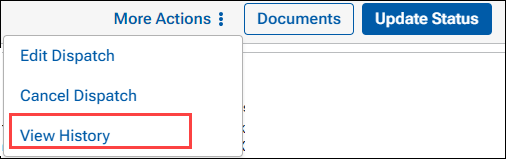
- More Actions:
- View History to view all changes to a transaction
- The See eBOL button is available if delivered, and the eBOL can be viewed, emailed, or downloaded
- Update Payment State if the load is not cancelled by the carrier
- Copy Info Into New Listing will not affect vehicle count quota if relisted with the same vehicle and no changes
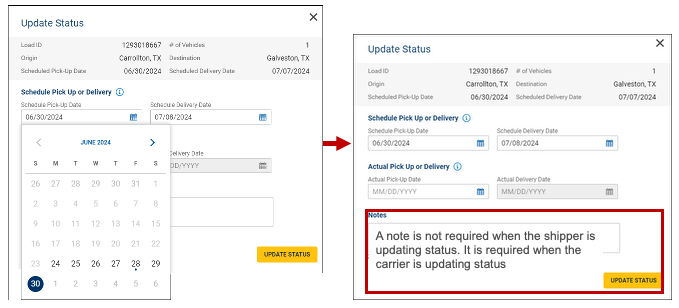
Update Dates by Clicking on Update Status Button:
- Click calendar to select available dates in bold
- Click Update Status
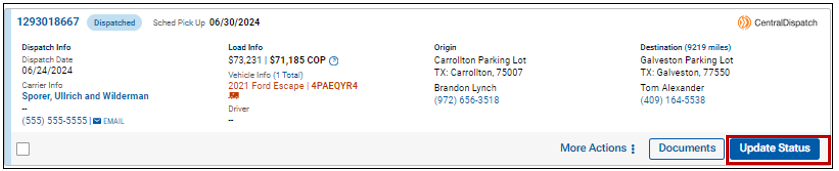
- The Scheduled Pick up Date cannot be later than Scheduled Delivery Date – if changing both, the delivery date will need to be updated prior to updating the scheduled pick-up date
- The Actual Pick-up Date must be entered prior to the Actual Delivery Date
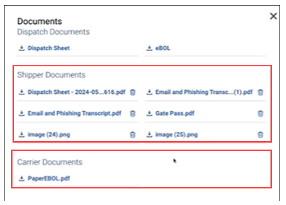
Documents Button
- View and download documents attached to the order, such as the Dispatch Sheet, Vehicle Release, or eBOL
- Upload up to 10 documents with no size limit to the order, which will be visible to the carrier
- The shipper and carrier can each upload up to 10 documents, no size limit
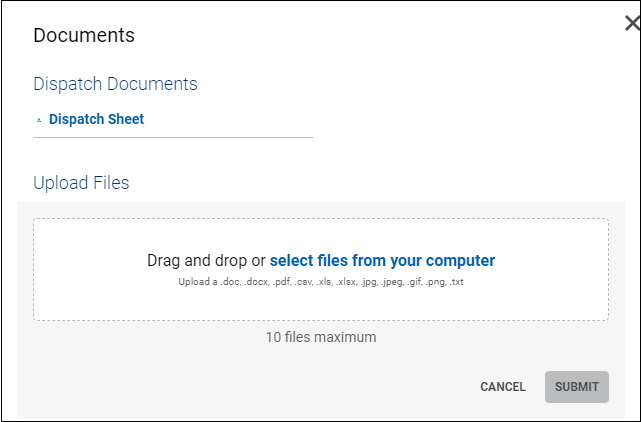
- View documents or download documents uploaded by the carrier or shipper
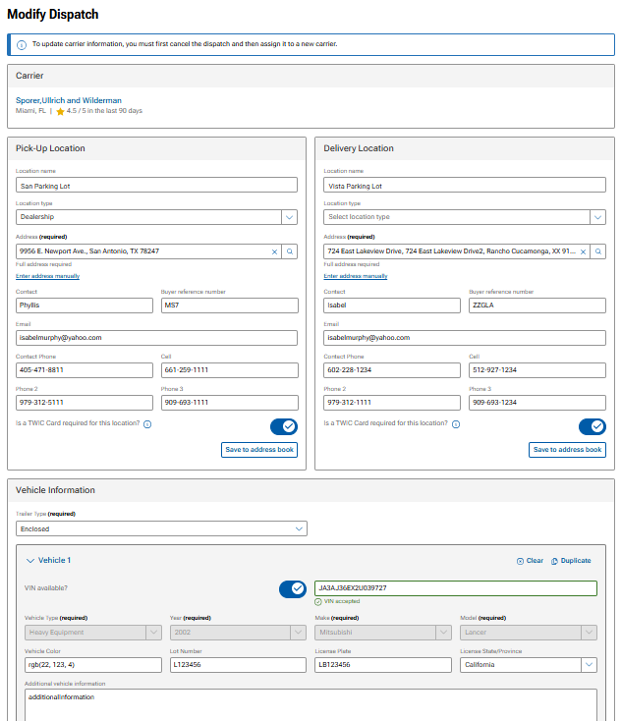
Modify Dispatch
The Modify Dispatch button is available for loads that have not been delivered, cancelled, or archived
- The Modify Dispatch button will open to a Modify Dispatch page to update information
- Modifying dispatch increases vehicle quota count if additional vehicles are added to the load, or the VIN or YMM are changed
- If the status is Dispatched, carrier information cannot be updated, and the dispatch will need to be cancelled to updated to do so
- Updated information will update on the Dispatch Sheet
Cancel Dispatch
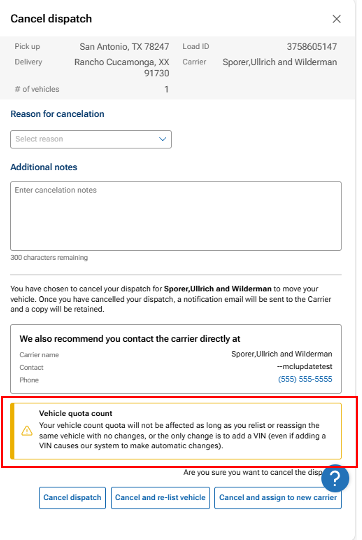
Shippers can cancel loads that are in Not Signed, Dispatched, or Picked Up status
A slide out opens to select the reason for cancel, add a note, and choose to cancel, relist, or assign to a new carrier
- Cancel Dispatch
- Will not decrease vehicle quota count
- Cancel and re-list vehicle will open the Create Load page to post to the load board
- Cancel and assign to new carrier will open the Create Load page to assign to a carrier
Vehicle quota count will not be affected as long as the same vehicle is listed with no changes
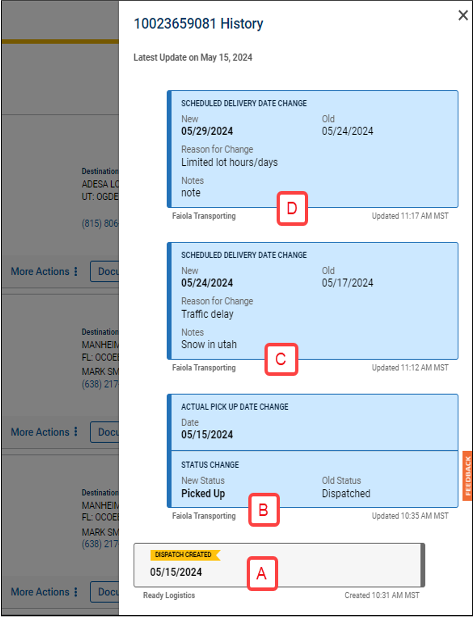
View History
This button is available on loads, except loads in the “Not Signed” status
- Displays events for the load, including dispatch date, status changes, and any updates to the scheduled pick-up and delivery
- Note with dispatch
- Actual Pick Up Date entered
- Delivery Date change
- 2nd Delivery Date change
- History displays changes based on the role of the user
View History is available for both the Carrier view and the Shipper view.
View History is available for both the Carrier view and the Shipper view.
- The type of change
- Updated status and information
- The carrier or shipper who created the change
- The date and time of change
Updates made by the viewer (carrier or shipper) will appear in the blue shaded boxes. Updates made by the other party will appear in gray boxes. In the example, the carrier made the updates in blue.
Events are added to the View History panel in real-time.
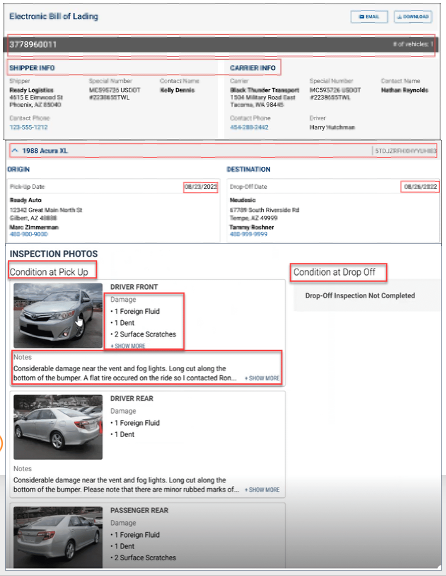
See eBOL
If the carrier used the mobile app to take inspection photos at pick-up and delivery, the See eBOL button will be available.
- Loads in Picked-Up status
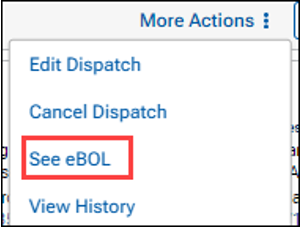
- Loads in Delivered status

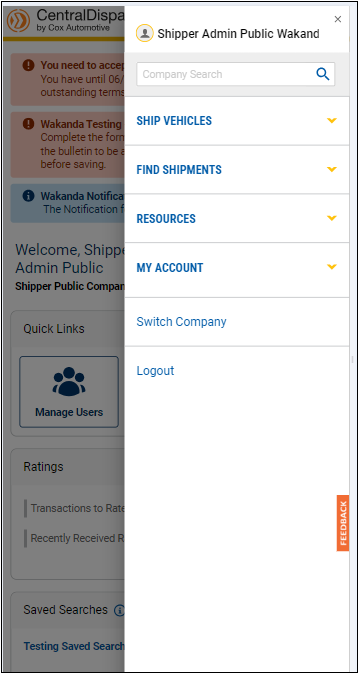
Manager User Access
View and access is based on user role
View of Standard role – without Manager User access
View on smaller device – Cell phone or tablet

•Scroll up/down page
- Click on hamburger menu to view pages,
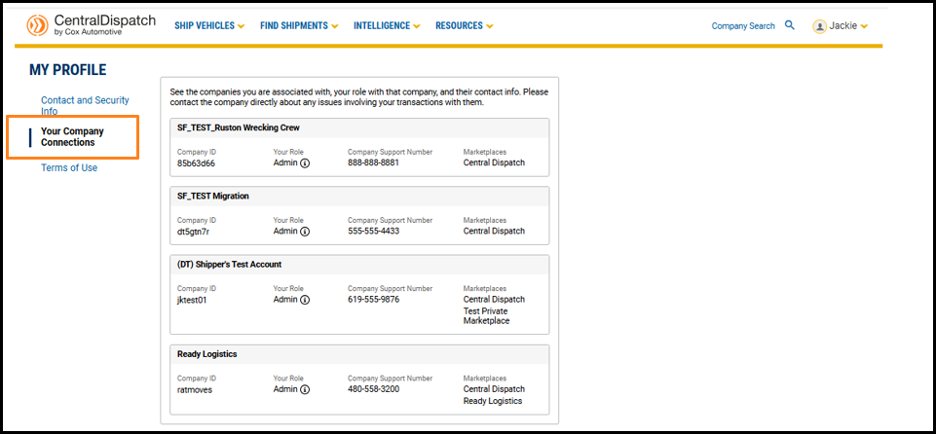
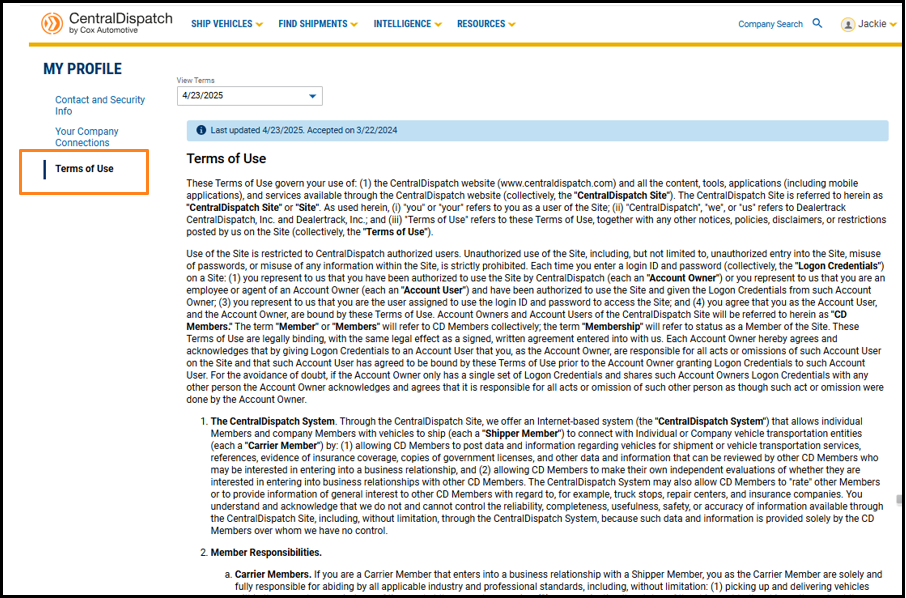
An overview of the My Profile page, including how to edit your contact information, manage verification steps, view company relationships, and access terms of use.
Every User has their own My Profile page:
- Contact and Security Info contains your username and password to log into your account
- Your Company Connections displays the different companies you are associated with on Central Dispatch
- Terms of Use includes the date you accepted the terms
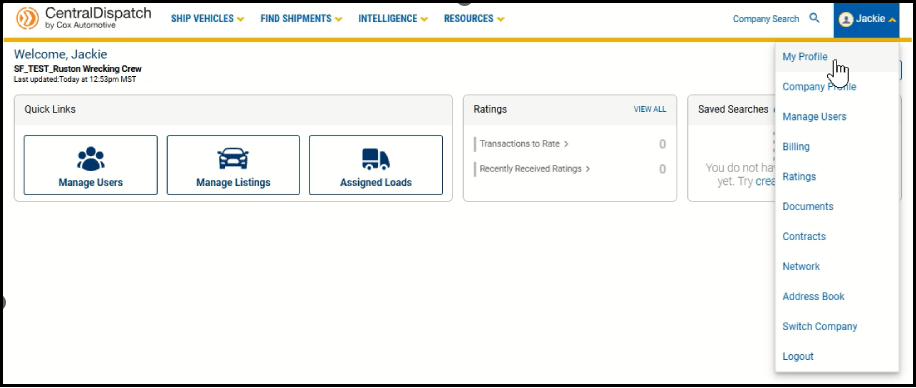
To view your My Profile page, click on your username and My Profile from the drop-down menu.
From the Contact and Security Info tab, click EDIT or CHANGE to update profile information.

- Making any changes to your My Profile requires verification for the security of your account
- Enter the verification code sent
- Enter your new contact and recovery email (or phone number)
- A verification code will be sent to the added email or phone number to confirm you have access
- Enter code and submit
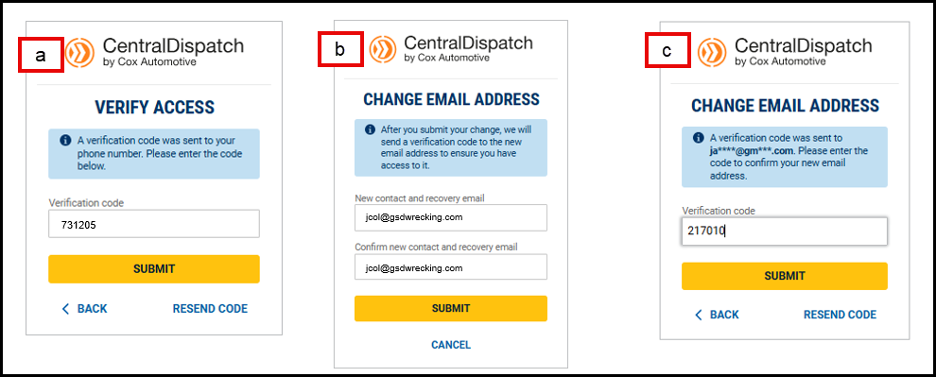
Result: A message will appear displaying the update was successful
If you are a member of multiple companies, the Your Company Connections tab displays all the companies you are associated with, along with your role.
- The Company Support Number is available, and users are encouraged to reach out to the company directly for help with issues regarding their account or transactions
Terms of Use allows you to view the terms of use and the last time they were updated.
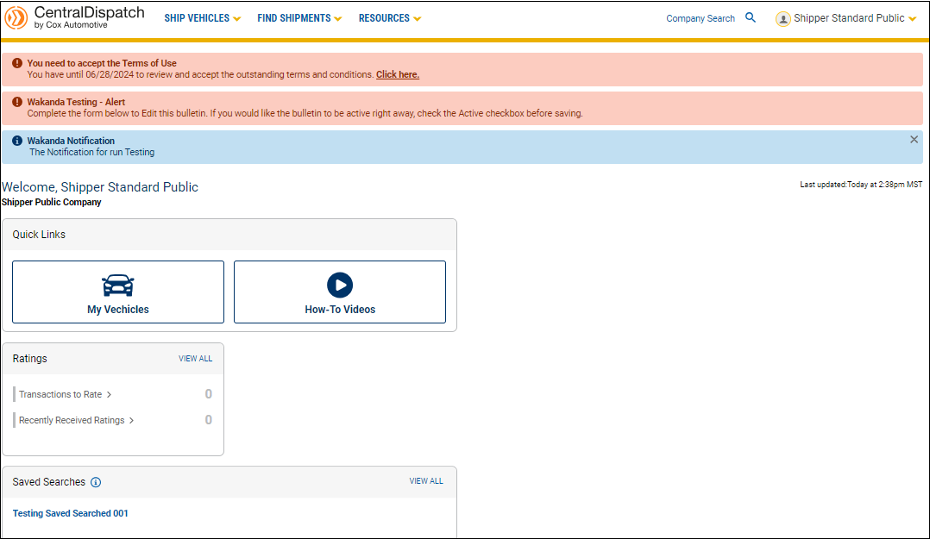
Customize your Central Dispatch Dashboard to show widgets that are most relevant to your business. Showcase what’s most important to you, while hiding anything you don’t need to see in order to save time and streamline your view.
To get started, click the Customize button on your dashboard.
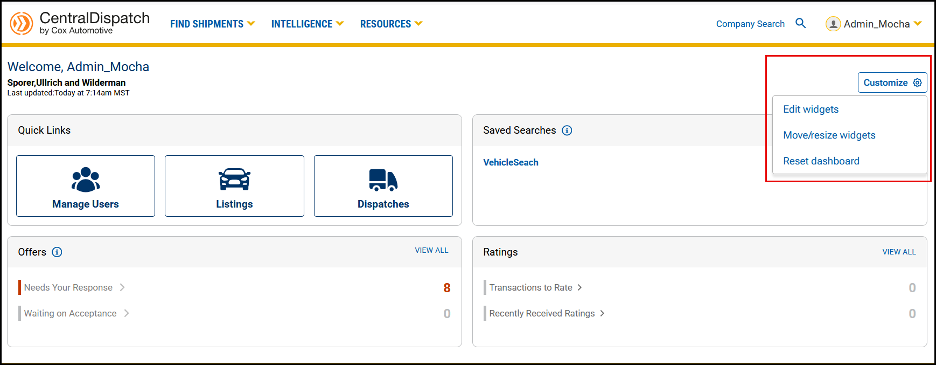
Edit widgets opens a slide out form, allowing users to select which widgets they want to appear on their dashboard. After selecting widgets, click Confirm.

Move/resize widgets allow you to drag and drop the widgets to any position on the dashboard.
- Widgets will automatically resize based on their position on the page
- Click Done to lock the widgets in place
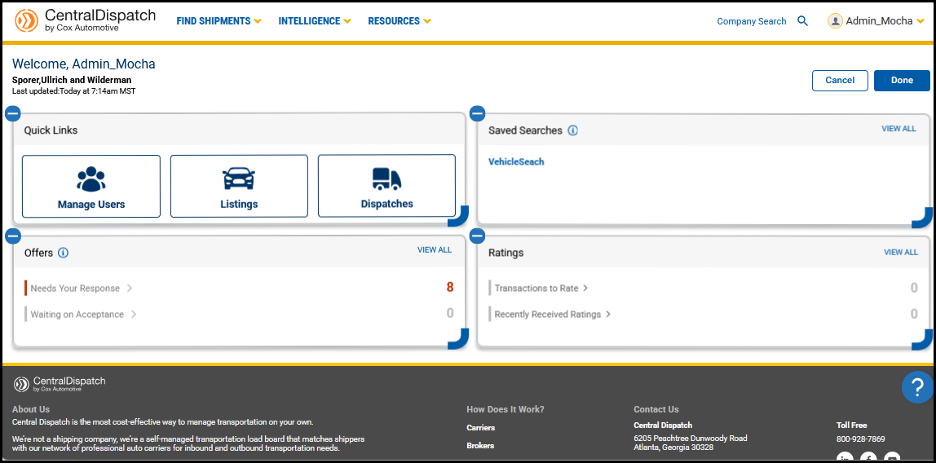
Reset dashboard returns the widgets to their original position.
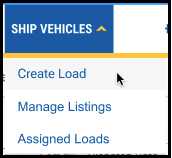
Shippers can Create Load and then choose to assign directly to a carrier or post the load to the board.
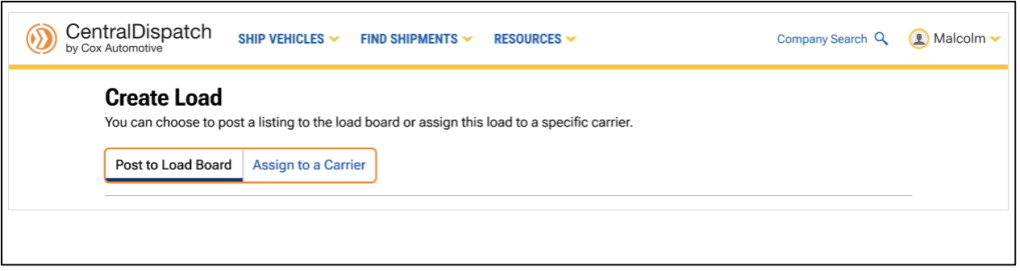
Overview of Create Load
1. Under the Ship Vehicles tab, click Create Load
2. From the Create Load page, choose to post the listing to the load board or assign the load to a specific carrier
- The page defaults to Post to Load Board, or click on Assign to a Carrier
- Users can toggle between the Post to Load Board and Assign to a Carrier tabs without losing any load information that was entered
Post to Load Board Tab
1. Enter load information:
- Type-ahead functionality for address fields speed up data entry and encourages accurate address entry
2. After the load is posted to the board, open Manage Listings to assign to a carrier, modify, archive, or delete a listing
- Manage Listing page contains links to easily toggle between pages

3. Click on the Assigned Loads tab to:
- Edit the dispatch information
- Cancel the dispatch, including the ability to re-list or assign to a new carrier

Assign to a Carrier Tab
1. Select Carrier field is added to the top of the page
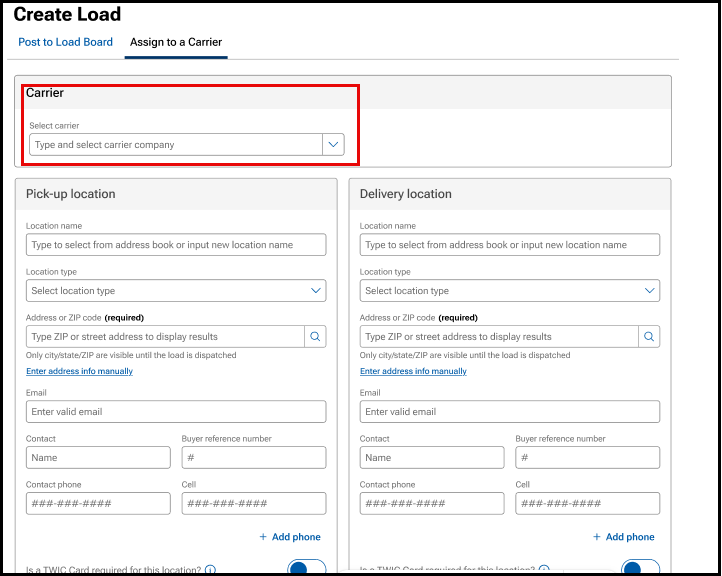
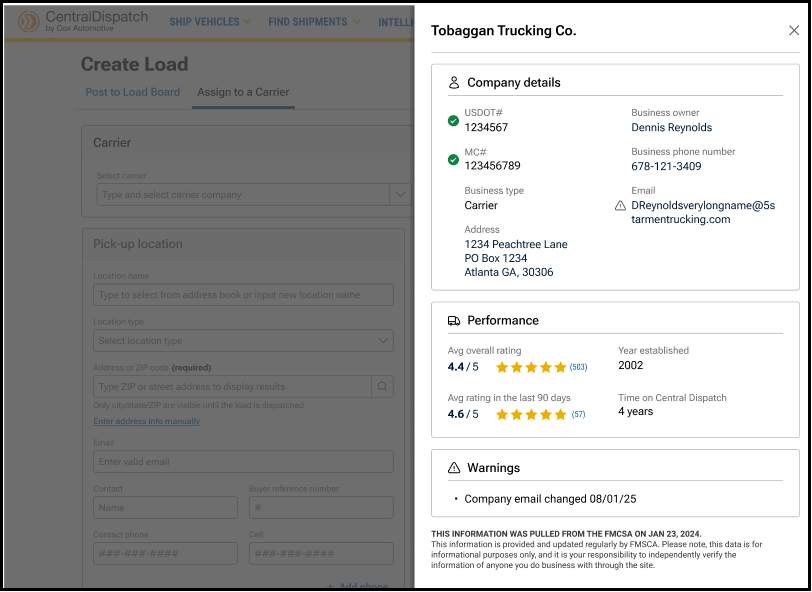
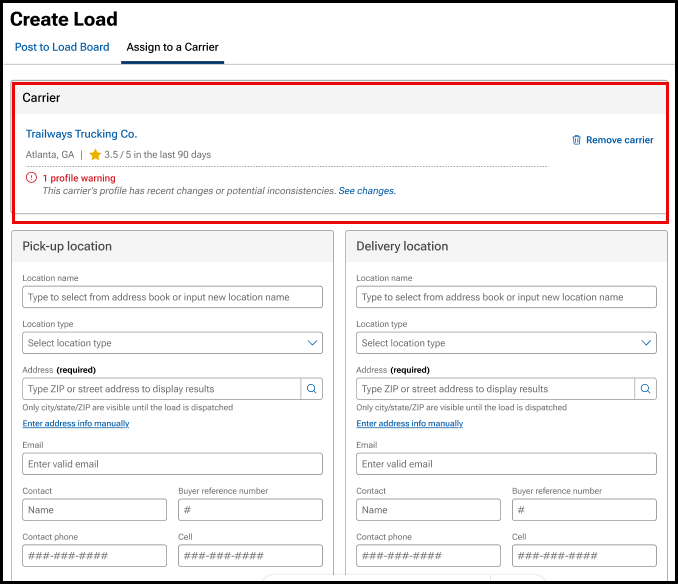
- Slide bar will appear with a carrier scorecard, including performance data, FMCSA data, and a summary of any warnings associated with the carrier to allow for additional investigation. A warning could indicate a recent change in phone number or email address, and are indicated with the triangle icon
- Carrier name, scorecard, and any carrier warnings display below the carrier selection, making them easier to review
- Click on the trash can icon to remove carrier
2. Enter load information
3. After the load is assigned to a carrier, click on the Assigned Loads tab to:
- Edit the dispatch information
- Cancel the dispatch, including the ability to re-list or assign to a new carrier

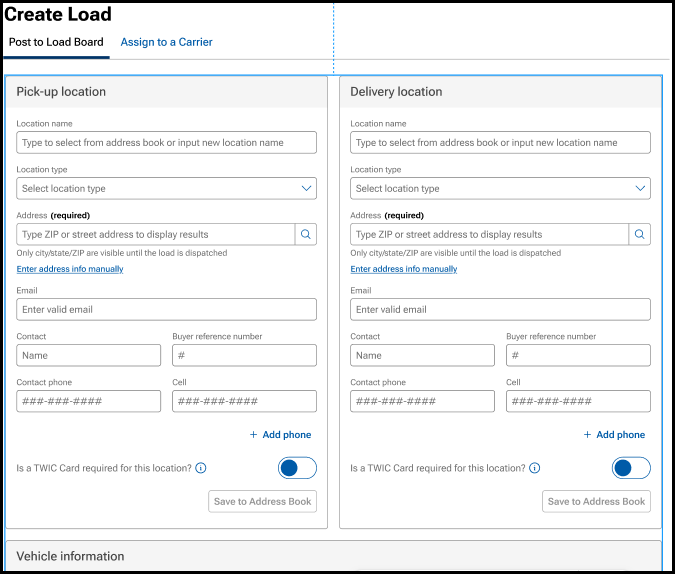
Entering Load Information
Step 1: Add Pick Up and Delivery Location Information
- NOTE: Only the city, state, and zip code of locations are visible to the carrier prior to accepting a dispatch. All other information is hidden
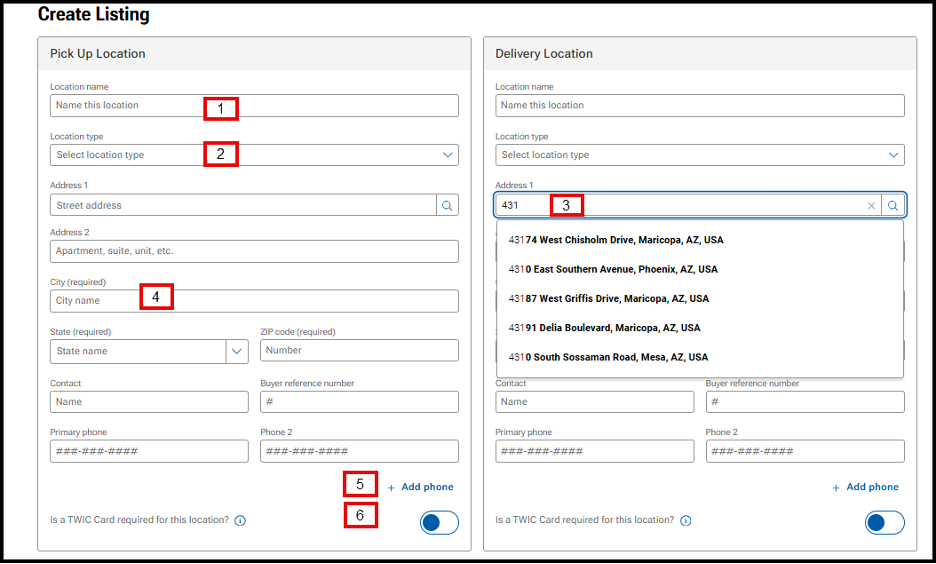
- Location name: Integrates with the address book to populate address and contact information
- Location type: Use the drop-down to choose the location type
- Address: Integrates with Google address lookup to predict and populate address information
- Note: If the address seems to be disappearing after entering, use the Enter key instead of the Tab key
- City/State/Zip code: All fields are required
- Note: Entering the Zip Code will auto-populate City and State
- Phone: Add up to 4 phone numbers for listing by clicking Add Phone
- TWIC Card toggle: Indicates if a TWIC Card is required for location access
- Tooltip text reads: A TWIC (Transportation Worker Identification Credential) is a credential required by the Maritime Transportation Security Act for carriers to access some locations. If you are not sure if a TWIC is needed, please contact the location.
Step 2: Add Vehicle Information
- Note: VIN is hidden from carrier view until the dispatch has been accepted
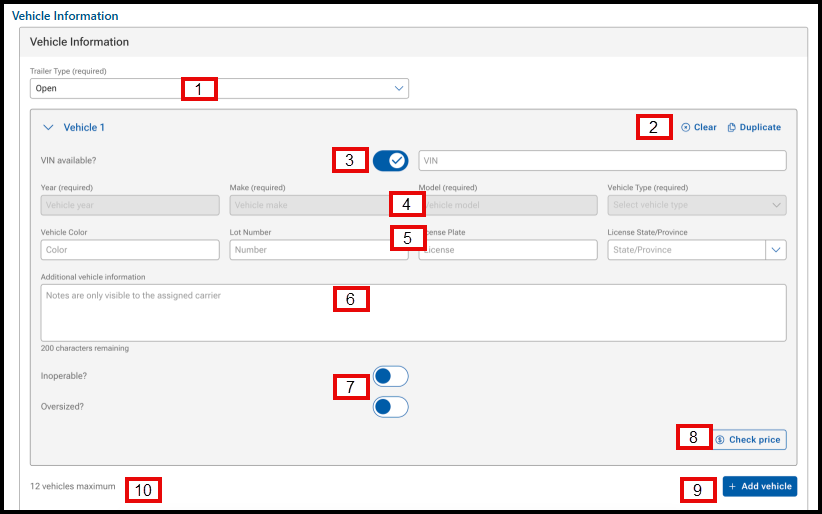
- Trailer Type: Required field. Use the drop-down menu to select the trailer type
- Clear and Duplicate buttons: Clears vehicle information and allows user to duplicate a vehicle (replaces the quantity), respectively
- VIN available? and VIN: VIN available? toggle is defaulted to on, allowing the user to enter the VIN. When the VIN is entered, the Year, Make, and Model (YMM) fields will populate by VIN decoding
- Year/Make/Model/Vehicle Type: Required field. If you enter the VIN, it will be populated by the VIN decoder
- NOTE: If the year of the vehicle is older than 1981 or a specialty vehicle:
- Uncheck the toggle for VIN available?
- Under the Vehicle Type field, use the drop-down to select Other
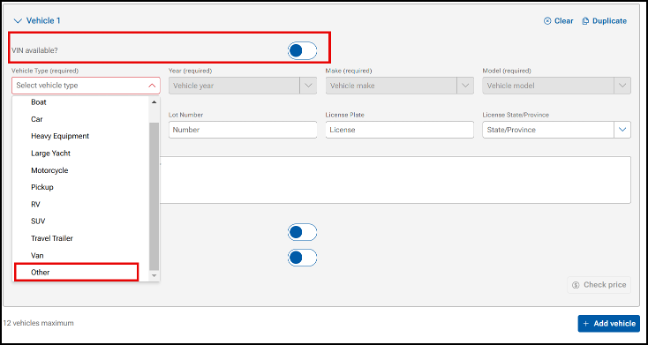
- NOTE: If the year of the vehicle is older than 1981 or a specialty vehicle:
- Vehicle Color/Lot Number/License Plate/License Plate State: Not required fields, but may be helpful for a carrier to locate a vehicle on a lot
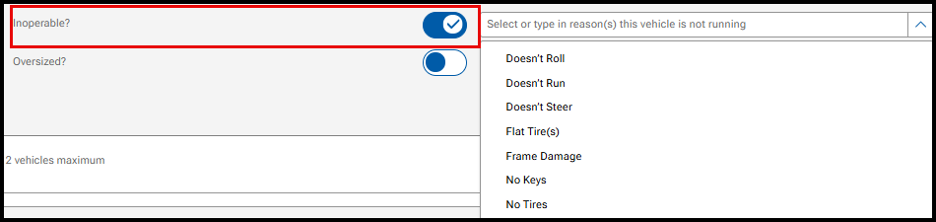
- Inoperable/Oversized: Toggles available to indicate operability of vehicle and if oversized
- If Inoperable: Use the drop-down menu to indicate why the unit is inoperable. This information is available to the carrier
- Check Price: Opens the Price Check tool to view prices on comparable loads
- +Add vehicle: Add additional vehicles to the listing
- Note: User can add up to 12 vehicles to a listing, dictated by the maximum carrier trailer capacity
Step 3: Add Dates
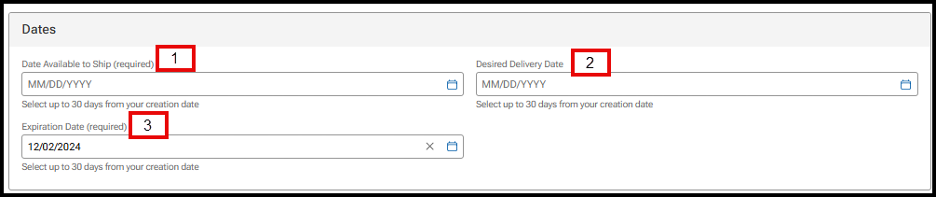
- Date Available to Ship: Required field. Use the calendar icon to select the date the vehicle will be available. Users can select up to 30 days from the listing date
- Desired Delivery Date: Not required. Use the calendar icon to select the desired date for the delivery of the vehicle. Users can select up to 30 days from the listing date
- Expiration Date: Required field. Defaulted to 14 days, but you can use the calendar icon to extend up to 30 days from posting
- Listings that are 30 days from the posting date will be auto-archived and visible under the ARCHIVED tab in Manage Listings
- Listings over 365 days will be removed from Listings
Step 4: Pricing and Payment
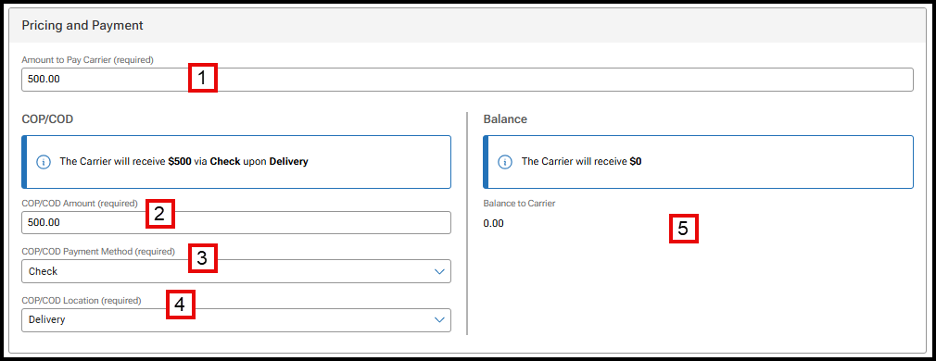
- Amount to Pay Carrier: Required field
- COP/COD Amount: Required field. Users can select the amount to pay a carrier at pick-up or delivery. This allows the ability to pay carriers partial at pick-up and the remainder at delivery
- COP/COD Payment Method: Required field. Use the drop-down menu to select if payment will be made by check or cash
- COP/COD Location: Required field. Use the drop-down menu to select if payment will be made at pick-up or delivery
Balance fields: If the total amount owed to the carrier is split between pick-up and delivery, the Balance fields will be populated and required
Step 5: Additional Information
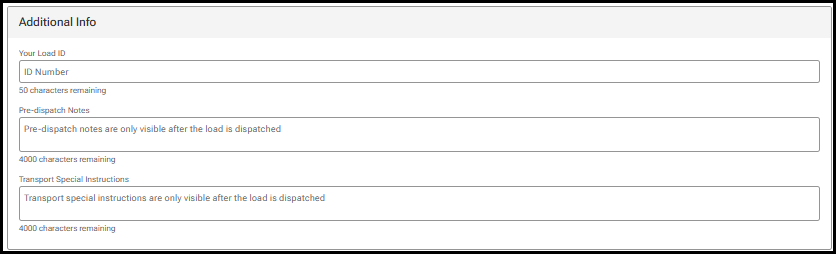
- Load ID allows shippers to enter information to identify a dispatch load. It can be up to 50 characters and anything a shipper chooses. If the Load ID is not populated, one will be generated by Central Dispatch
- Pre-dispatch Notes and Transport Special Instructions are only visible after the load is accepted
STEP 6: Add Your Contract Information
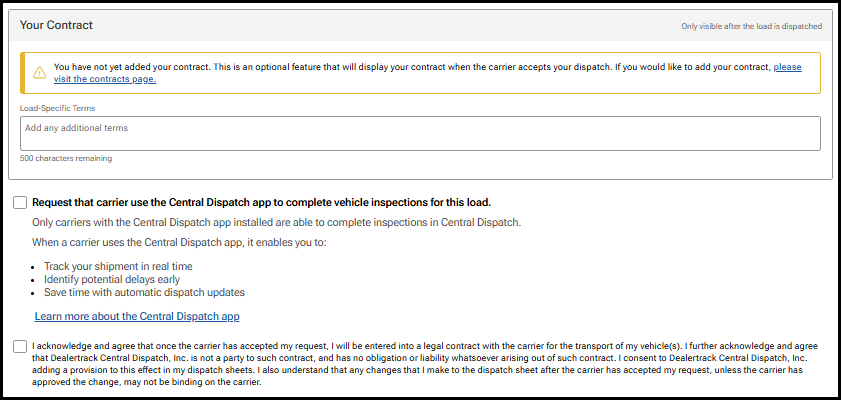
- Add Load-Specific Notes that will be visible prior to a carrier accepting the load
- Click the request carrier to use Central Dispatch mobile app if desired
- Click the acknowledge box:
- If posting to the load board, click the Acknowledge box, and click Post Load
- If posting to the load board, click the Acknowledge box, and click Assign Load
